
1. Maintenance of the “Grocubator”
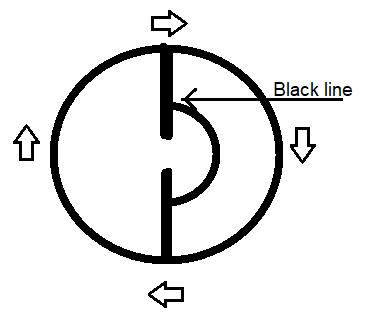
Grocubator was a incubator developed within Vigyan Ashram for the purpose of sprouting legumes. It was developed with an intention of producing good quality sprouts in bulk. It has various advantages over the conventional methods, yet follows the similar steps for growth. The system has a water pump that supplies water to the container in a cyclic process. The system has a metal container with holes on one side for draining the water, which rotates due to the rotation assemble driven by a viper motor. The rotation occurred at 180 deg with the help of a IR feedback system that sensed the black lines on the container. These black lines act like a switch/trigger for the system to start and stop. They were placed in such a way that the holes on the container would be pointed upwards or downwards to flood or drain the system with water, respectively. It has an initial soaking step, followed by multiple cycles of rotation and rinsing. More information on the same is available in the blogs provided below :
- https://vadic.vigyanashram.blog/2022/08/02/grocubator-cad/
- https://vadic.vigyanashram.blog/2022/02/11/__trashed-2/
- https://vadic.vigyanashram.blog/2021/09/17/grocubator-v2/
The issue with the grocubator was that the vessel was not rotating in 180 deg as desired. On close inspection it was revealed that the IR sensor feedback was not efficient. The black lines absorb IR whereas the plain surface reflects the light. Sometimes the container would slip resulting in the disorientation of the IR sensor with respect to the black lines on the container. Once the black line was missed the code would not function as it would require a the IR sensor in front of the black line to begin the next rotation.

Since there were unwanted slippage of a few degrees, it would not hamper the position of the container totally. Therefore, the missing of the black line trigger was possible by giving it more tolerance by making the black lines thicker. This would prevent it from missing the black line and being stuck in the position. Even though the solution is helpful it would not stop at the exact desired position and the thickness of the black line could be increased to only to a certain extent. In case the sensor missed the black line due noise (reflections) the container would be rotated for 360 deg and causing an error further.

Another solution was to make half of the rotation by detection just the black colour and the other half of of the rotation with reflection from the plain surface. This would fix the position of the holes up or down making the process more particular and more error-free.
This last solution seemed best fit and was implemented to the grocubator to fit the IR feedback system. The code was rewritten and was made to support the new design.
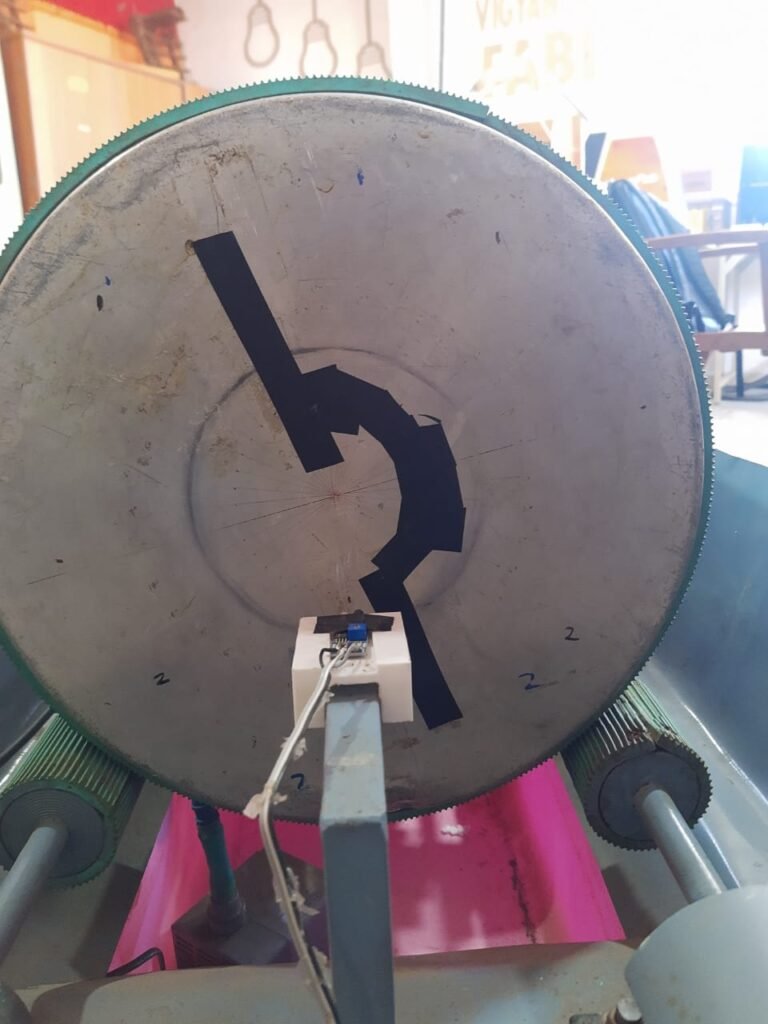
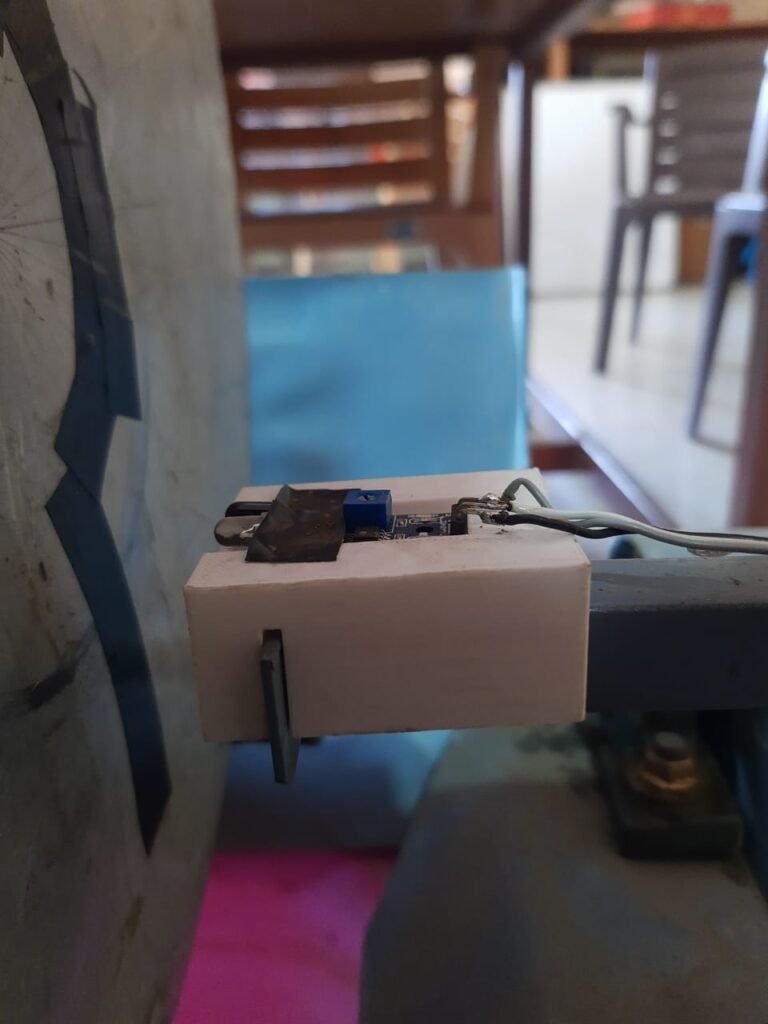
The IR sensor also needed a sort of protection as it was susceptible to damage while removing the container and also place it at an equidistant from the container to let it detect the surface of the container properly. For this a 3D printed block was designed and printed to fit the existing frame and have a provision to fit the IR sensor.

Upgrading the electronics
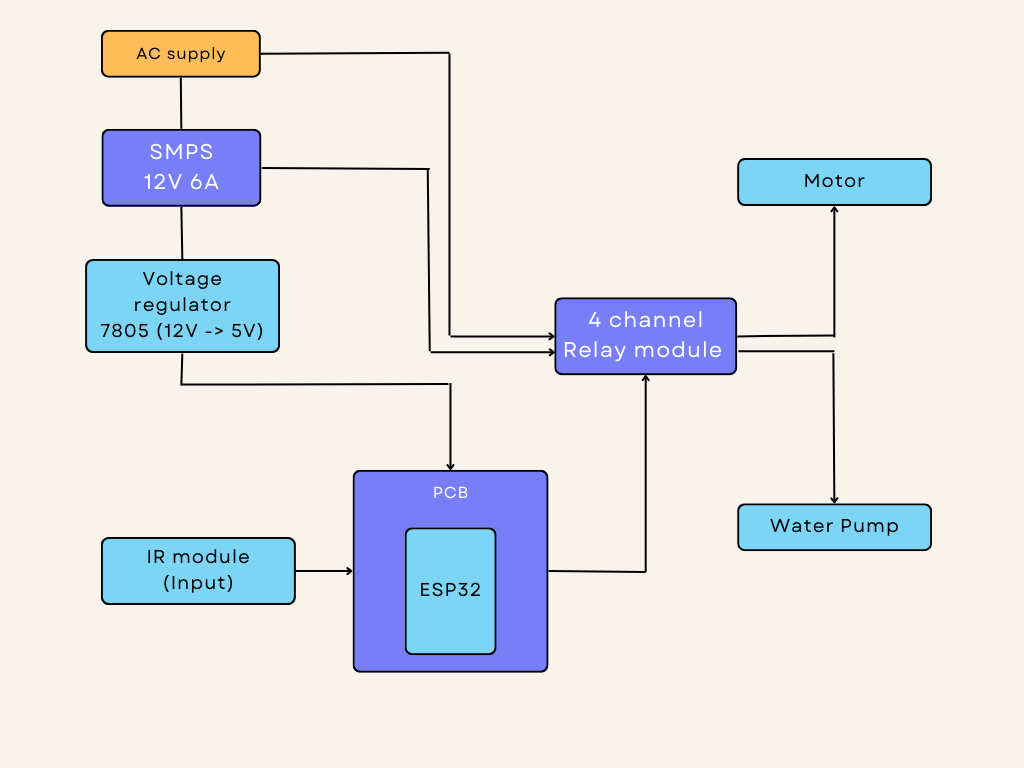
The previous electronic system was complicated, non-modular and prone to water damage. There was a need to upgrade the system with a better packaging, modular electronics and use of advanced micro-controller like the ESP-32. In order to do this an PCB for he ESP32 was used along with the input and output sensors. The ESP32 requires 5, therefore a 7805 voltage regulator was used. The electronics along with the SPMS was enlosed in an ABS enclosure to protect it from water and make it durable.

Code
int cycle;
int timer;
int pump = 26;
int motor = 27;
#define IR 34
bool irval = 0;
#define on LOW
#define off HIGH


void hup()
{
  irval = digitalRead(IR);
  Serial.println("down");
  while(irval == LOW)
  {
    digitalWrite(motor, on);
    delay(200);
    irval = digitalRead(IR);
  }
  digitalWrite(motor, off);
}

void hdown()
{
  irval = digitalRead(IR);
  Serial.println("up");
  while(irval == HIGH)
  {
    digitalWrite(motor, on);
    delay(200);
    irval = digitalRead(IR);
  }
  digitalWrite(motor, off);
}

void fill_water()
{
  Serial.println("Fill water");
  digitalWrite(pump, on);
  delay(50*1000);
  digitalWrite(pump, off);
}

void setup()
{
  Serial.begin(9600);

  pinMode(pump, OUTPUT);
  pinMode(motor, OUTPUT);
  pinMode(IR, INPUT);
  irval = digitalRead(IR);

  //*********************Test*****************************
  hup();
  digitalWrite(pump, on);
  delay(2000);
  digitalWrite(pump, off);
  hdown();
  delay(3000);
  Serial.println("Test complete");

  //******************Begin cycle**************************
  hup(); //Get system ready to fill water

  //Soaking
  fill_water();
  Serial.println("Undistured for 2 hours");
  delay(2*60*60*1000);//undistured for 2 hours

  //Draining
  hdown();
  Serial.println("Drain for 5 minutes");
  delay(5*60*1000);
  hup();

  //Start repetetive cycles

  for(cycle = 1; cycle <25; cycle++)
  {
    Serial.print("Cycle  ");
    Serial.print(cycle);
    Serial.println(" begins");

    //Undisturbed for 15 minutes
    delay(15*60*1000);
    //Rotate 180 deg
    hdown();
    //Undisturbed for 15 minutes
    delay(15*60*1000);
    //Rotate 180 deg
    hup();
    //Undisturbed for 15 minutes
    delay(15*60*1000);
    //Rotate 180 deg
    hdown();
    //Undisturbed for 15 minutes
    delay(15*60*1000);
    //Rotate 180 deg
    hup();

    //Flood the system with water
    fill_water();
  }
  Serial.println("Cycles complete!");
}

void loop()
{

}
Trials conducted on the grocubator
Three trials were conducted post the upgradtion.
- The first trial was conducted with 250 g of legume seeds were added to the apparatus and trial was conducted. On completion of trial the legumes sprouted properly with no odor and clean water was left behind. Additionally, the vessel got stuck in the middle of the cycles and needed a slight help in rotation.
- Based on the first trial it was suspected that the low weight of the contents was the reason for the cycle to gave stopped. Therefore, the next trial was conducted with 2kg sand to test the rotation. During this trial it was found that system rotated in the desired way with no problems .
- The third trial was conducted for the agricultural department in order to be used as a feed for the goats. 2 kg of legumes were added to the system. Initially there was some leakage which was fixed by simply adjusting the water tray below. The trial went on for about 1.5 days. In the end the sprouts were obtained as desired. The water in the tray below turned brown and had a mucilage layer on top and the sprouts had a little pungent odor.
2. Maintenance of the egg incubator
The egg incubator is a device used to incubate chicken eggs in order to get chicks out of them. The incubator achieves this by replicating the conditions a chicken creates for her eggs during their hatching. This can be done by optimizing the temperature, humidity and the turning motion for them to hatch. There has been an egg incubator in the campus not functioning. This egg incubator was studied and fixed by replacing the necessary parts and rewiring the setup.
The incubator uses a RD150 poultry controller. This controller is capable of sensing the temperature and humidity using a generic and readilly available DHT22 sensor. These parameters are controlled by inbuilt relays. The temperature levels are maintained by heating up an AC heater within the chamber or switching it off . To modify the humidity it also has provisions to switch on and of the humidification system. In this case, it is a honeycomb structured cooling pad that increases the humidity by evaporating water. The humidity is indirectly controlled by turning on and off a AC solenoid valve that supplies water to the cooling pads. This system is continuously ventilated using a fan to maintain circulation of air. The egg incubator along with this has a motor that shakes the eggs by rotating an egg tray 40-50 deg about it’s axis.

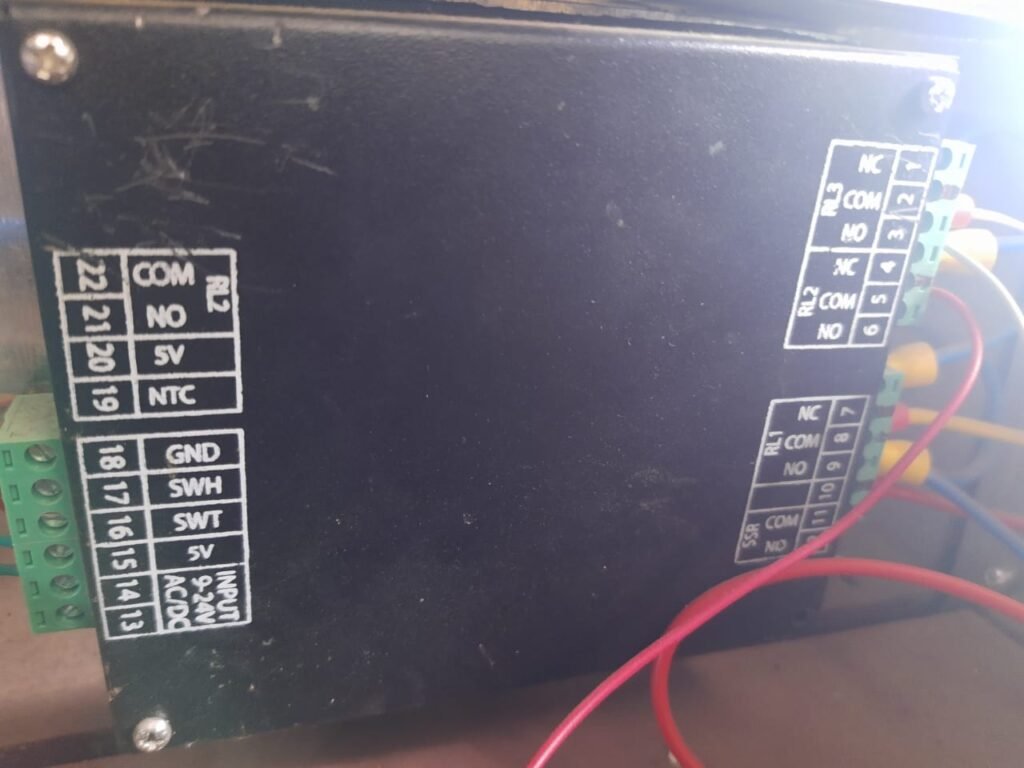
On studying the system properly the system was cleaned, rewired to make the connections strong and a missing solenoid valve used to regulated the humidity was connected to the system. On connecting the solenoid a test run was taken by setting temperature and humidity in the controller. The heater worked and heated up and the solenoid was switched on to supply water in order to increase the humidity.


