This project is an assistance provided for the project led by Rago sir, focusing on creating fireworks for Diwali conducted by the students.
The objective is to activate programmable LEDs to create a fireworks effect and add a sound aspect to closely resemble a real fireworks display.
Programming the LEDs:
Code arduino :
This code essentially creates an animated lighting sequence on two NeoPixel rings (“fuse” of 50 led and “explosion” of 10 * 5 led in parallel), with dynamic color changes and pixel manipulations.
- Libraries Used:
Adafruit_NeoPixel: This library is used to control NeoPixel LEDs.
- Hardware Configuration:
- Two NeoPixel rings are connected to pins 11 and 12 on the Arduino.
- Additionally, there is a control pin (
pinFlancDescendant) configured to send signals to the MP3 module (see below).
- NeoPixel Initialization:
- Two NeoPixel objects (
pixelsandpixels2) are created for each ring. - The rings have sizes of 10 (
NUMPIXELS) and 50 (NUMPIXELS2) pixels, respectively.
- Two NeoPixel objects (
- Color Patterns:
- An array
colors[]holds different RGB color values. - The code cycles through these colors, applying them to the NeoPixel rings.
- An array
- Main Loop:
- The main loop iterates through each color in the
colorsarray. - For each color, a sequence of signals is sent (
HIGHandLOWstates) to the control pin. - The NeoPixel colors are set according to the current color in the loop, creating dynamic patterns on both rings.
- The lighting effect involves turning on and off specific pixels, creating a visual animation.
- The main loop iterates through each color in the
- Timing and Delays:
DELAYVALandDELAYVAL2control the delays between pixel updates for each ring.delaidefines a general delay used in the signal sending sequence.
- Pixel Updates:
- The code updates the pixels in a dynamic pattern, turning on and off specific pixels to create the desired lighting effect.
- The
previousLEDandpreviousLED1variables keep track of the previously lit pixels for smooth transitions.
- Clearing and Displaying:
- The code clears the pixel colors (
clear()) before updating them with the next pattern. - After updating the pixel colors, the
show()function is called to send the updated colors to the hardware.
- The code clears the pixel colors (
// NeoPixel Ring simple sketch (c) 2013 Shae Erisson
// Released under the GPLv3 license to match the rest of the
// Adafruit NeoPixel library

#include <Adafruit_NeoPixel.h>
#ifdef __AVR__
 #include <avr/power.h> // Required for 16 MHz Adafruit Trinket
#endif

// Which pin on the Arduino is connected to the NeoPixels?
#define PIN        11 // On Trinket or Gemma, suggest changing this to 1
#define PIN2        12 // On Trinket or Gemma, suggest changing this to 1

#define pinFlancDescendant        5

// How many NeoPixels are attached to the Arduino?
#define NUMPIXELS 10 // Popular NeoPixel ring size
#define NUMPIXELS2 50 // Popular NeoPixel ring size

// When setting up the NeoPixel library, we tell it how many pixels,
// and which pin to use to send signals. Note that for older NeoPixel
// strips you might need to change the third parameter -- see the
// strandtest example for more information on possible values.
Adafruit_NeoPixel pixels(NUMPIXELS, PIN, NEO_GRB + NEO_KHZ800);
Adafruit_NeoPixel pixels2(NUMPIXELS2, PIN2, NEO_GRB + NEO_KHZ800);

#define DELAYVAL 50 // Time (in milliseconds) to pause between pixels
#define DELAYVAL2 30 // Time (in milliseconds) to pause between pixels
#define delai 200

uint32_t colors[] = {
  //colors[k],
  pixels.Color(255, 255, 0),  // Red
  pixels.Color(0, 255, 255),  // Green
  pixels.Color(255, 0, 255),  // Blue
  pixels.Color(255, 0, 0),  // Red
  pixels.Color(0, 255, 0),  // Green
  pixels.Color(0, 0, 255),  // Blue
};


void setup() {
  // These lines are specifically to support the Adafruit Trinket 5V 16 MHz.
  // Any other board, you can remove this part (but no harm leaving it):
#if defined(__AVR_ATtiny85__) && (F_CPU == 16000000)
  clock_prescale_set(clock_div_1);
#endif
  // END of Trinket-specific code.
  pinMode(pinFlancDescendant, OUTPUT);
  digitalWrite(pinFlancDescendant, LOW);

  pixels.begin(); // INITIALIZE NeoPixel strip object (REQUIRED)
  pixels2.begin(); // INITIALIZE NeoPixel strip object (REQUIRED)

}

void loop() {
  int previousLED = 0;
  int previousLED1 = 0;

  for(int k=0; k<5; k++) { // For each pixel...
    digitalWrite(pinFlancDescendant, HIGH); // Envoyer un signal haut (flanc montant)
    delay(delai); // Attendre pendant le délai spécifié
    digitalWrite(pinFlancDescendant, LOW); // Envoyer un signal bas (flanc descendant)
    delay(delai); // Attendre pendant le même délai spécifié
        digitalWrite(pinFlancDescendant, HIGH); // Envoyer un signal haut (flanc montant)
    delay(delai); // Attendre pendant le délai spécifié
    digitalWrite(pinFlancDescendant, LOW); // Envoyer un signal bas (flanc descendant)
    delay(delai); // Attendre pendant le même délai spécifié
        digitalWrite(pinFlancDescendant, HIGH); // Envoyer un signal haut (flanc montant)
    delay(delai); // Attendre pendant le délai spécifié
    digitalWrite(pinFlancDescendant, LOW); // Envoyer un signal bas (flanc descendant)
    delay(delai); // Attendre pendant le même délai spécifié
    digitalWrite(pinFlancDescendant, HIGH); // Envoyer un signal haut (flanc montant)
       delay(delai); // Attendre pendant le délai spécifié
    pixels.clear(); // Set all pixel colors to 'off'
    pixels2.clear(); // Set all pixel colors to 'off'

    // The first NeoPixel in a strand is #0, second is 1, all the way up
    // to the count of pixels minus one.
    for(int i=0; i<NUMPIXELS2; i++) { // For each pixel...

      // pixels.Color() takes RGB values, from 0,0,0 up to 255,255,255
      // Here we're using a moderately bright green color:
      pixels2.setPixelColor(i, colors[k]);
      if (previousLED >= 5){
        pixels2.setPixelColor(previousLED - 5, pixels.Color(0, 0, 0));
      }
      pixels2.show();   // Send the updated pixel colors to the hardware.
      previousLED = i;
      delay(DELAYVAL2); // Pause before next pass through loop
    }
    pixels2.clear();
    pixels.clear();
    pixels.show();   // Send the updated pixel colors to the hardware.
    pixels2.show();   // Send the updated pixel colors to the hardware.

    for(int i=0; i<NUMPIXELS; i++) { // For each pixel...

      // pixels.Color() takes RGB values, from 0,0,0 up to 255,255,255
      // Here we're using a moderately bright green color:
      pixels.setPixelColor(i, colors[k]);
      if (previousLED1 >= 3){
        pixels.setPixelColor(previousLED1 - 3, pixels.Color(0, 0, 0));
      }
      pixels.show();   // Send the updated pixel colors to the hardware.
      previousLED1 = i;
      delay(DELAYVAL); // Pause before next pass through loop
    }
    pixels2.clear();
    pixels.clear();
    pixels.show();   // Send the updated pixel colors to the hardware.
    pixels2.show();
    for(int l=0; l<3; l++) {
      for(int i=0; i<NUMPIXELS; i++) { // For each pixel...

        // pixels.Color() takes RGB values, from 0,0,0 up to 255,255,255
        // Here we're using a moderately bright green color:
        pixels.setPixelColor(i, colors[k]);
        delay(DELAYVAL); // Pause before next pass through loop
      }

     for(int i=0; i<NUMPIXELS; i++) { // For each pixel...

        // pixels.Color() takes RGB values, from 0,0,0 up to 255,255,255
        // Here we're using a moderately bright green color:
        pixels.setPixelColor(i, pixels.Color(0, 0, 0));
        pixels.show();   // Send the updated pixel colors to the hardware.

        delay(DELAYVAL); // Pause before next pass through loop
      }
    }
  }
} 
Sound modules
Creation of the sound file
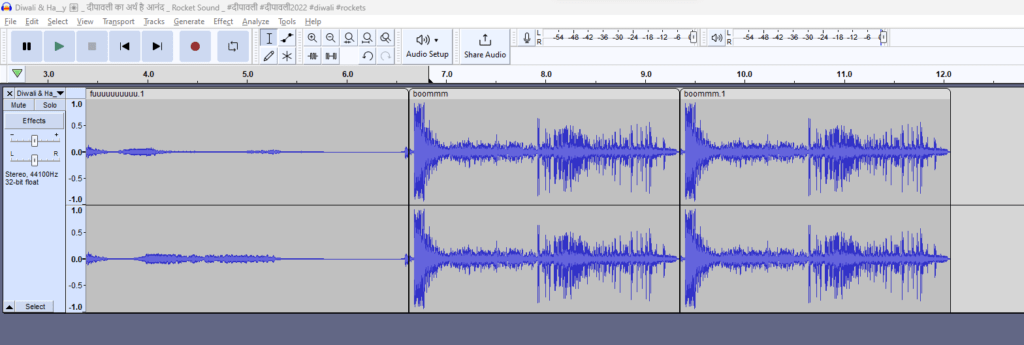
For sound modules, the software used includes Audacity. To achieve a fireworks-like sound, the simplest solution is to obtain MP3 sound clips directly from the internet, either from dedicated websites such as https://www.fesliyanstudios.com/royalty-free-sound-effects-download/fireworks-282, or by downloading soundtracks from YouTube videos using sites like “mp3 youtube downloader.”
Next, separate the soundtracks into clips (specific small parts) to reassemble them at the same tempo as the light effects.
The sequence consists of 3 clips: the first one representing the ascent “fuuuuuuu,” followed by the repetition of an explosion “boooomm” twice.
Mp3 module
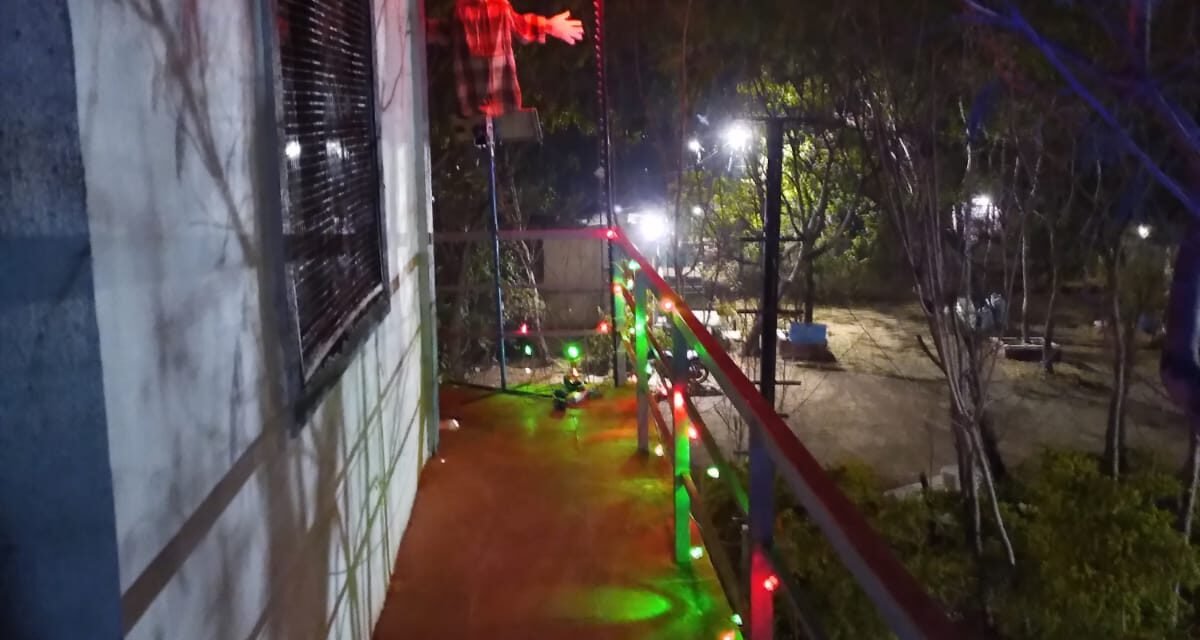
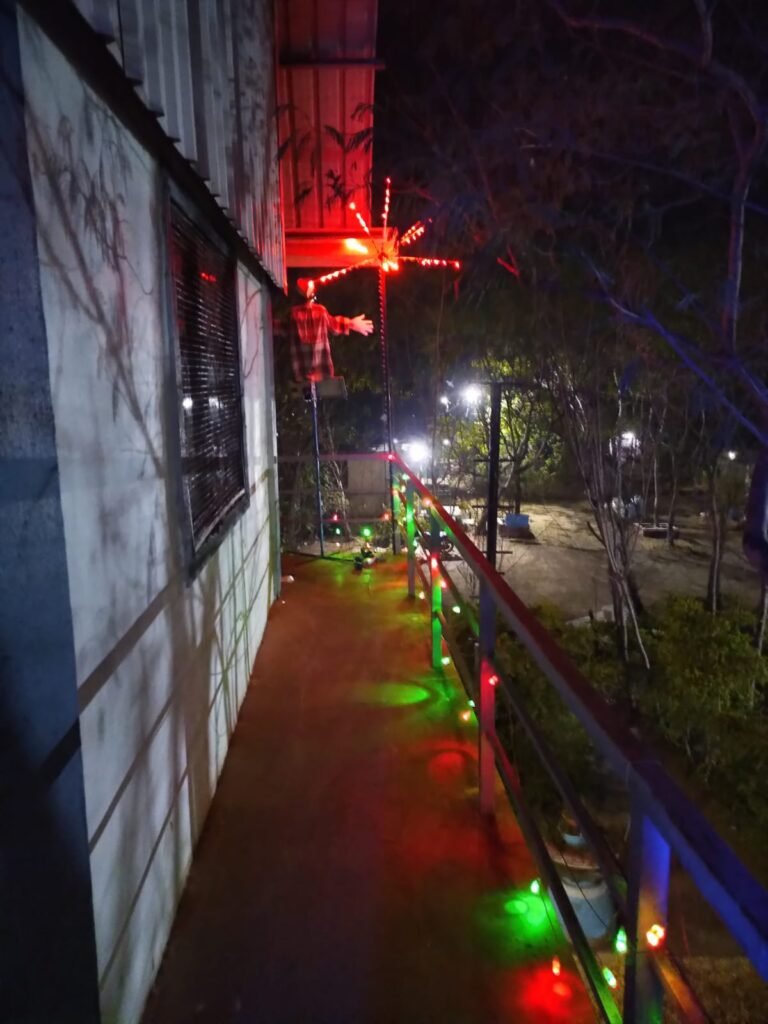
The project leveraged the sound module I created for the Smart Scarecrow project. This is why you can see the scarecrow model on the left (video below). For more information, you can refer to the details provided in the Smart Scarecrow project.


