Introduction
The objective of this project is to develop a graphical user interface on a website or as an application to interface with the ESP32. This can be very useful for keeping track of changes over time, detecting irregularities, and controlling equipment remotely. As an example, we can imagine a room with a temperature and humidity sensor, which continuously collects and stores data on a database, which can be easily viewed later on a website, and the room Programming can take substantial decisions on heating to fully control.
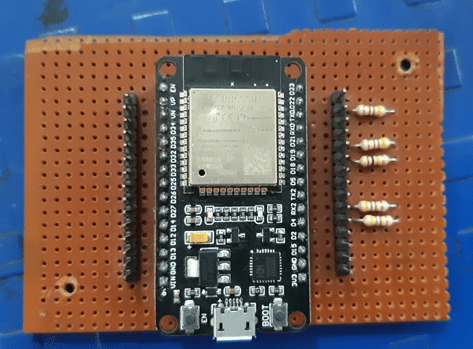
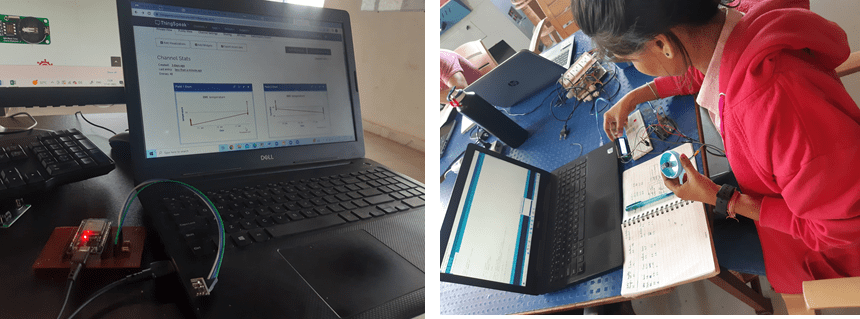
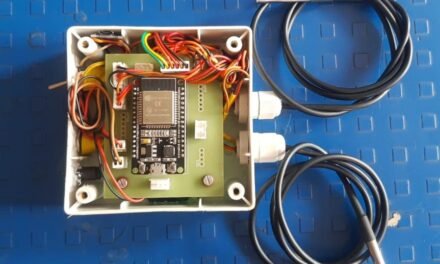
Trials were taken to make a solar dryer. But Prashant Sir wanted the data of all the trials, for this he asked me to take the temperature, humidity inside and outside the solar dryer every hour. For this, I took the temperature every hour with a thermometer. But this was to be done daily, so Prashant sir asked me to make a data logger. With the help of Suvarna madam, I made a data logger using ESP 32 WI-FI model.
Connect the ESP32 to a Simple Webpage
This was my first project using the ESP32, which is mainly used for it’s Wi-Fi and Bluetooth connections. I first had to understand how this Wi-Fi connection would work. Followed a simple tutorial and with Suvarna madam’s help, I was able to connect it to WiFi. I needed a webpage to view temperature data online. For this Suvarna madam told me about thingspeck where we can create our ID and see online data.
Setting up my first database
The next step in this project will be to create a database, store the data from the sensors for a long period of time and be able to access it from anywhere in the world at any time. I used ThingSpeak cloud services to monitor the output data. A free service that allows the creation of a simple database that is widely used, after following a simple introductory tutorial, I set up my first database. (https://www.iotstarters.com/send-ds18b20-temperature-sensor-data-to-thingspeak/)
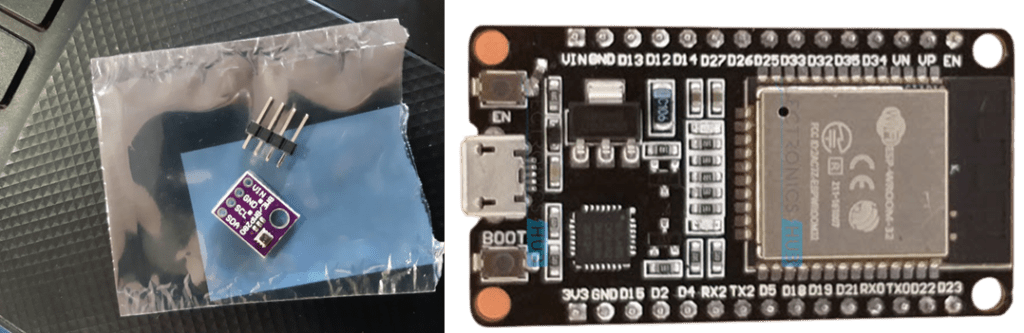
Components
ESP32 (read Best ESP32 development boards)
DS18B20 temperature sensor (one or multiple sensors) – waterproof version
4.7k Ohm resistor
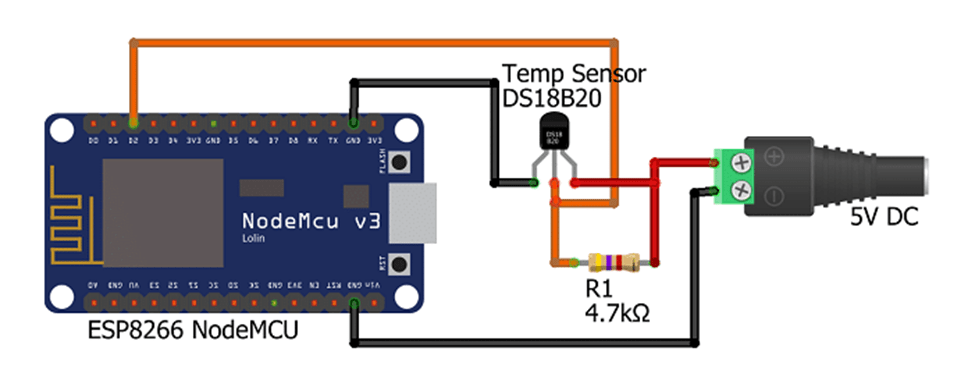
DS18B20 temperature sensor

The DS18B20 temperature sensor is a one-wire digital temperature sensor. This means that it just requires one data line (and GND) to communicate with your ESP32.
It can be powered by an external power supply or it can derive power from the data line (called “parasite mode”), which eliminates the need for an external power supply.
Each DS18B20 temperature sensor has a unique 64-bit serial code. This allows you to wire multiple sensors to the same data wire. So, you can get temperature from multiple sensors using just one GPIO.
The DS18B20 temperature sensor is also available in waterproof version.
Connection Diagram
ThinSpeak Work
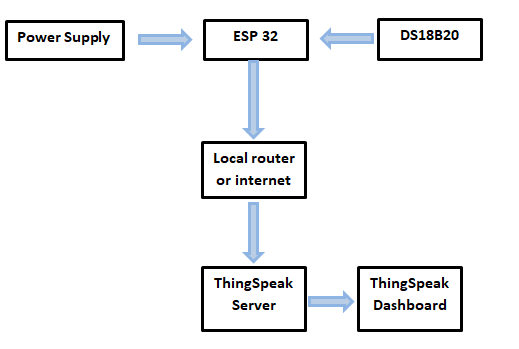
The temperature sensor collects temperature data and sends it to the ThingSpeak platform using the ESP32 . Data is sent at intervals of time given in the programming.
Sending DS18B20 Temperature sensor to ThingSpeak with ESP32 .
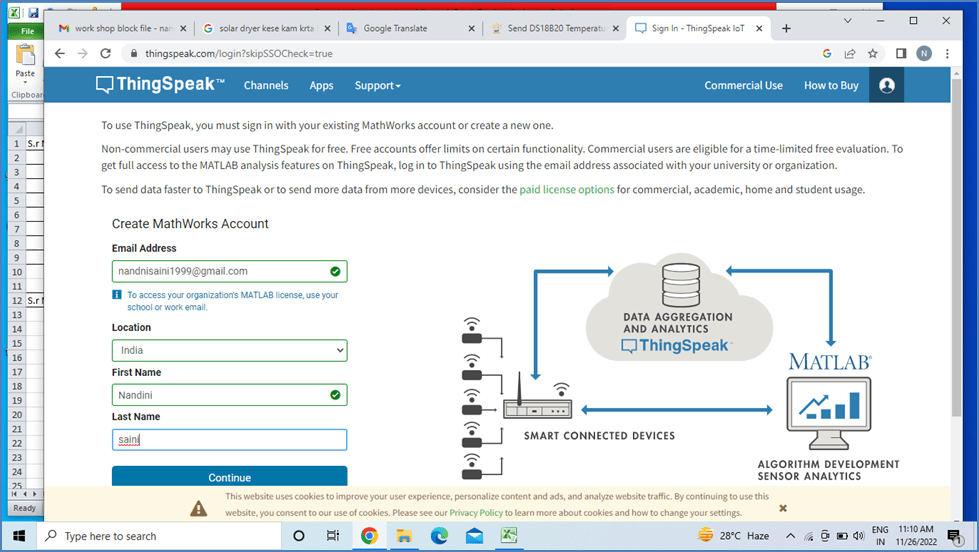
ThingSpeak Setup
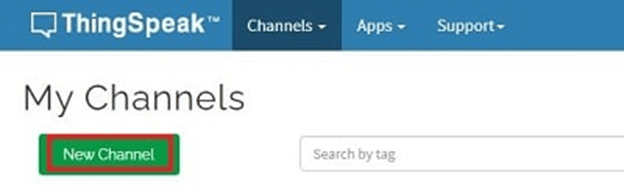
Setup in ThingSpeak. I registered with email id and created my account on ThingSpeak.
After creating your account Login and click on New Channel
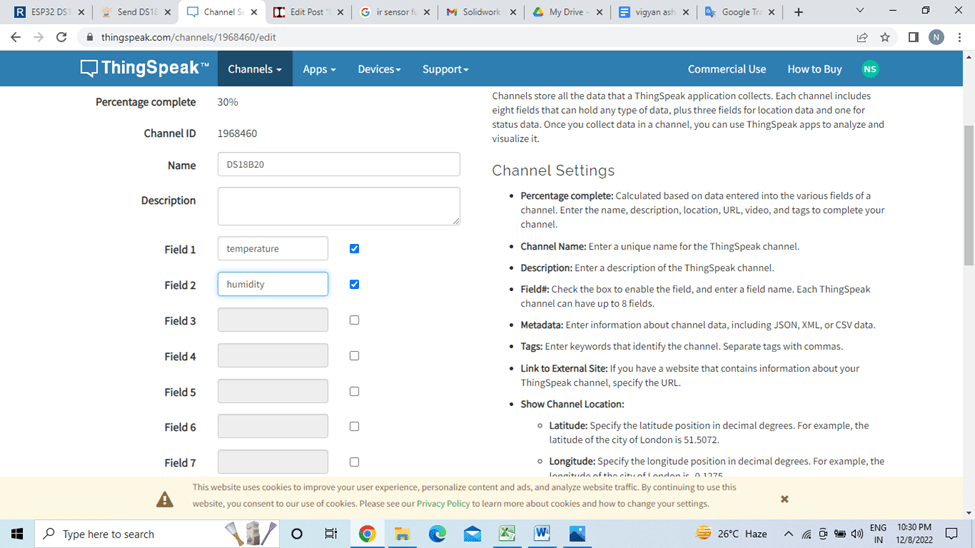
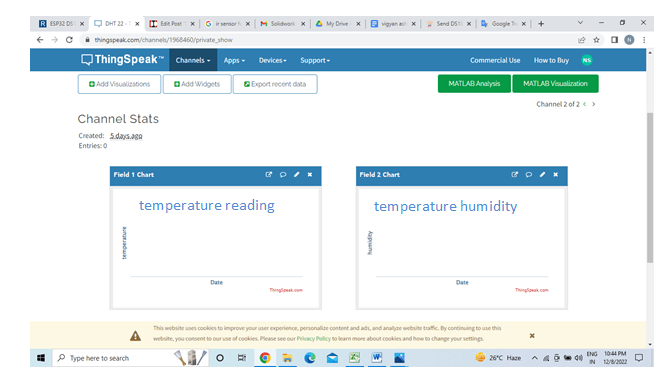
I provided a name for the channel and in the Select 2 field. One to show the temperature and the other to show the humidity.
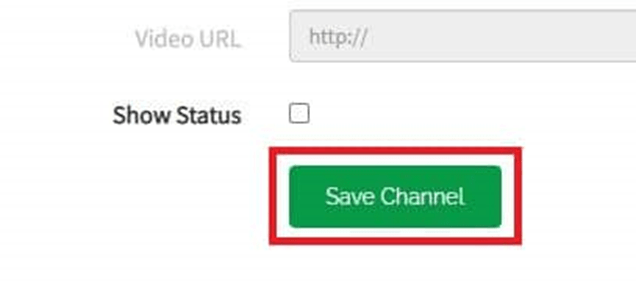
Then click on Save Channel.
Once channel is created, go to API Keys
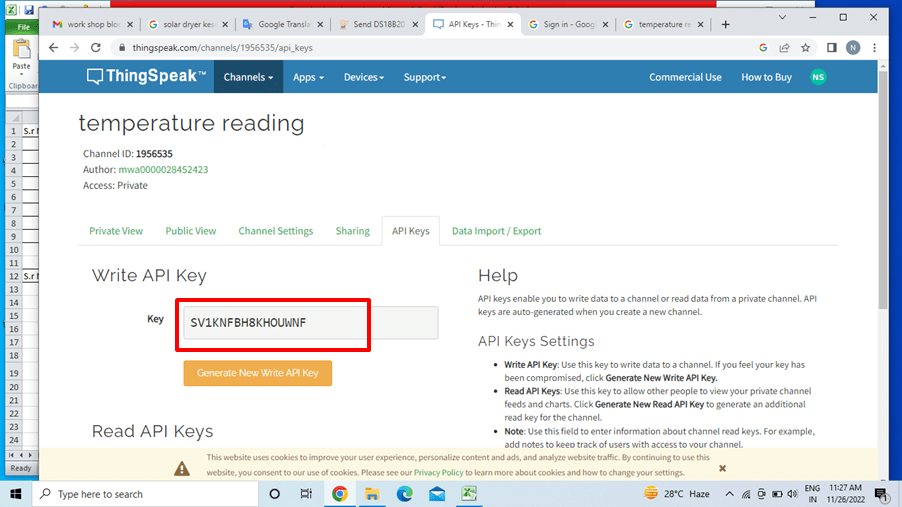
Now you will see the Write API key. This is required to send data to this channel and this API key will act as an authentication token. Copy the Right API Key and paste it into the Arduino code
we can also share the sensor data publicly or customize it for sharing .
After all these settings will get 2 Charts for displaying the sensor data. Now the ThingSpeak configuration is complete.
Installing Libraries
program the ESP32 using Arduino IDE,
program the ESP32 using Arduino IDE, so make sure you have the ESP32 add-on installed before proceeding.
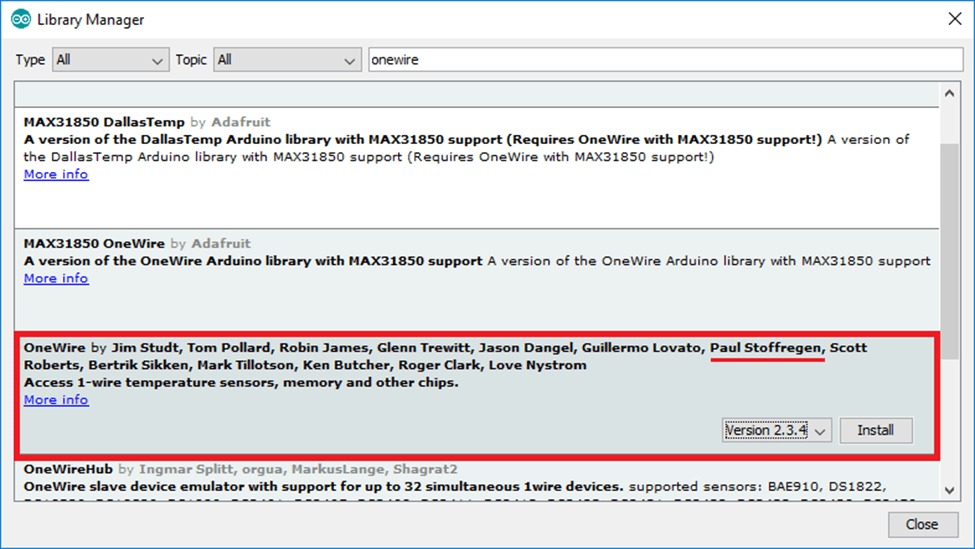
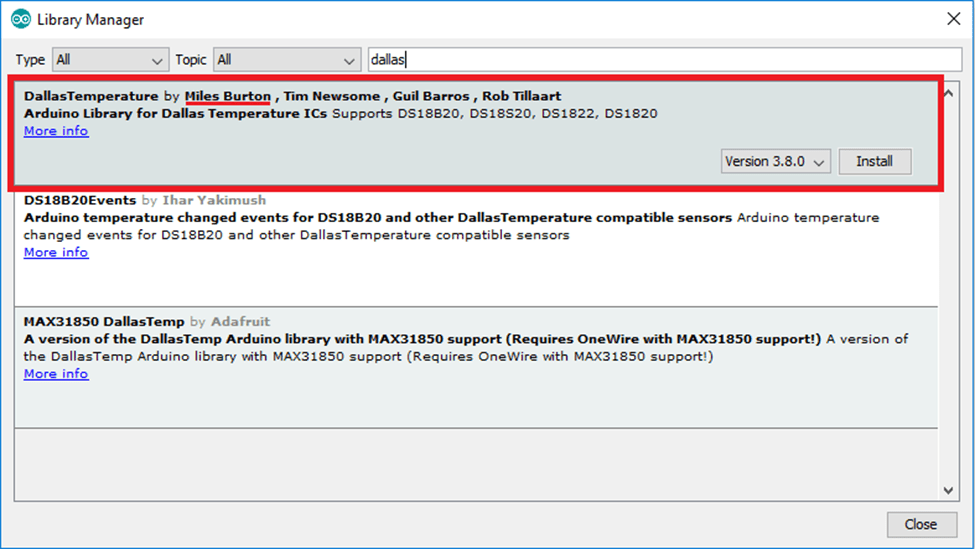
To interface with the DS18B20 temperature sensor, you need to install the One Wire library by Paul Stoffregen and the Dallas Temperature library.
1. Open Arduino IDE and go to Sketch > Include Library > Manage Libraries. The Library Manager should open.
2. Type “onewire” in the search box and install OneWire library by Paul Stoffregen.
3.Then, search for “Dallas” and install Dallas Temperature library.
Code :-
#include “ThingSpeak.h”
#include <SPI.h>
#include <WiFi.h>
#include <OneWire.h>
#include <DallasTemperature.h>
// Temperature sensor pin defination arduino & esp32
#define ONE_WIRE_BUS1 4 // D4
/*#define ONE_WIRE_BUS2 16 // RX2
#define ONE_WIRE_BUS3 21 // D21
#define ONE_WIRE_BUS4 22 // D22
#define FAN 5 // D5*/
//delay
//#define INTERVAL 60000
#define INTERVAL 1000 // 15 min delay
float t1;
/*float t2;
float t3;
float t4;
float n;
float n1;*/
// WIFI id & password
const char* ssid = “nandini”;
const char* password = “12345678”;
WiFiClient client;
//Thingspeak channel id & key
unsigned long Channel_ID = 1956535 ;//1686021 //1687316
const char * API_Key = “SV1KNFBH8KHOUWNF”; //C9WG0TPINZHBS90A //KW2ZDHVLHA3Y16DX
unsigned long last_time = 0;
OneWire oneWire1(ONE_WIRE_BUS1);//dry bulb temperature
/*OneWire oneWire2(ONE_WIRE_BUS2);//wet bulb temperature
OneWire oneWire3(ONE_WIRE_BUS3);//wet bulb without fan
OneWire oneWire4(ONE_WIRE_BUS4);//water temperature// wet bulb with fan*/
// Pass our oneWire reference to Dallas Temperature.
DallasTemperature sensors1(&oneWire1);
/*DallasTemperature sensors2(&oneWire2);
DallasTemperature sensors3(&oneWire3);
DallasTemperature sensors4(&oneWire4);
*/
void setup() {
Serial.begin(115200);
sensors1.begin();
/*sensors2.begin();
sensors3.begin();
sensors4.begin();*/
// pinMode(FAN,OUTPUT);
WiFi.mode(WIFI_STA);
ThingSpeak.begin(client);
}
void loop() {
// Connect or reconnect to WiFi
Serial.println (“welcome”);
if (WiFi.status() != WL_CONNECTED) {
Serial.print(“Connecting…”);
while (WiFi.status() != WL_CONNECTED) {
WiFi.begin(ssid, password);
delay(5000);
}
Serial.println(“\nConnected.”);
}
// digitalWrite(FAN, HIGH);
// Temperature
sensors1.requestTemperatures(); // Send the command to get temperature readings
/*sensors2.requestTemperatures(); // Send the command to get temperature readings
sensors3.requestTemperatures(); // Send the command to get temperature readings
sensors4.requestTemperatures(); // Send the command to get temperature readings*/
t1 = sensors1.getTempCByIndex(0); // Dry temp
/* t2 = sensors2.getTempCByIndex(0); // wet bulb temp with fan
t3 = sensors3.getTempCByIndex(0); // wet bulb without fan temp
t4 = sensors4.getTempCByIndex(0); // water tempearture*/
// Humidity
/* float d = ((17.502 * t1) / (240.97 + t1)); // Equation for Humidity
// float d1 = ((17.502*t2)/(240.97+t2));
float e = 2.7183;
float g = 6.112 * (pow(e, d));
// float g1 = 6.112*(pow(e,d1));
float j = ((17.502 * t2) / (240.97 + t2)); //wet bulb with fan
float j1 = ((17.502 * t3) / (240.97 + t3)); // wet bulb without fan
float k = 2.7183;
float m = 6.112 * (pow(k, j));
float m1 = 6.112 * (pow(k, j1));
n = (m – (0.6687 * (1 + 0.00115 * t2) * (t1 – t2))) / g * 100; //Humidity upto 2 digit for with fan
n1 = (m1 – (0.6687 * (1 + 0.00115 * t3) * (t1 – t3))) / g * 100; //Humidity upto 2 digit for without fan*/
//Serial monitor print
Serial.print(“DBT: “);
Serial.println(t1);
/* Serial.print(“WBT: “);
Serial.println(t2);
Serial.print(“WBTF: “);
Serial.println(t3);
Serial.print(“WBT1: “);
Serial.println(t4);
Serial.print(“Humidity With Fan”);
Serial.println(n);
Serial.print(“Humidity Without Fan”);
Serial.println(n1);*/
// data send to thingspeak field
ThingSpeak.setField(1, t1);
/* ThingSpeak.setField(2, t2);
ThingSpeak.setField(3, t3);
ThingSpeak.setField(4, t4);
//humidity
ThingSpeak.setField(5, n);
ThingSpeak.setField(6, n1);*/
// All data send to thingspeak channel
int Data = ThingSpeak.writeFields(Channel_ID, API_Key);
// Delay
delay((INTERVAL – 1) – (millis() % INTERVAL));
}
Uploading the code help with suvrna madam.
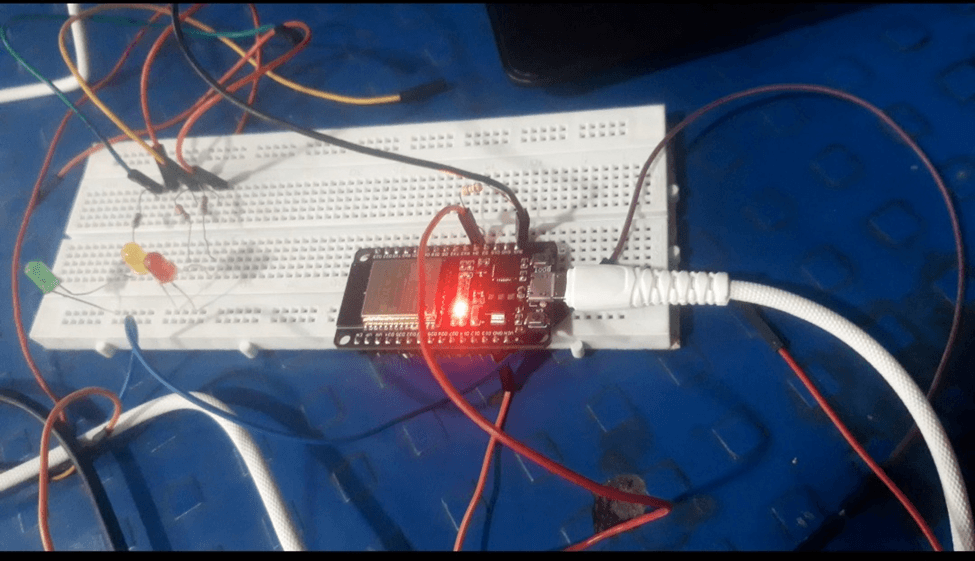
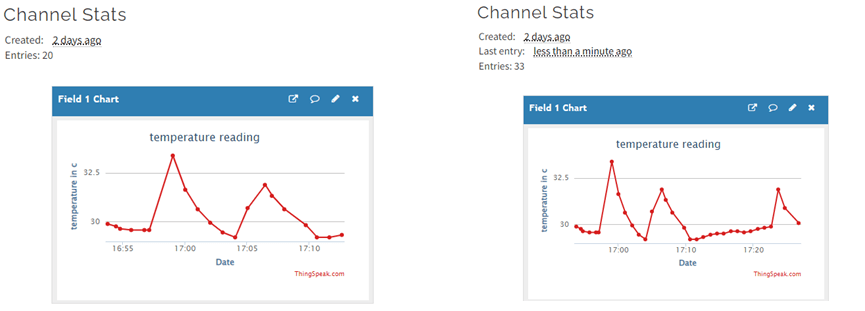
Once connected the output will be something like this.
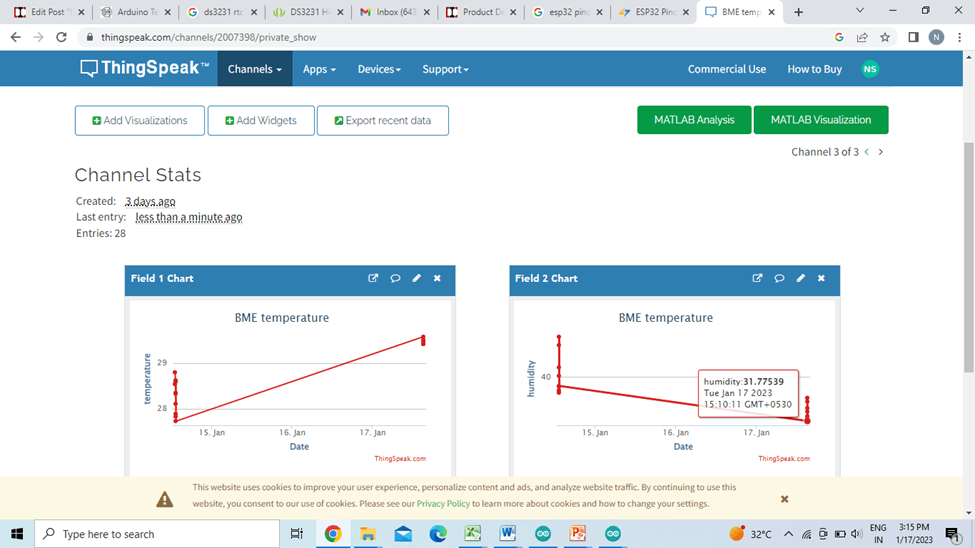
Data sheet:-
BME 280 Temperature sensor
Date – 9/01/2023 to 13/01/2023
DS18B20 sensor was facing accuracy problem in humidity. So used BME sensor.
Bosch BME280 Humidity, Temperature & Pressure Sensor is an integrated environmental sensor which is very small-sized with low power consumption. This BME280 Atmospheric Sensor Breakout is the easy way to measure barometric pressure, humidity, and temperature readings all without taking up too much space. Basically, anything you need to know about atmospheric conditions you can find out from this tiny breakout.
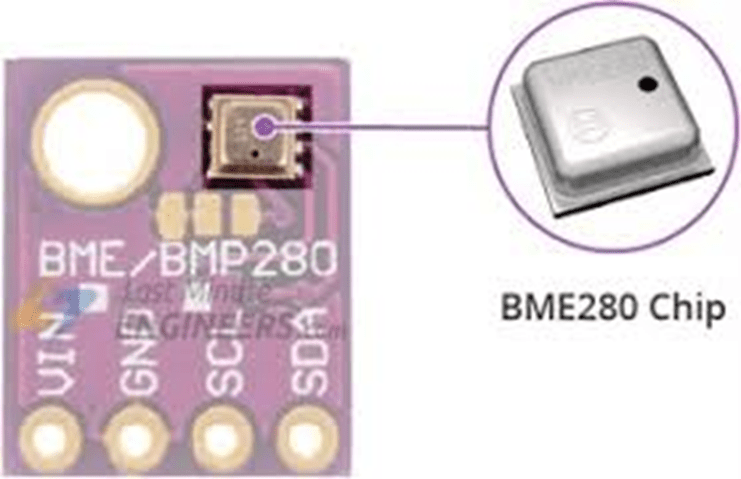
This module uses an environmental sensor manufactured by Bosch with temperature, barometric pressure sensor that is the next generation upgrade to the popular BMP085/BMP180/BMP183 Sensor. This sensor is great for all sorts of weather sensing and can even be used in both I2C and SPI! This precision sensor from Bosch is the best low-cost, precision sensing solution for measuring barometric pressure with ±1 hPa absolute accuracy, and temperature with ±1.0°C accuracy. Because pressure changes with altitude, and the pressure measurements are so good, you can also use it as an altimeter with ±1 meter accuracy.
Features of BME280
1. Interface: I2C & SPI
2. Supply Voltage: 1.71V to 3.6V
3. Temperature Range: -40 to +85°C
4. Humidity Range: 0% to 100% rel. humidity
5. Pressure Range: 300hPa to 1100hPa
BME280 Pinout
The BME280 I2C interface uses the following pins:
1. VCC: 1.71V to 3.6V
2. GND: Connect to GND
3. SCL: serial clock (SCK)
4. SDA: Serial data (SDI)
5. CSB: Must be connected to VDDIO to select I2C interface. 6. SDO: The I2C address decides the pin. If SDO connects to GND(0), the address is 0x76, if it connects to VDDIO
Connection Diagram
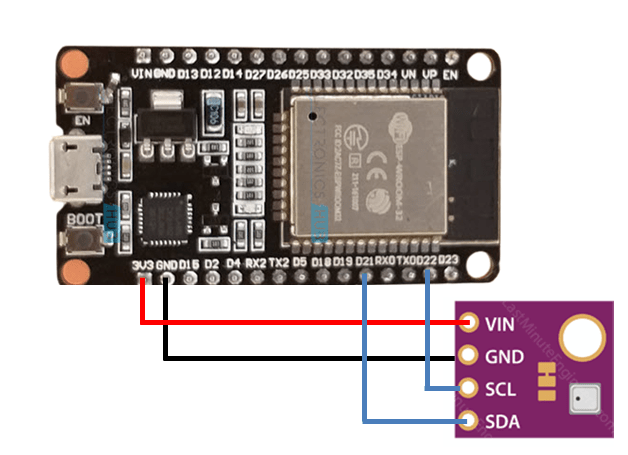
Pin connection
Connect the VCC pin of the BME sensor to the 3-volt pin of the ESP 32 board.
Connect the GND pin of the BME sensor to the GND pin of the ESP 32 board.
Connect the SCL (Clock) pin of the BME sensor to the GPIO 22 pin of the ESP 32 board.
Connect the SDA (DATA Line) pin of the BME sensor to the GPIO 21 pin of the ESP 32 board.
Programing Code
#include <WiFi.h>
#include “ThingSpeak.h”
#include <Adafruit_BME280.h>
#include <Adafruit_Sensor.h>
const char* ssid = “nandini”;
const char* password = “12345678”;
WiFiClient client;
unsigned long Channel_ID = 2007398;
const char * API_Key = “1VK8AQD594SHHO9U”;
unsigned long last_time = 0;
unsigned long Delay = 30000;
// Variables to store sensor readings
float temperature;
float humidity;
float pressure;
//int relay = 2; //D2
// Create a sensor object
Adafruit_BME280 bme;
void initBME(){
if (!bme.begin(0x76)) {
Serial.println(“BME280 not properly connected!”);
while (1);
}
}
void setup() {
Serial.begin(115200);
initBME();
//pinMode(relay, OUTPUT);
WiFi.mode(WIFI_STA);
ThingSpeak.begin(client);
//digitalWrite(relay,LOW);
}
void loop() {
if ((millis() – last_time) > Delay) {
// Connect or reconnect to WiFi
if(WiFi.status() != WL_CONNECTED){
Serial.print(“Connecting…”);
while(WiFi.status() != WL_CONNECTED){
WiFi.begin(ssid, password);
delay(5000);
}
Serial.println(“\nConnected.”);
}
// Obtaining a new sensor reading for all fields
temperature = bme.readTemperature();
/* if (temperature > 50)
{
// digitalWrite(relay, HIGH);
}
else
{
//digitalWrite(relay, LOW);
}*/
Serial.print(“Temperature (ºC): “);
Serial.println(temperature);
humidity = bme.readHumidity();
Serial.print(“Humidity (%): “);
Serial.println(humidity);
/* pressure = bme.readPressure() / 100.0F;
Serial.print(“Pressure (hPa): “);
Serial.println(pressure);*/
ThingSpeak.setField(1, temperature);
//ThingSpeak.setField(2, pressure);
ThingSpeak.setField(2, humidity);
int Data = ThingSpeak.writeFields(Channel_ID, API_Key);
if(Data == 200){
Serial.println(“Channel updated successfully!”);
}
else{
Serial.println(“Problem updating channel. HTTP error code ” + String(Data));
}
last_time = millis();
}
}
Uploaded the code with the help of Suvarna madam.
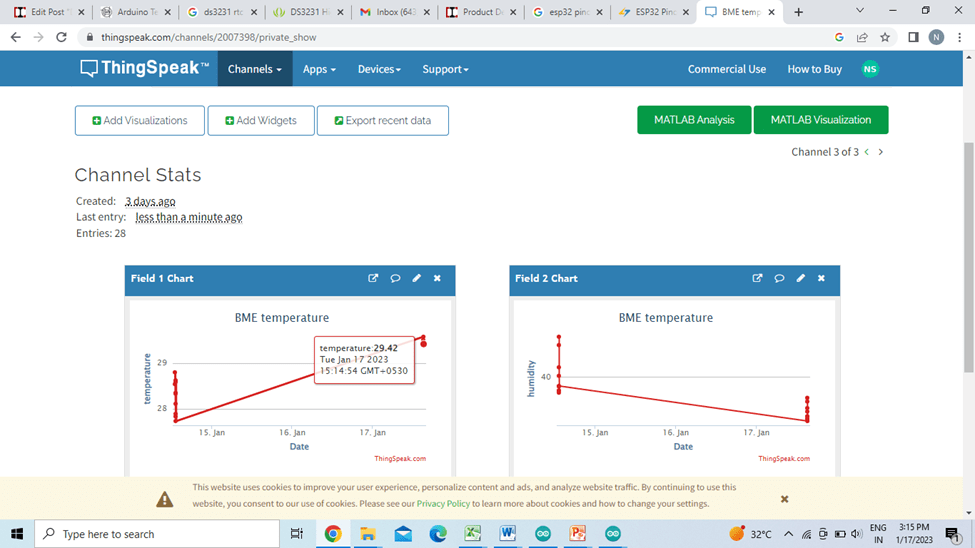
Temperature & Humidity on ThingSpeak.
Conclusion
learned about programming
Found information about the ThingSpeak web site. Learned to visualize data on ThingSpeak.
Learned to use the sensor (DS18B20 & BME280).

