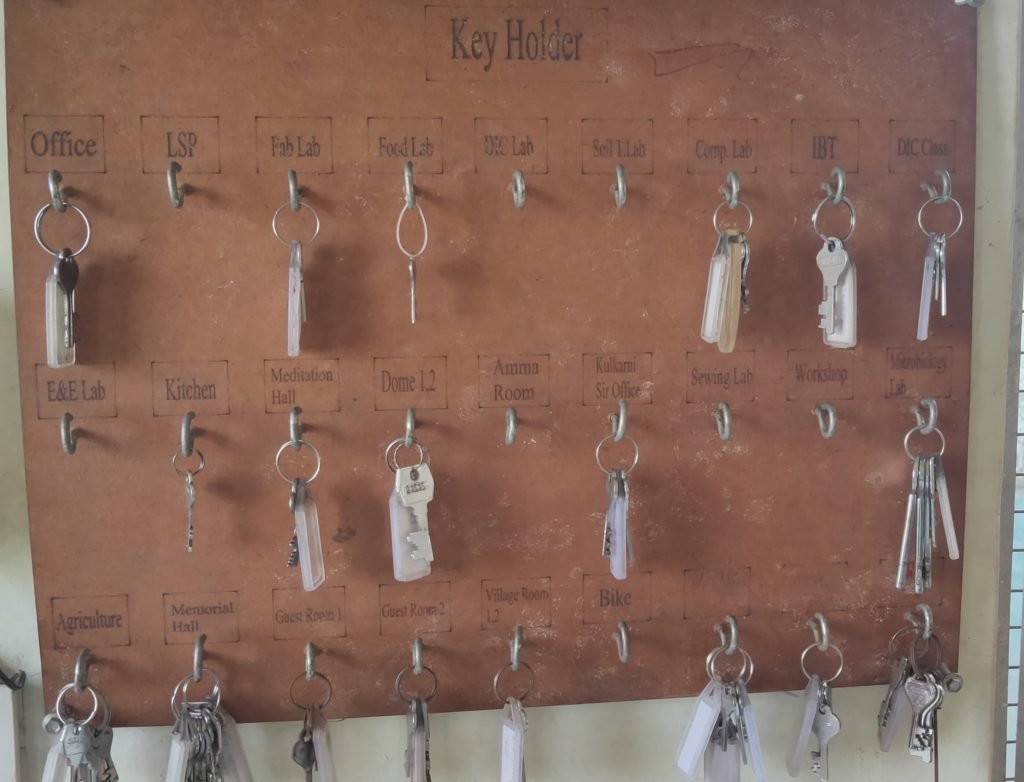
Problem Statement:
Before installing this project keys were misplaced in their places and many times keys were lost also data of issued key was not written in register.Anyone can take key without permission. Because of these issues this project came into consideration.
Objective of project:
- Security of keys.
- Restricted access to authorized persons.
- Proper data log of keys.
- Proper enclosure design.
Overview:
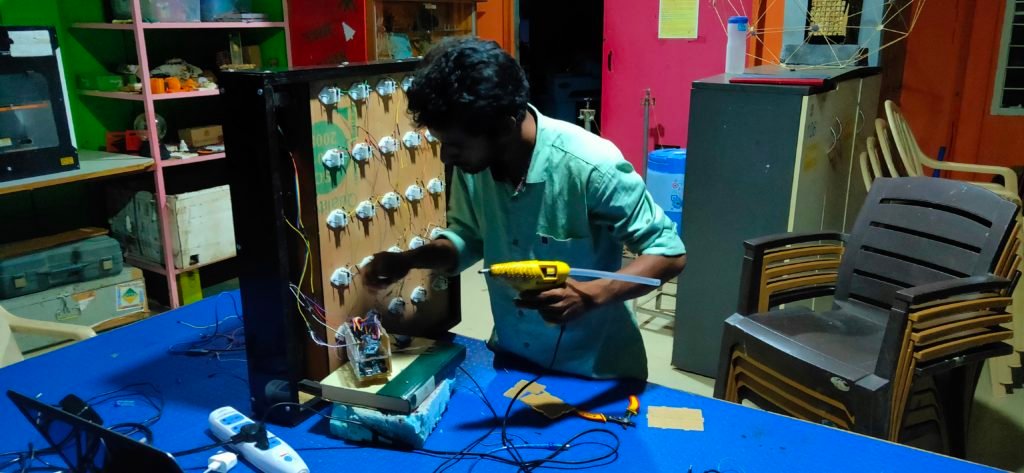
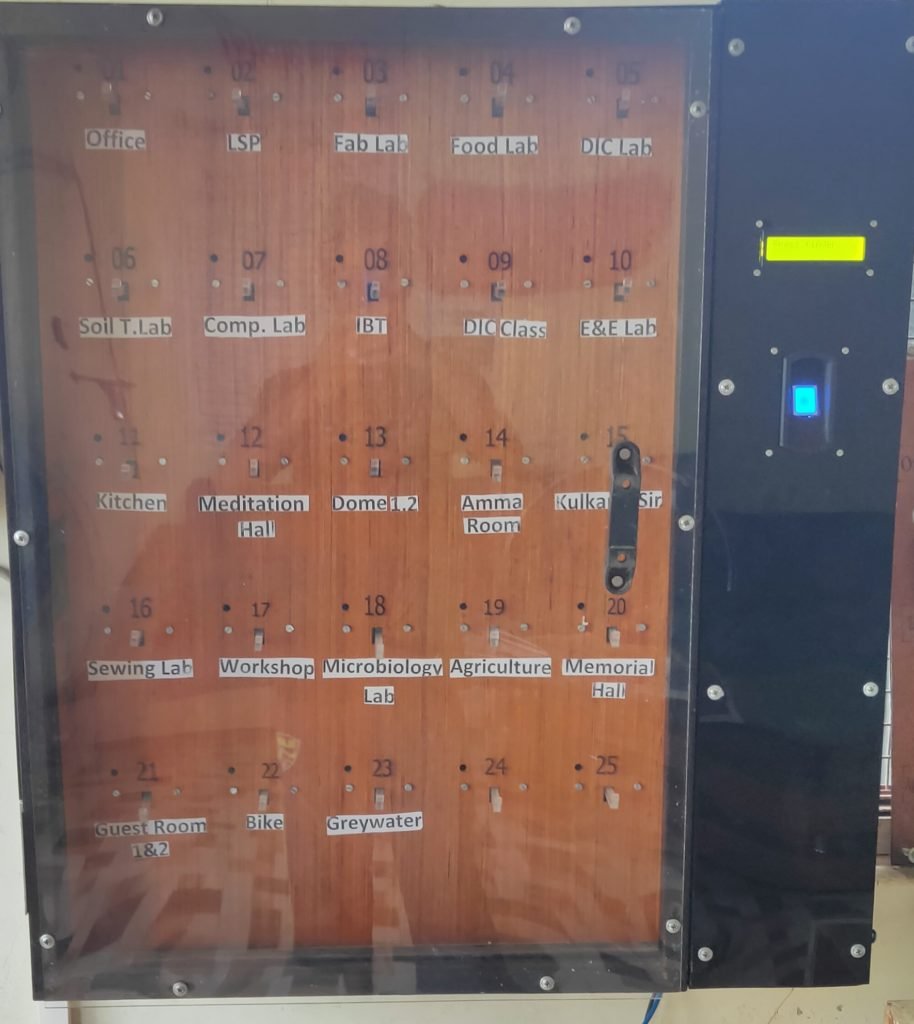
In this project we have made proper design to secure keys by using fingerprint sensor. Fingerprint authentication will act as door unlocking pass code. Those who have enrolled their ID with system they can take keys out. While taking out key, information like name of person , key which is taken ,date and time is registered in SD card. We can access these information whenever it requires.
Block Diagram:

Component Required:
- Fingerprint Sensor:Sparkfun Fingerprint scanner-TTL(GT-511C3) is used in this project which can take up to 200 valid fingerprint images. Uses Simple UART protocol.
- SD card module :xcluma Micro SD card Module is used. Supports SPI communication protocol. Used for making a systematic recording of events, observations, or measurements.
- Door lock solenoid :It is a electromechanical device can be controlled by Arduino signals.
- Real Time Clock (RTC):Real time clock is a computer clock that keeps track of the current time (most often in the form of integrated circuit)
- 16×2 LCD display :LCD is an electronic display module. It can display 16 characters per line and there are 2 such lines.
- 5×5 keypad : 5X5 limit switch based keypad is used to hold keys as well as for systematic recording of key data.
- Enclosure :To provide degree of protection to equipment against incidental contact, to prevent electric shock and protect contents from the environment.
- Memory card: For storage of data log.
Working:
After complete connections of sensors , input and output devices to the Arduino . Fingerprint sensor will take fingerprint templates of different users and assign them ID number. Also RTC keeps track of real timing. SD card module is connected for storing data of finger templates who recently accessed system as well as current timing. And main thing is it keeps track of which key has taken by whom. So SD card can get data of timing , fingerprint template and key which taken with the help of 5X5 matrix. If new fingerprint template is to be added then only authorized person can do it so.
Main system:
Main code:
#include "FPS_GT511C3.h"
#include "SoftwareSerial.h"

FPS_GT511C3 fps(10, 11); // (Arduino SS_RX = pin 2, Arduino SS_TX = pin 3)

int doorlock = 4; //solenoid valve as a door lock
const int gndPin = 12; // ground pin
#include <SD.h>
#include <SPI.h>
File sdcard_file;
//LCD
int CS_pin=53 ;
#include <DS3231.h>
DS3231  rtc(SDA, SCL);

#include <Wire.h>
#include <LiquidCrystal_I2C.h>

LiquidCrystal_I2C lcd(0x27,16,2);  // set the LCD address to 0x27 for a 16 chars and 2 line display

// these constants won't change.  But you can change the size of
// your LCD using them:
const int numRows = 2;
const int numCols = 16;

void setup(){
 lcd.init();
 lcd.backlight();
 Serial.begin(9600);
  pinMode(CS_pin, OUTPUT);
  rtc.begin();
  if (!SD.begin(53)) {
    Serial.println("initialization failed!");
    while (1);
  }
  Serial.println("initialization done.");
  Serial.print("ID_No  ");
  Serial.print("      ");
  Serial.print("Date  ");
  Serial.print("      ");
  Serial.print("   Time  ");
  Serial.print("     ");
  Serial.println("     ");
  sdcard_file = SD.open("FINAL.txt", FILE_WRITE);


//set up Arduino's hardware serial UART
  delay(100);
   // make the pushbutton's pin an input:
   lcd.begin(numCols, numRows);
  pinMode(doorlock, OUTPUT);
  pinMode(gndPin, OUTPUT);
 digitalWrite(gndPin, LOW);
  fps.Open();         //send serial command to initialize fps
  fps.SetLED(true);   //turn on LED so fps can see fingerprint


 // Enroll();
  //lcd.print("Enroll start");//begin enrolling fingerprint

}


void Enroll()
{

  // Enroll test

  // find open enroll id
  int enrollid = 0;
  bool usedid = true;
  while (usedid == true)
  {
    usedid = fps.CheckEnrolled(enrollid);
    if (usedid==true) enrollid++;
  }
  fps.EnrollStart(enrollid);

  // enroll
  lcd.clear();
  lcd.setCursor(0,0);//cursur position
  lcd.print("Enroll New");// Print a message to the LCD.

  lcd.setCursor(0,1);//cursur position
  lcd.print("Finger:");// Print a message to the LCD.

  lcd.setCursor(8,1);//cursur position
  lcd.print(enrollid);// Print a message to the LCD.

  while(fps.IsPressFinger() == false) delay(100);
  bool bret = fps.CaptureFinger(true);
  int iret = 0;
  if (bret != false)
  {
     lcd.clear();
     lcd.setCursor(0,0);//cursur position
  lcd.print("Remove finger");// Print a message to the LCD.
    fps.Enroll1();
    while(fps.IsPressFinger() == true) delay(10);

     lcd.clear();
     lcd.setCursor(0,0);//cursur position
  lcd.print("Press Finger");// Print a message to the LCD.
    lcd.setCursor(0,1);//cursur position
  lcd.print("Again");// Print a message to the LCD.

    while(fps.IsPressFinger() == false) delay(100);
    bret = fps.CaptureFinger(true);
    if (bret != false)
    {
 lcd.clear();
       lcd.setCursor(0,0);//cursur position
  lcd.print("Remove finger");// Print a message to the LCD.

      fps.Enroll2();
      while(fps.IsPressFinger() == true) delay(100);

      lcd.clear();
       lcd.setCursor(0,0);//cursur position
  lcd.print("Press finger");// Print a message to the LCD.
  lcd.setCursor(0,1);//cursur position
  lcd.print("Again");// Print a message to the LCD.

      while(fps.IsPressFinger() == false) delay(100);
      bret = fps.CaptureFinger(true);
      if (bret != false)
      {
        lcd.clear();
        lcd.setCursor(0,0);//cursur position
  lcd.print("Remove finger");// Print a message to the LCD.
        iret = fps.Enroll3();
        if (iret == 0)
        {
          lcd.clear();
          lcd.setCursor(0,0);//cursur position
  lcd.print("Enrolling Done");// Print a message to the LCD.
  delay(1000);

        }

        else
        {
          lcd.clear();
          lcd.setCursor(0,0);//cursur position
  lcd.print("Enrolling Failed");// Print a message to the LCD.

          lcd.setCursor(0,1);//cursur position
  lcd.print(iret);// Print a message to the LCD.
        }
      }
      else
      lcd.clear();
      lcd.setCursor(0,0);//cursur position
  lcd.print("Failed 3rd Time");// Print a message to the LCD
    }

    else
    lcd.clear();
    lcd.setCursor(0,0);//cursur position
  lcd.print("Failed 2nd Time");// Print a message to the LCD.
  }
 else
//  break;
  lcd.clear();
  lcd.setCursor(0,0);//cursur position
  lcd.print("Thank You");// Print a message to the LCD.
}


void loop()
{

  sdcard_file = SD.open("FINAL.txt", FILE_WRITE);

  // Identify fingerprint test
  if (fps.IsPressFinger())
  {
    fps.CaptureFinger(false);
    int id = fps.Identify1_N();

       /*Note:  GT-521F52 can hold 3000 fingerprint templates
                GT-521F32 can hold 200 fingerprint templates
                 GT-511C3 can hold 200 fingerprint templates.
                GT-511C1R can hold 20 fingerprint templates.
       Make sure to change the id depending on what
       model you are using */
    if (id <200) //<- change id value depending model you are using
    {//if the fingerprint matches, provide the matching template ID

      lcd.clear();
      lcd.setCursor(0,0);//cursur position
      if(id==0)
      {
        lcd.print("VIPUL ");
        Enroll();
        delay(1000);
      }
      if(id==1)
      {
        lcd.print("Authorised     ");
        Enroll();

      }
      if(id==9)
      {
        lcd.print("Authorised     ");
        Enroll();

      }
       if(id==12)
      {
        lcd.print("Authorised     ");
        Enroll();

      }
  lcd.print("Verified ID:");
  Serial.print(id);// Print a message to the LCD.
  Serial.println("     ");
  Serial.print(rtc.getDateStr());
  Serial.println("     ");
  Serial.println(rtc.getTimeStr());


      lcd.setCursor(0,1);//cursur position
      lcd.print(id);// Print a message to the LCD.
      digitalWrite(doorlock, HIGH);
      lcd.clear();
      delay(3000);
       if (sdcard_file) {
    sdcard_file.print(id);
    sdcard_file.println("     ");
     sdcard_file.print(rtc.getDateStr());
    sdcard_file.print("     ");
    sdcard_file.print(rtc.getTimeStr());
    sdcard_file.print("     ");
    sdcard_file.close();
      delay(1000);
      lcd.clear();
      digitalWrite(doorlock, LOW);
      delay(1000);
      lcd.clear();
      // close the file
  }
  // if the file didn't open, print an error:
  else {
    Serial.println("   Welcome");
  }
    }
    else
    {//if unable to recognize
      lcd.clear();
      lcd.setCursor(0,0);//cursur position
  lcd.print("Finger not found");// Print a message to the LCD.
    }
  }
  else
  {
    lcd.clear();
    lcd.setCursor(0,0);//cursur position
  lcd.print("Press finger");// Print a message to the LCD.
  }
  delay(1000);
  digitalWrite(doorlock, LOW);
}
Status of current system:
System currently installed can be able to take out information of fingerprint template, time of taking key date.
System installed on date 01/10/2019….
Problems
- Back cover panel was not their.(Solved)
- Fingerprint sensor was not fixed tightly.(solved)
- Not keeping track of which key is taken.(Pending)
- Arduino adapter was connected to power supply board openly,So everyone can able to reset system just by hitting single switch hence door will automatically open.(Solved, By taking adapter inside board and we have removed switch from board. Another option was attaching lead acid battery so system won’t reset even board power is turned off)
Modification needs:
After 6 months of continuous use system started malfunctioning so to overcome that few updates is needed.
- OLED display: 16×2 LCD display must be replaced by OLED display.
- New reliable fingerprint sensor: Fingerprint sensor is not much sensitive, as it fails to recognize fingers that are too clean & dry.
- New design: No provision to take out SD card.
- Key log: We can keep track of only time and person who is taking key, not of which key is taken.
- Rechargeable battery backup: In current system we are using external board. If someone hits button then system undergoes in reset state.
- 5×5 Keypad: Instead of using limit switches keypad is more reliable. Less costly & better lifetime.