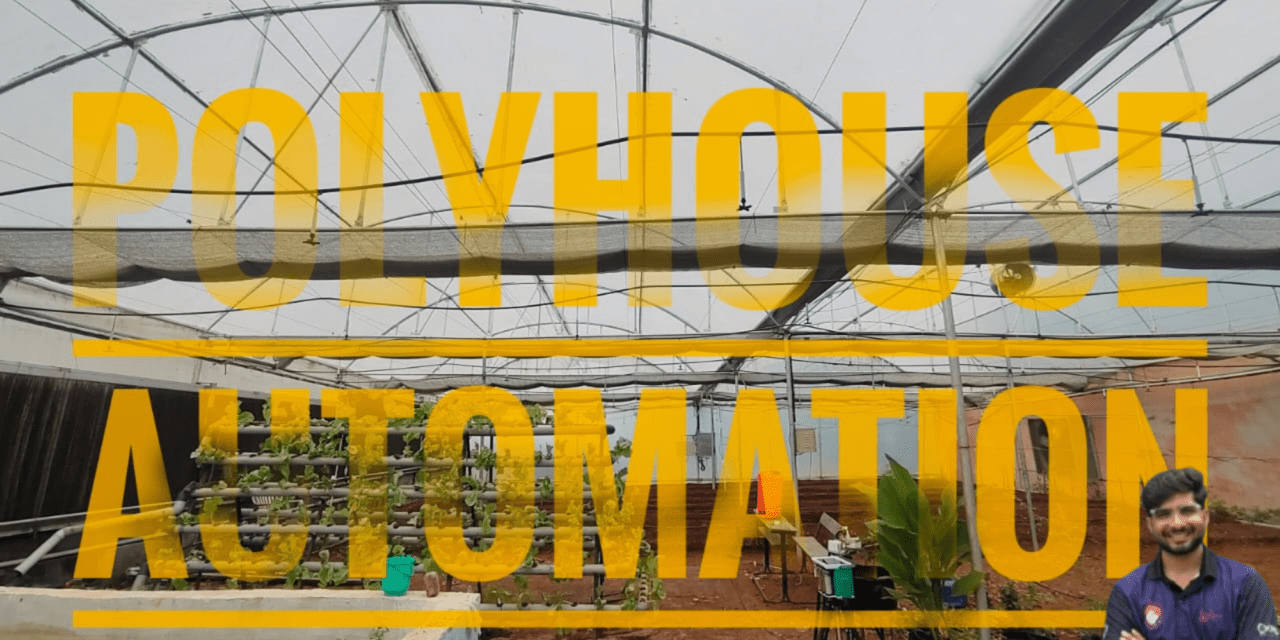
Automating Polyhouse Curtains: A Step Toward Smarter Farming
Automating Polyhouse Curtains: A Step Toward Smarter Farming Smart farming is not just about sensors and apps it’s also about solving small, real-world problems with simple but effective technology. Lately, I have been working on automating the curtain mechanism in a polyhouse setup, and it’s been an exciting challenge with a mix of electronics, motors, code, and a lot of learning along the way.
Why Automate Curtains in a Polyhouse?
In a polyhouse, controlling how much sunlight reaches the crops is crucial. Too much direct sunlight can damage sensitive plants or cause overheating, while too little can slow down growth. The curtain mechanism helps manage this balance by opening or closing based on how much light is needed.
Doing this manually every day, especially in changing weather, is not practical so automation makes a lot of sense.

The Motor Behind the Movement
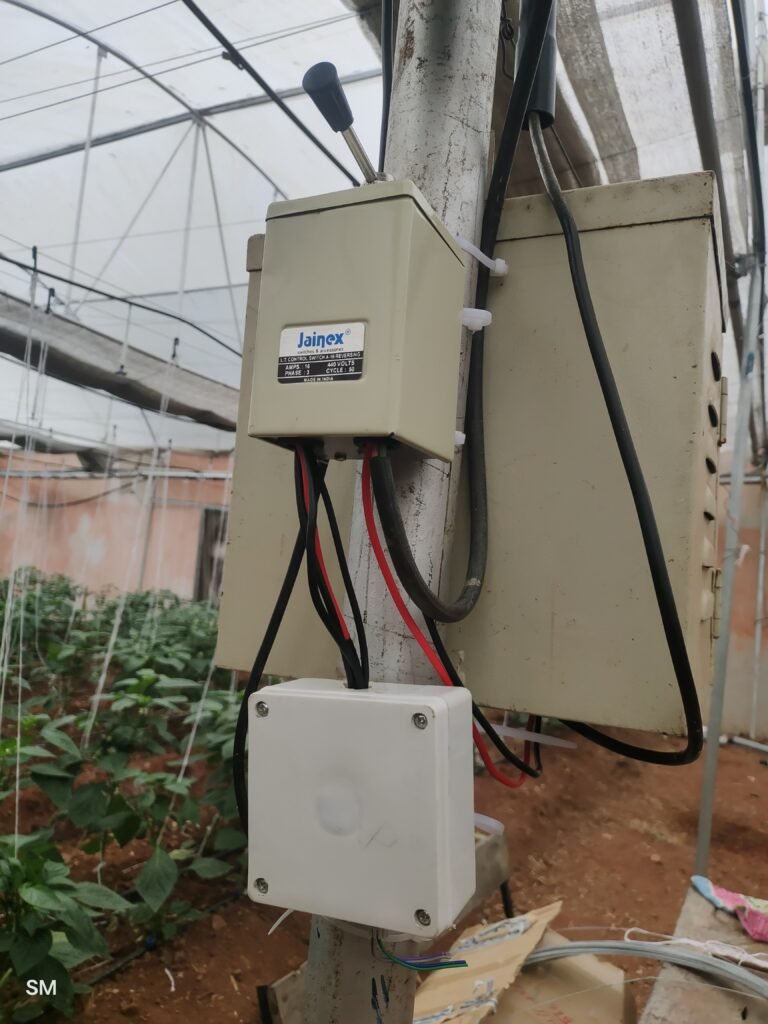
To handle the curtain movement, I’m using a single-phase induction motor that runs on a standard 230V AC supply. The tricky part was making it rotate in both directions one to open the curtain and the other to close it.

I achieved this by switching the current flow between the motor’s starting winding and running winding. It’s a classic method, but it works reliably. I’m using relays to manage the switching safely and accurately.
Limit Switches and Microcontroller
To make sure the curtain doesn’t overrun or get damaged, I’ve added limit switches at both ends. These switches act like checkpoints once the curtain is fully opened or fully closed, the corresponding switch cuts off the motor to prevent over-travel.
All of this is controlled by an XIAO ESP32-C3 microcontroller. It’s a compact board, but powerful enough for this task and it has built-in Wi-Fi, which opens the door for remote monitoring and control later on.

Custom PCB Design and Assembly
I also designed a custom PCB in KiCad to bring everything together motor control, relays, ESP32, Temperature sensor, power management, and connectors for the limit switches. I’ll be attaching some photos of the PCB in this blog to show how it looks.
Once the design was finalized, I soldered and assembled all the components by hand. There’s something really satisfying about seeing your own circuit design come to life and actually work.


What’s Next? This project is still in progress, but things are shaping up nicely. The next big step is to add a light spectrum sensor, so the system can automatically open or close the curtains based on real-time light intensity. That way, the crops get just the right amount of sunlight without anyone lifting a finger.
Eventually, I plan to connect the system to a cloud dashboard or mobile app for remote control and logging. But first, the mechanical part has to be bulletproof.
Connection Diagram

This diagram shows the connections between the motor and the controller. The motor is wired to a forward-reverse switch as well as a 2-channel relay, allowing it to rotate clockwise or counter-clockwise. A manual switch is included so the motor can still be operated in case of controller connectivity issues. Two limit switches are connected to let the controller detect whether the curtains are fully closed. The 2-channel relay switches current between the two windings of the motor to reverse its direction.
Code :
#define BLYNK_PRINT Serial

#define BLYNK_TEMPLATE_ID "TMPL36-RBqW1w"
#define BLYNK_TEMPLATE_NAME "Curtain Automation"
#define BLYNK_AUTH_TOKEN "GhGbn_sd-GZ7yPGwcj3xtqIQHrVa4fSm"

#include <WiFi.h>
#include <WiFiClient.h>
#include <BlynkSimpleEsp32.h>

char ssid[] = "TP-Link_7FE0";
char pass[] = "70497755";

#define RELAY1_PIN 26
#define RELAY2_PIN 27
#define LIMIT_SWITCH1_PIN 18
#define LIMIT_SWITCH2_PIN 19

BlynkTimer timer;
bool limitSwitchTriggered = false;

// Relay switching logic with delay
void switchRelays(int relay) {
  if (limitSwitchTriggered) {
    Serial.println("Limit switch active. Ignoring command.");
    digitalWrite(RELAY1_PIN, HIGH);
    digitalWrite(RELAY2_PIN, HIGH);
    return;
  }

  switch (relay) {
    case 1:
      digitalWrite(RELAY2_PIN, HIGH); // Turn OFF Relay 2 first
      delay(1000);
      digitalWrite(RELAY1_PIN, LOW);  // Turn ON Relay 1
      Serial.println("Relay 1 ON, Relay 2 OFF");
      break;

    case 2:
      digitalWrite(RELAY1_PIN, HIGH); // Turn OFF Relay 1 first
      delay(1000);
      digitalWrite(RELAY2_PIN, LOW);  // Turn ON Relay 2
      Serial.println("Relay 2 ON, Relay 1 OFF");
      break;

    case 0:
    default:
      digitalWrite(RELAY1_PIN, HIGH);
      digitalWrite(RELAY2_PIN, HIGH);
      Serial.println("Both Relays OFF");
      break;
  }
}

// V2 - Button for Relay 1 ON
BLYNK_WRITE(V1) {
  int state = param.asInt();
  if (state == 1) {
    switchRelays(1);
  } else {
    digitalWrite(RELAY1_PIN, HIGH);
    Serial.println("Relay 1 OFF");
  }
}

// V3 - Button for Relay 2 ON
BLYNK_WRITE(V2) {
  int state = param.asInt();
  if (state == 1) {
    switchRelays(2);
  } else {
    digitalWrite(RELAY2_PIN, HIGH);
    Serial.println("Relay 2 OFF");
  }
}

// Check limit switches
void checkLimitSwitches() {
  bool limit1 = digitalRead(LIMIT_SWITCH1_PIN) == LOW;
  bool limit2 = digitalRead(LIMIT_SWITCH2_PIN) == LOW;

  if ((limit1 || limit2) && !limitSwitchTriggered) {
    digitalWrite(RELAY1_PIN, HIGH);
    digitalWrite(RELAY2_PIN, HIGH);
    Serial.println("Limit switch triggered! Relays OFF");
    limitSwitchTriggered = true;
  }

  if (!limit1 && !limit2) {
    limitSwitchTriggered = false;
  }
}

void setup() {
  Serial.begin(115200);

  pinMode(RELAY1_PIN, OUTPUT);
  pinMode(RELAY2_PIN, OUTPUT);
  pinMode(LIMIT_SWITCH1_PIN, INPUT_PULLUP);
  pinMode(LIMIT_SWITCH2_PIN, INPUT_PULLUP);

  digitalWrite(RELAY1_PIN, HIGH);
  digitalWrite(RELAY2_PIN, HIGH);

  Blynk.begin(BLYNK_AUTH_TOKEN, ssid, pass);
  timer.setInterval(500L, checkLimitSwitches);
}

void loop() {
  Blynk.run();
  timer.run();
}
Blynk IOT :
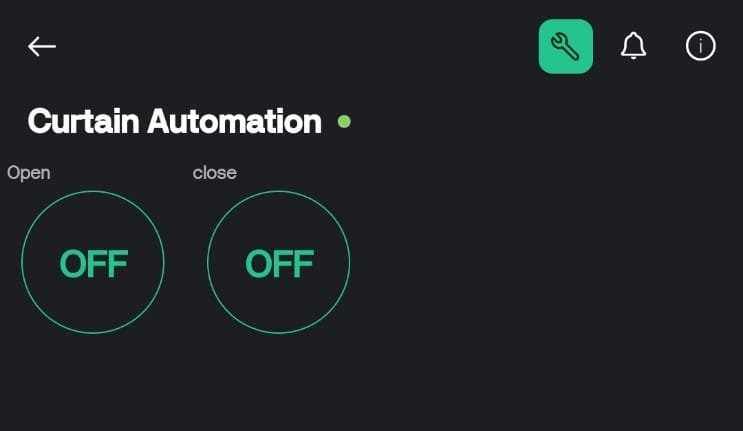
One of the key features I wanted in my smart curtain project was remote operation. To achieve this, I used an open-source loT platform called Blynk loT.
Blynk makes it easy to connect hardware projects to the cloud and control them through a mobile app or web dashboard. In my setup, I created two virtual switches within the Blynk mobile application. These switches act as simple controls for the curtain motor one for opening and the other for closing.
Whenever I press a button on the app, the command is sent to the Blynk cloud, which then communicates with my controller. The controller processes the signal and triggers the relay to rotate the motor in the correct direction. This allows me to move the curtains from anywhere with an internet connection.
What I really like about this setup is the flexibility it provides. The motor can still be operated manually with hardware switches, ensuring reliability even if there’s a connectivity issue. But when connected to the internet, Blynk adds a layer of convenience by enabling me to control the curtains remotely with just a tap on my phone.
Working –
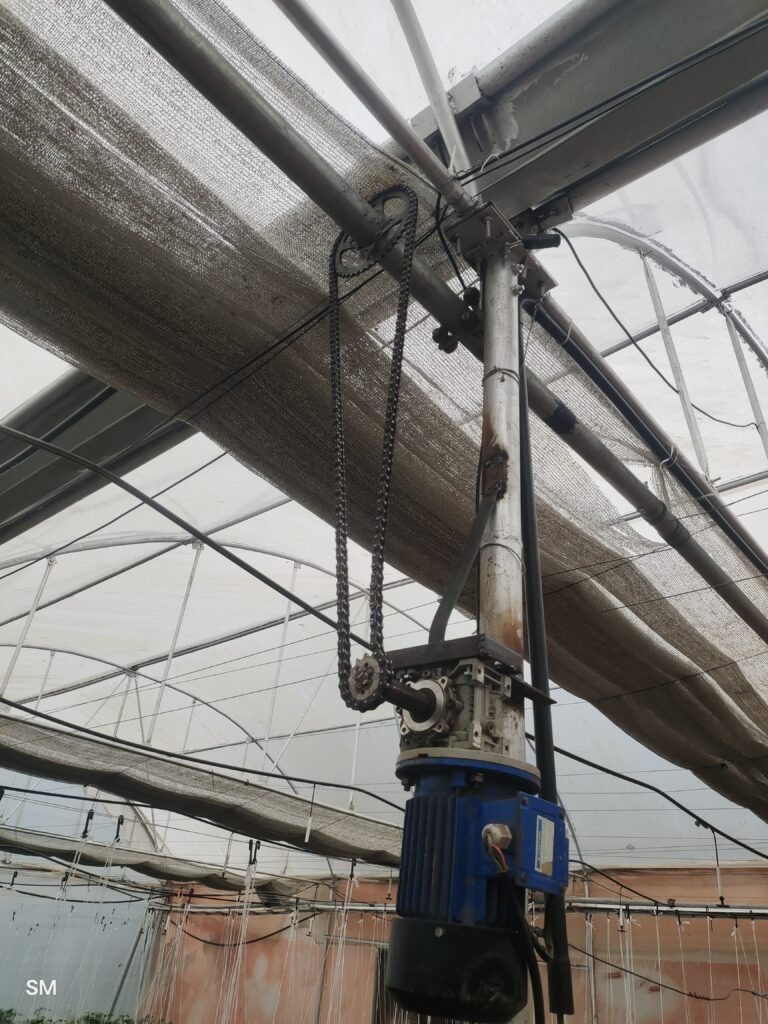
In our polyhouse, we’ve set up an automation system that takes care of opening and closing the curtains with just the push of a button. At the heart of this setup is a three-phase induction motor, which is controlled by a 2-channel relay module. This relay switches the current between the motor windings, allowing it to rotate in both directions clockwise and counterclockwise. The motor itself is mounted on a vertical pole and connected to a horizontal pole at the top of the polyhouse through a simple chain and sprocket drive. This horizontal pole works like the backbone of the system, pulling or releasing the curtains across the entire structure. When the motor rotates clockwise, the curtains close, and when it rotates counterclockwise, they open, giving us complete centralized control. And just in case we ever want to operate the system by hand, we’ve also added a forward-reverse switch that lets us open or close the curtains manually. It’s a neat blend of automation and practicality that makes managing the polyhouse a lot easier.
Lux Measurement
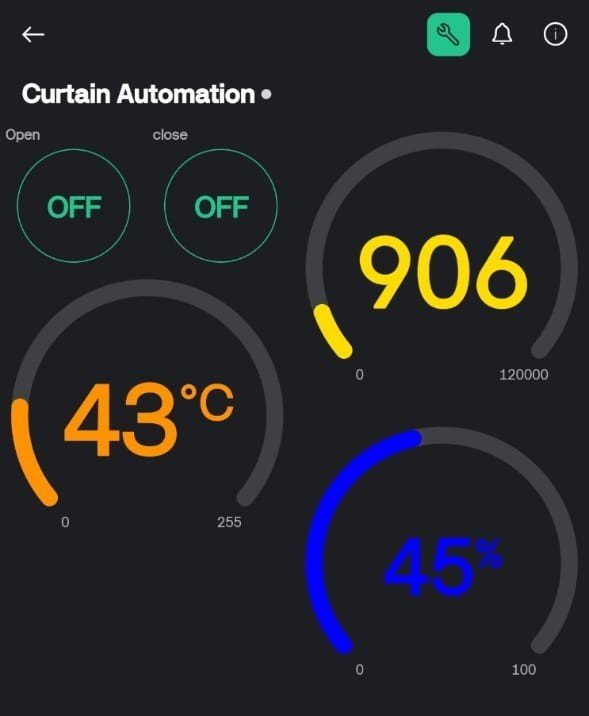
To optimize the curtain automation system, a VEML7700 digital ambient light sensor has been integrated to precisely measure sunlight intensity and provide real-time lux readings. In addition, a temperature and humidity sensor and an audio buzzer module have been incorporated to enhance environmental monitoring and alert functionalities.
The buzzer is triggered when the measured light intensity exceeds the predefined lux threshold suitable for polyhouse plantation conditions, ensuring proper regulation of environmental parameters. Both the buzzer and the temperature–humidity sensor are interfaced with the microcontroller located within the main control panel. Furthermore, all real-time sensor data and motor control operations are visualized through the Blynk IoT platform, enabling remote monitoring and system management.
Code with temperature and Lux monitoring –
// Polyhouse Automation - By_SM
#define BLYNK_PRINT Serial
#define BLYNK_TEMPLATE_ID "TMPL36-RBqW1w"
#define BLYNK_TEMPLATE_NAME "Curtain Automation"
#define BLYNK_AUTH_TOKEN "GhGbn_sd-GZ7yPGwcj3xtqIQHrVa4fSm"
#include <WiFi.h>
#include <WiFiClient.h>`
#include <BlynkSimpleEsp32.h>
// ----------------- WiFi Credentials -----------------
char ssid[] = "Polyhouse";
char pass[] = "Polyhouse";
// ----------------- Pin Definitions -----------------
#define RXD2 16
#define TXD2 17
#define BUZZER_PIN 25
#define RELAY1_PIN 26
#define RELAY2_PIN 27
#define LIMIT_SWITCH1_PIN 18
#define LIMIT_SWITCH2_PIN 19
// ----------------- Blynk Virtual Pins -----------------
#define VPIN_RELAY1 V1
#define VPIN_RELAY2 V2
#define VPIN_LUX V3
#define VPIN_TEMPERATURE V4
#define VPIN_HUMIDITY V5
// ----------------- Sensor Data Struct -----------------
struct SensorData {
float lux;
float temp;
float humidity;
};
String payload;
SensorData extracted_data = {0, 0, 0};
// ----------------- Timing Variables -----------------
unsigned long lastRequestTime = 0;
const unsigned long requestInterval = 2000; // 2 seconds
unsigned long lastPrintTime = 0;
const unsigned long printInterval = 1000; // 1 second
// ----------------- Blynk and Timer -----------------
BlynkTimer timer;
bool limitSwitchTriggered = false;
// ----------------- FUNCTION DECLARATIONS -----------------
String readSerialMessage();
SensorData parseData(String input);
void checkLimitSwitches();
void switchRelays(int relay);
// ----------------- RELAY CONTROL LOGIC -----------------
void switchRelays(int relay) {
if (limitSwitchTriggered) {
Serial.println("Limit switch active. Ignoring command.");
digitalWrite(RELAY1_PIN, HIGH);
digitalWrite(RELAY2_PIN, HIGH);
return;
}
switch (relay) {
case 1:
digitalWrite(RELAY2_PIN, HIGH);
delay(1000);
digitalWrite(RELAY1_PIN, LOW);
Serial.println("Relay 1 ON, Relay 2 OFF");
break;
case 2:
digitalWrite(RELAY1_PIN, HIGH);
delay(1000);
digitalWrite(RELAY2_PIN, LOW);
Serial.println("Relay 2 ON, Relay 1 OFF");
break;
default:
digitalWrite(RELAY1_PIN, HIGH);
digitalWrite(RELAY2_PIN, HIGH);
Serial.println("Both Relays OFF");
break;
}
}
// ----------------- BLYNK CONTROL -----------------
BLYNK_WRITE(VPIN_RELAY1) { // Button for Relay 1
int state = param.asInt();
if (state == 1) switchRelays(1);
else digitalWrite(RELAY1_PIN, HIGH);
}
BLYNK_WRITE(VPIN_RELAY2) { // Button for Relay 2
int state = param.asInt();
if (state == 1) switchRelays(2);
else digitalWrite(RELAY2_PIN, HIGH);
}
// ----------------- LIMIT SWITCH LOGIC -----------------
void checkLimitSwitches() {
bool limit1 = digitalRead(LIMIT_SWITCH1_PIN) == LOW;
bool limit2 = digitalRead(LIMIT_SWITCH2_PIN) == LOW;
if ((limit1 || limit2) && !limitSwitchTriggered) {
digitalWrite(RELAY1_PIN, HIGH);
digitalWrite(RELAY2_PIN, HIGH);
Serial.println("Limit switch triggered! Relays OFF");
limitSwitchTriggered = true;
}
if (!limit1 && !limit2) {
limitSwitchTriggered = false;
}
}
// ----------------- SETUP -----------------
void setup() {
Serial.begin(115200);
Serial2.begin(115200, SERIAL_8N1, RXD2, TXD2);
// Pin modes
pinMode(BUZZER_PIN, OUTPUT);
pinMode(RELAY1_PIN, OUTPUT);
pinMode(RELAY2_PIN, OUTPUT);
pinMode(LIMIT_SWITCH1_PIN, INPUT_PULLUP);
pinMode(LIMIT_SWITCH2_PIN, INPUT_PULLUP);
digitalWrite(BUZZER_PIN, LOW);
digitalWrite(RELAY1_PIN, HIGH);
digitalWrite(RELAY2_PIN, HIGH);
// Blynk and Timer
Blynk.begin(BLYNK_AUTH_TOKEN, ssid, pass);
timer.setInterval(500L, checkLimitSwitches);
// Send sensor data to Blynk every 2 seconds
timer.setInterval(2000L, []() {
Blynk.virtualWrite(VPIN_LUX, extracted_data.lux);
Blynk.virtualWrite(VPIN_TEMPERATURE, extracted_data.temp);
Blynk.virtualWrite(VPIN_HUMIDITY, extracted_data.humidity);
});
Serial.println("Init Done");
}
// ----------------- MAIN LOOP -----------------
void loop() {
Blynk.run();
timer.run();
unsigned long currentMillis = millis();
// Request new sensor data periodically
if (currentMillis - lastRequestTime >= requestInterval) {
lastRequestTime = currentMillis;
Serial2.print('1');
}
// Read incoming sensor data
payload = readSerialMessage();
if (payload != "") {
extracted_data = parseData(payload);
payload = "";
// Buzzer alert on high lux
if (extracted_data.lux > 25000) {
Serial.println("⚠ Lux threshold exceeded! Buzzing...");
digitalWrite(BUZZER_PIN, HIGH);
delay(500);
digitalWrite(BUZZER_PIN, LOW);
}
}
// Print sensor data to serial
if (currentMillis - lastPrintTime >= printInterval) {
lastPrintTime = currentMillis;
Serial.print("Lux: "); Serial.print(extracted_data.lux);
Serial.print(" Temp: "); Serial.print(extracted_data.temp);
Serial.print(" Humidity: "); Serial.println(extracted_data.humidity);
}
}
// ----------------- SENSOR MESSAGE HANDLING -----------------
String readSerialMessage() {
static String buffer = "";
while (Serial2.available() > 0) {
char c = (char)Serial2.read();
if (c == '*') {
buffer = "*";
} else if (c == '@') {
buffer += "@";
String completeMsg = buffer;
buffer = "";
return completeMsg;
} else {
if (buffer.length() > 0) buffer += c;
}
}
return "";
}
SensorData parseData(String input) {
SensorData data = {0, 0, 0};
if (input.startsWith("*") && input.endsWith("@")) {
input.remove(0, 1);
input.remove(input.length() - 1);
int firstHash = input.indexOf('#');
int secondHash = input.indexOf('#', firstHash + 1);
if (firstHash > 0 && secondHash > firstHash) {
String luxStr = input.substring(0, firstHash);
String tempStr = input.substring(firstHash + 1, secondHash);
String humStr = input.substring(secondHash + 1);
data.lux = luxStr.toFloat();
data.temp = tempStr.toFloat();
data.humidity = humStr.toFloat();
}
}
return data;
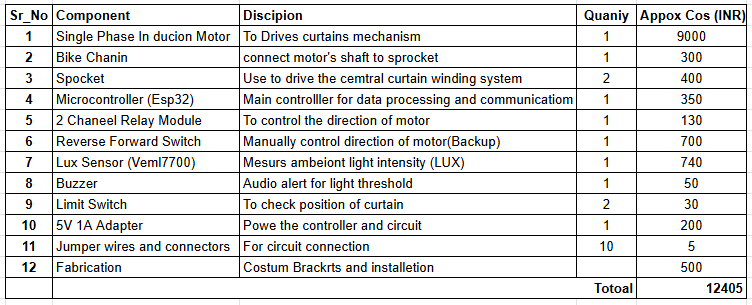
}Bill of Material


