- Introduction:-
In today’s modern age the use of electricity is increasing day by day. Also, due to the high rate of population growth, we have not been able to estimate the amount of electricity consumed per capita in Maharashtra. Also, due to the population growth, we have not been able to use the source of electricity generation as much as we want. This is because some of the sources of electricity are naturally abundant and free. Converting the energy of sunlight into electrical energy, such as sunlight, water, wind, ocean waves, creates a lot of money and technical difficulties.
There are geographical difficulties in converting wind and ocean waves into electrical energy. Because these things are not available in abundance everywhere. If we consider water resources, then to date, we have only built a few dams to generate electricity from that water. Only three to five percent of the energy we get for free has been used to convert electricity. In artificial power generation, we use electricity generated from coal and chemical sources. But according to a geographical survey, our country has coal reserves of about 40 to 50 years. Also, the capacity to generate electricity from coal is 29 to 30 percent. Also, considering the chemical source, the chemical source in our country has to be taken from another country. It is also understood that the use of technology abroad is humanely appropriate. Using both coal and chemical sources, we generate about 65 to 70 percent of the electricity we use today.
- Problem identification:-
Considering all the above factors, it is clear that we need to save electricity. Today, every person needs electricity from waking up in the morning to sleeping at night, and considering the foresight, there is no denying the possibility of a huge difference between the power source and the electricity required in our country in the next 25 years. Therefore, saving electricity from today is very necessary and time-consuming. For this, we did a small experiment in which the light would turn on automatically when a person went to the bathroom and would turn off when the person comes out.
- Objectives:-
- To save electricity and make system economically viable.
- Component list:-:-
- Arduino Uno
- Ultrasonic sensor
- 5v adapter
- 5V relay
- Jumper wire
- Light
- SMPS
- Arduino IDE (software)
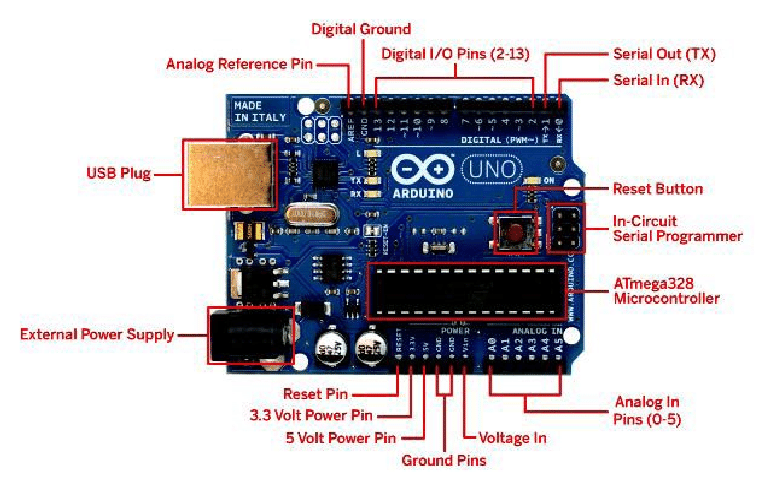
- Arduino Uno
Arduino Uno is a controller board that includes an Atmegha328 microcontroller IC, analog and digital pins on the left and right sides respectively, a USB port for uploading code, as well as a power jack for the power supply, are located on the top. When you give Arduino input, it produces output. As in this experiment, an ultrasonic sensor was used as input and the output is light. The ultrasonic sensor’s digital pin and the relay’s signal pin are connected to the digital pins of Arduino and ultrasonic sensor and relay receives power supply through Arduino shown in the figure.
- Ultrasonic sensor :-
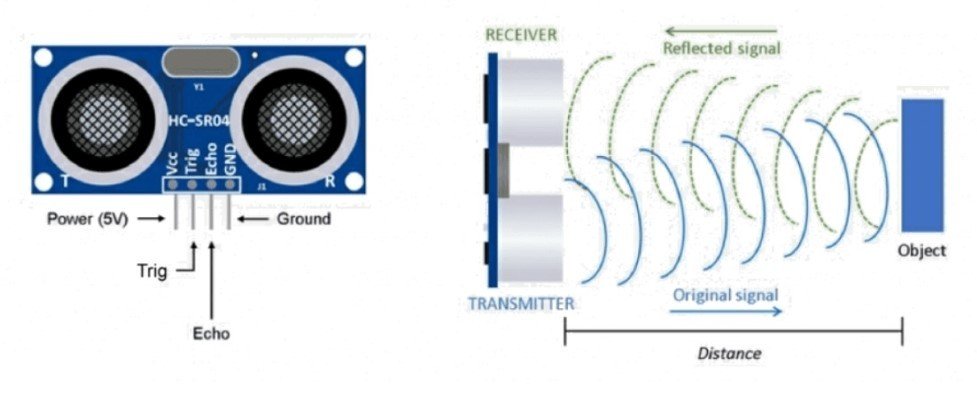
Ultrasonic has four pins as shown in the figure. Positive (5 v), trigger pin, echo pin, and ground (-) pin. In ultrasonic two circular circles are visible, sound waves emanating from one circular circle. When the sensor senses obstacles, the sound waves go back to the second circle of the sensor, after which the ultrasonic sensor sends a signal to the Arduino. The relay starts by sending a signal to the Arduino relay and the light force starts.
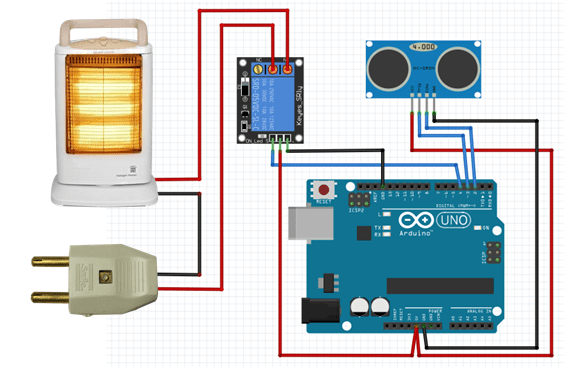
- Circuit diagram :-
- System Code : –
int distance;
int duration;
#define triggerpin 10
#define ecopin 11

void setup() {
  // put your setup code here, to run once:
  pinMode(triggerpin , OUTPUT);
  pinMode(ecopin,INPUT);
  pinMode(9 , OUTPUT);
  digitalWrite(9 ,HIGH);
Serial.begin(9600);
}

void loop() {
  // put your main code here, to run repeatedly:
digitalWrite(triggerpin,LOW);
delayMicroseconds(2);
digitalWrite(triggerpin, HIGH);
delayMicroseconds(10);
digitalWrite(triggerpin,LOW);
delayMicroseconds(2);
duration = pulseIn(ecopin,HIGH);
distance = duration * 0.034/2;
Serial.print("distance = ");
Serial.print(distance);
Serial.println("cm");
delay(1000);
if (distance <=90)
{
  digitalWrite(9 , LOW);
 //delay(10000);
 // digitalWrite( 9 ,HIGH);

  }
else
{
  digitalWrite( 9 ,HIGH);
  }
}
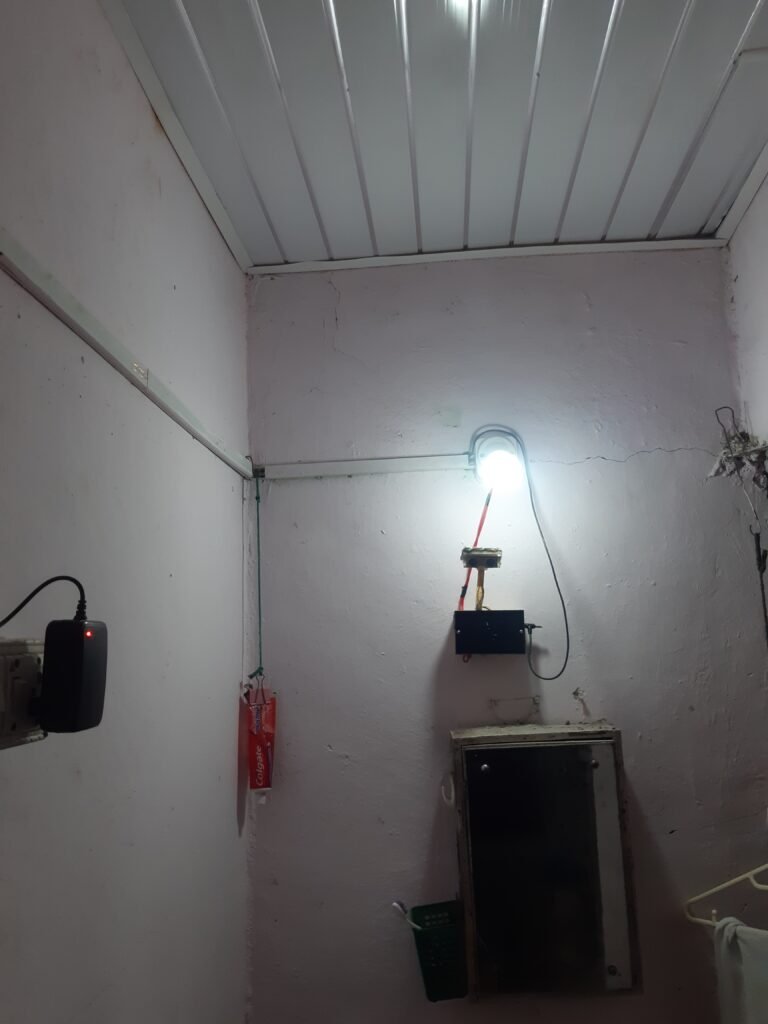
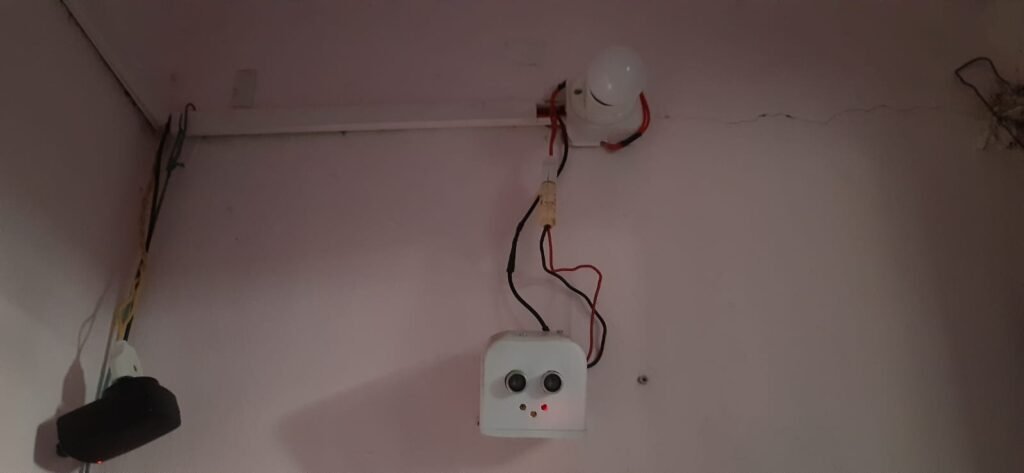
- Experimental setup : –
Installation place

Problems encountered while working on the project: –
- If the wire connection made in this project is not done properly, there may be a problem with this project.
- Furthermore, before uploading, the code must be double-checked.
- If the Arduino Uno fitted adapters do not function properly, they can cause issues in your project. While I was preparing,I had to deal with all of these difficulties.
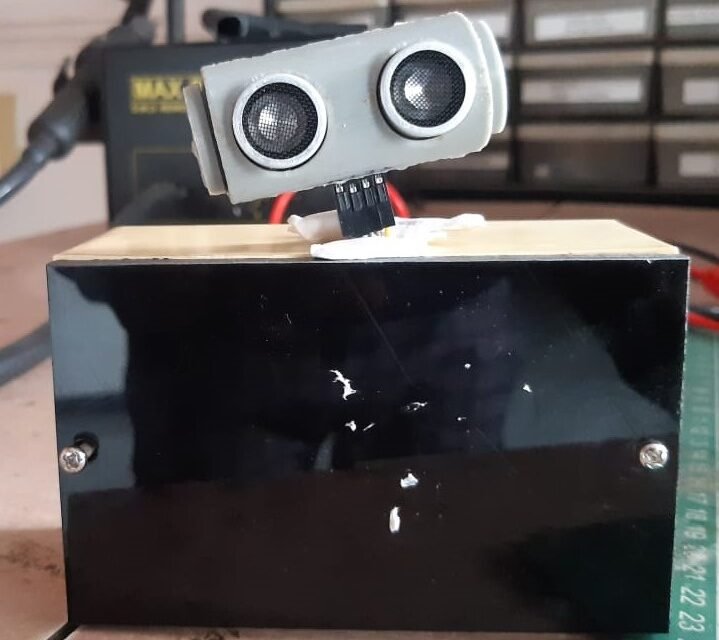
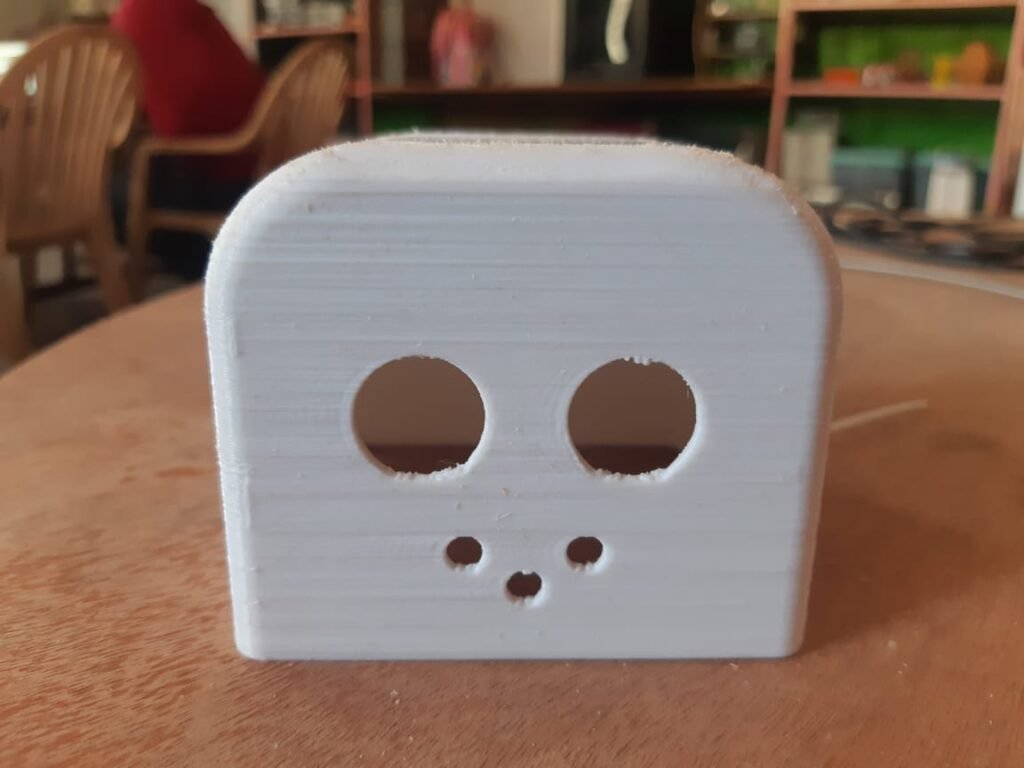
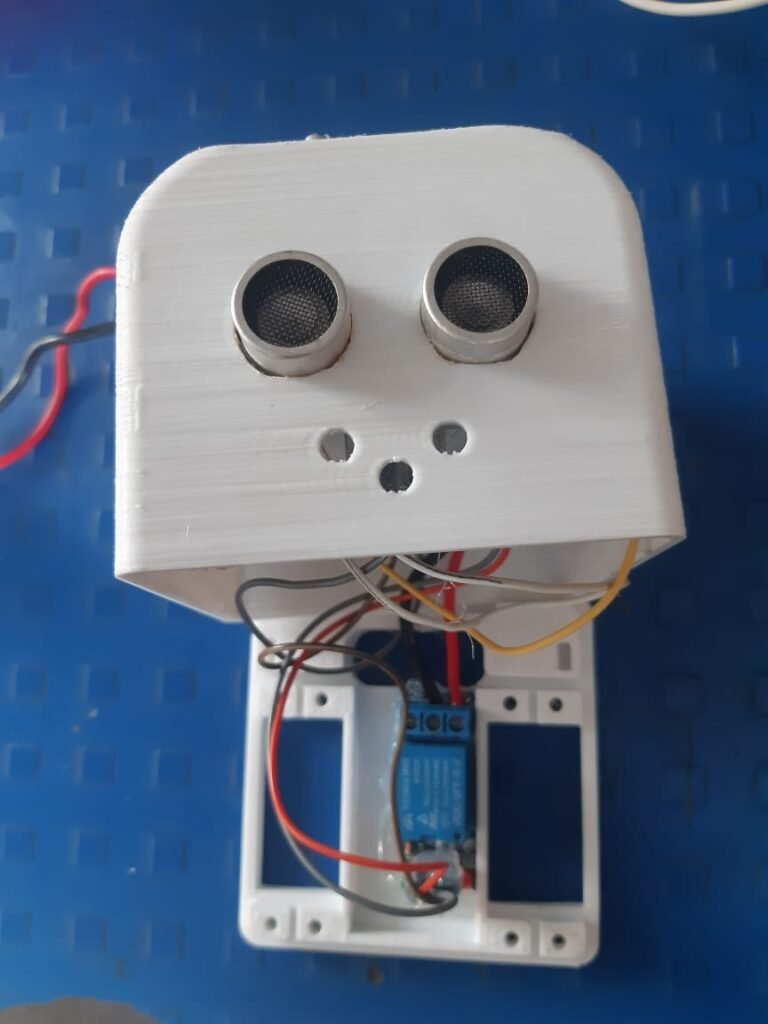
After that, I dismantled everything and decided to rebuild everything, so I used a robotic head. this head print is on 3d print. this file is available at the given link https://wikifactory.com/+OttoDIY/tito/files/3D%20Printed%20Files

And installed an Arduino and an ultrasonic sensor, relay double-checked all connections and uploaded the code, and everything worked.

All tests properly then we decided to install it in the bathroom also check it 4 to 5 times it working or not.
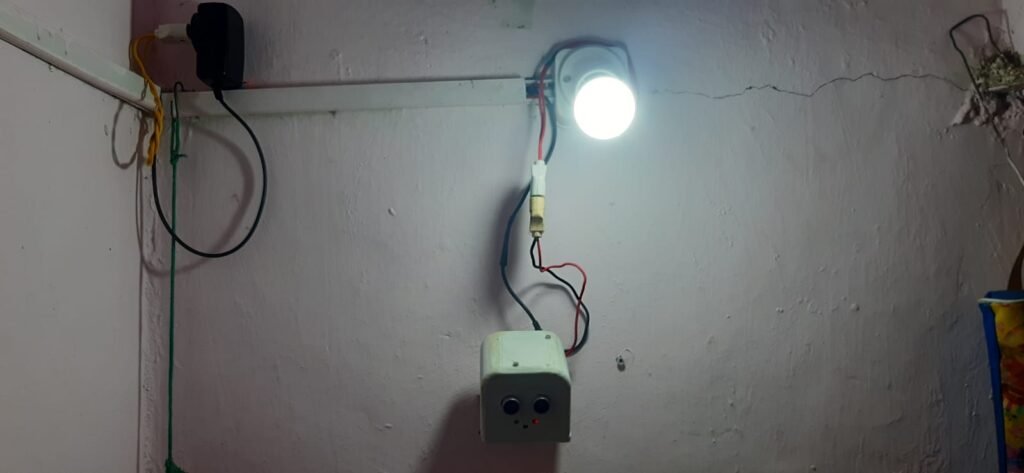
How it works:- You put an Arduino and ultrasonic sensor in the robot’s head. the ultrasonic sensor looks like a robot’s eye. If an object or a person comes in front of it, the sensor is activated and it sends a signal to Arduino. Arduino received single and send single to relay when the relay is on when the light is on and after 5 minutes light off. it’s showing the video below.

