INTRODUCTIO
A flat bed solar dryer is an efficient and eco-friendly system designed to remove moisture from agricultural products by utilizing solar energy. This type of solar dryer features a flat surface or tray—commonly referred to as the drying bed—on which the produce is evenly spread out in a thin layer for optimal exposure to sunlight. The structure is typically enclosed with a transparent cover, such as glass or clear plastic, which allows solar radiation to enter while simultaneously trapping heat inside the chamber. This greenhouse-like effect increases the internal temperature and accelerates the drying process by promoting moisture evaporation.
DESCRIPTION
A flat bed dryer is a type of dryer which is commonly used in small and medium scale farming operations . It helps to remove moisture to prevent spoilage and improve shelf life . As the material dries , it can be easily removed from the bed , making the flat bed dryer a simple and efficient way to dry a variety of products .The flat bed solar dryer also protects the produce from contamination by dust, insects, and rain, making it more hygienic than open sun drying. It is particularly well-suited for drying a variety of agricultural goods such as vegetables, fruits, herbs, spices, and medicinal plants. The system is simple to construct, cost-effective, and highly beneficial for small-scale farmers and rural communities, helping to preserve food, reduce post-harvest losses, and extend shelf life.
28/02/2025
Abhijeet Sir informed us that the new version of the flat bed dryer would be constructed using polycarbonate sheets instead of the previously used materials. Polycarbonate was chosen for its high durability, excellent light transmission, impact resistance, and ability to withstand outdoor conditions—making it an ideal material for solar drying applications.
Following this instruction, we began by carefully reviewing the updated design and dimensions of the dryer. We measured the total surface area that needed to be covered with polycarbonate sheets, including the top cover, side panels, and any additional sections requiring transparent or semi-transparent covering.

Once all areas were measured, we totaled the surface area and compared it with the standard size of available polycarbonate sheets in the market.
Based on our calculations and the dimensions of each sheet, we were able to determine the exact number of polycarbonate sheets required for the construction. We also accounted for a small margin of extra material to cover any cutting errors, fitting adjustments, or future repairs.
This detailed planning step ensured that we would have the right quantity of material, minimized waste, and helped us prepare for the installation process smoothly and efficiently.
01/03/2025
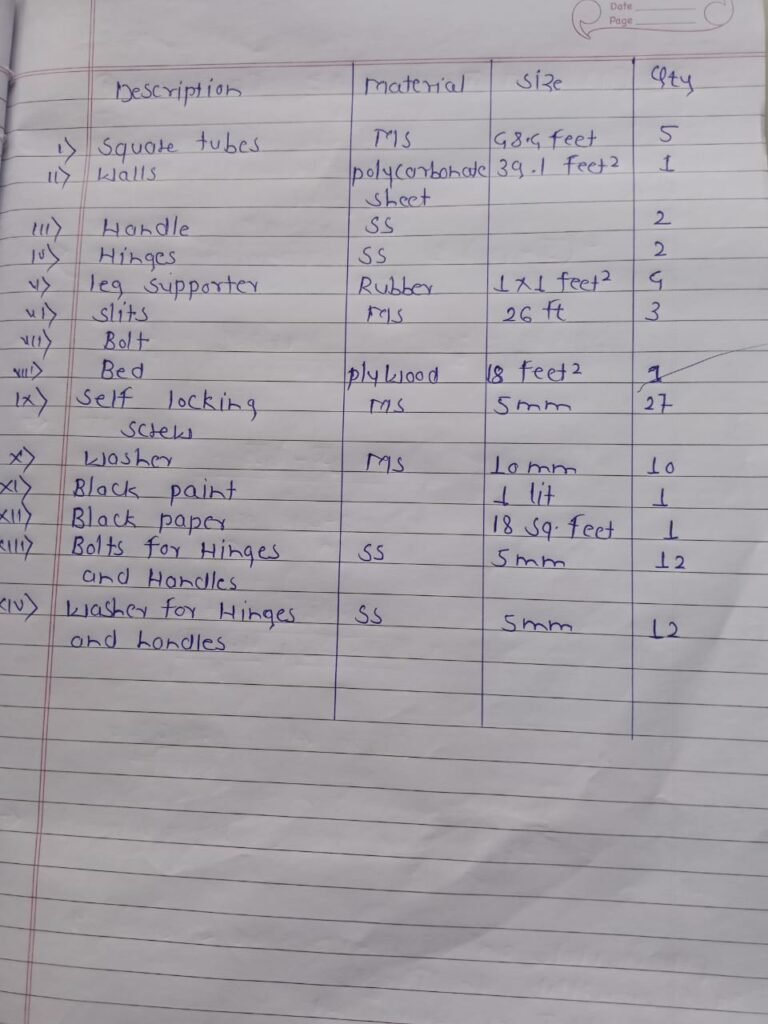
After meeting with Prasad sir we decided the next step of our work . We calculated the dimensions of square tube and total area required . Also calculate the total amount of polycarbonate sheet used .We conducted a thorough, hands-on inspection of the earlier version of the flat bed dryer to identify any performance issues. During this assessment, we discovered that one of the primary causes of heat loss was the presence of noticeable gaps between the joined plywood sheets used in the base structure. These gaps allowed warm air to escape, reducing the internal temperature and overall drying efficiency of the system.

This issue was particularly concerning because maintaining a consistent internal temperature is crucial for effective drying. The uncontrolled heat loss not only slowed down the drying process but also led to uneven drying of the materials inside.
To address this challenge and improve the performance of the new model, we explored several possible solutions:
- Sealing the Gaps:
We considered sealing the joints between the plywood sheets using high-temperature-resistant sealants or insulating tapes. This would help create an airtight seal to prevent hot air from escaping through the gaps. - Using Single-Sheet Plywood:
Another solution was to use a single, large sheet of plywood to avoid joints altogether. This would eliminate the risk of gaps forming between multiple sheets and enhance the base’s structural integrity. - Overlapping Design:
We also explored redesigning the plywood layout with an overlapping edge system, where one sheet slightly covers the edge of the other. This overlap would reduce the chance of direct gaps and help trap heat more effectively. - Thermal Insulation Layer:
Adding an insulating layer beneath the plywood base—such as a foam or reflective material—could further reduce heat loss and help retain warmth inside the dryer chamber.
By identifying these issues and researching practical solutions, we aimed to significantly improve the thermal efficiency and overall performance of the upgraded flat bed dryer.
04/03/2025
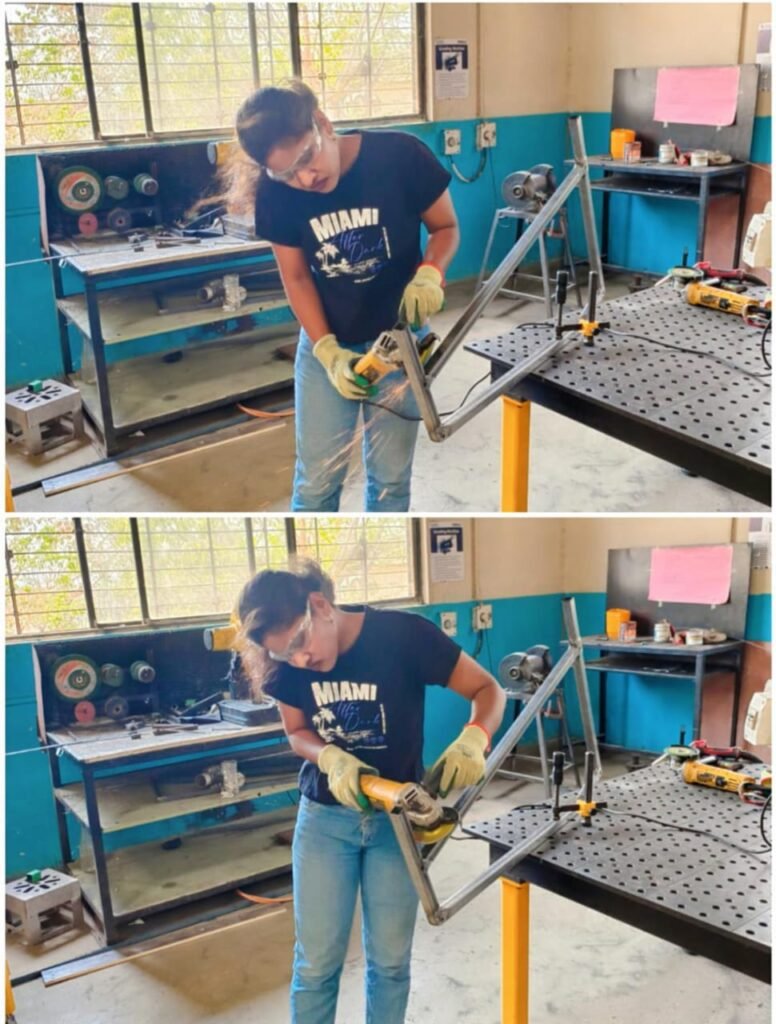
That day we visited the Fab Lab for some fabrication work . We began the fabrication process for the flat bed dryer by cutting the square metal tubes according to the updated design specifications. These measurements were based on a revised plan that included several key improvements aimed at increasing the durability, efficiency, and ease of assembly of the dryer.

Modifications we implemented:
- Use of Polycarbonate Sheets:
Instead of traditional transparent covers like glass or plastic film, we chose to use polycarbonate sheets. These sheets are lightweight, impact-resistant, and provide excellent light transmission, which made them ideal for enhancing the performance and lifespan of the dryer. - Replacement of L-Angles with Square Tubes:
To improve the strength and stability of the structure, we replaced the previously used L-angles with square metal tubes. Square tubes offered better load-bearing capacity and made the frame more robust and suitable for supporting the overall weight of the dryer components. - Sheet Installation Through Slits:
Unlike the earlier approach of fixing the sheets by drilling holes and fastening them with nuts and bolts, we decided to create narrow slits in the frame for inserting the polycarbonate sheets. This method simplified the assembly process, reduced the need for hardware, and made the overall design cleaner and more efficient. - Foldable Structure:
A major upgrade was designing the entire dryer to be foldable. This feature made the dryer more portable and easy to store when not in use. It also allowed for easier transportation, especially for users in rural or remote areas. - Black Paper Sheet on Plywood Base:
Instead of painting the plywood base, we opted to cover it with a 350-micron black paper sheet. This black surface helped absorb more heat from sunlight, improving the drying efficiency by increasing the internal temperature of the dryer.
With all these modifications in place, we moved forward with the fabrication work, making sure each component was prepared with precision to match the improved design.

10/03/2025
That day after meeting with Prasad sir we learned the powder coating and painting . We learned about the powder coating process, which was a dry finishing method used to apply a tough and protective layer to metal and other suitable materials. Unlike traditional liquid painting, this process involved spraying a fine powder—made from a mix of resins, pigments, and plastic particles—onto the surface of the object. An electrostatic charge was used during spraying, which helped the powder stick evenly to the surface.
Once the powder had fully covered the object, the coated material was placed in an oven. Inside the oven, the powder melted and flowed over the surface, eventually curing into a smooth, hard, and durable finish. This process not only improved the object’s appearance but also increased its resistance to scratches, corrosion, and general wear and tear.
Some of the key advantages we found in powder coating were:
- Durability: It provided a strong, long-lasting finish that was more durable than regular paint, making it ideal for products exposed to harsh conditions or heavy use.
- Environmentally Friendly: It was an environmentally friendly process, as it produced less waste and didn’t use harmful solvents. The powder was also 100% recyclable, making it more sustainable than traditional methods.
- Consistency: It offered a more even and consistent coating with fewer flaws, as the electrostatic spray ensured that the powder was applied uniformly across the surface.
- Aesthetic Flexibility: It came in a wide range of colors and finishes, including matte, glossy, and textured options, which provided flexibility in design and aesthetics for different applications.
11/03/2025
We learned about the powder coating process, which was a dry finishing method used to apply a tough and protective layer to metal and other suitable materials. Unlike traditional liquid painting, this process involved spraying a fine powder—made from a mix of resins, pigments, and plastic particles—onto the surface of the object. An electrostatic charge was used during spraying, which helped the powder stick evenly to the surface.
Once the powder had fully covered the object, the coated material was placed in an oven. Inside the oven, the powder melted and flowed over the surface, eventually curing into a smooth, hard, and durable finish. This process not only improved the object’s appearance but also increased its resistance to scratches, corrosion, and general wear and tear.
Some of the key advantages we found in powder coating were:
- It provided a strong, long-lasting finish that was more durable than regular paint.
- It was environmentally friendly, as it produced less waste and didn’t use harmful solvents.
- It offered a more even and consistent coating with fewer flaws.
- It came in a wide range of colors and finishes, giving flexibility in design.
Overall, powder coating proved to be a reliable and efficient method for protecting and finishing metal surfaces.

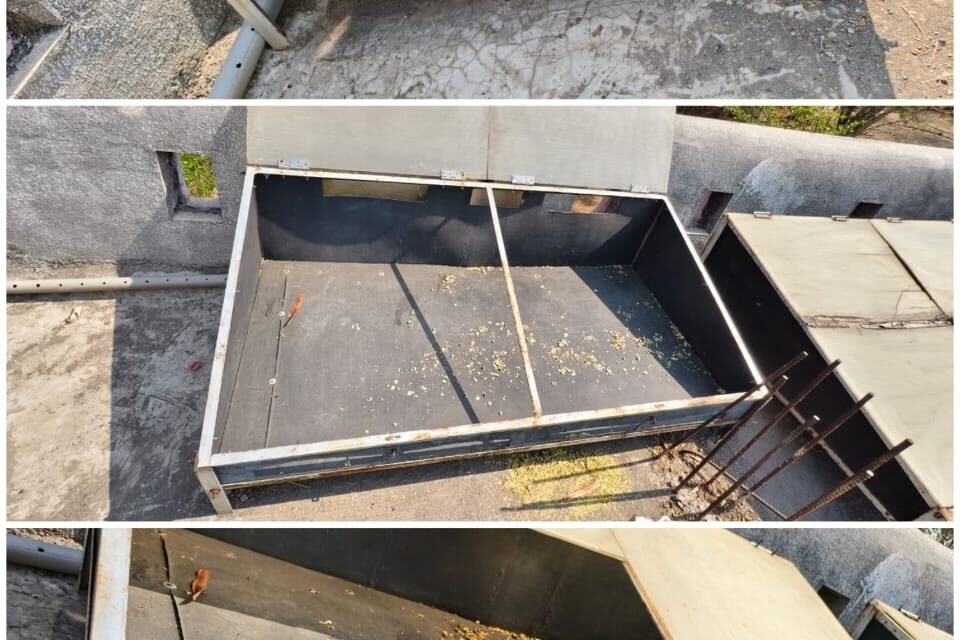
12/03/2025
We faced some problems with the first frame, as it didn’t fit well, so we decided to rebuild it completely. First, we carefully checked what went wrong, then redesigned the frame with better measurements and structure. After that, we cut and ground all the metal parts for the new frame using proper tools. We made sure each piece was the correct size, with smooth edges, so everything would fit together tightly and give the frame good strength and balance.
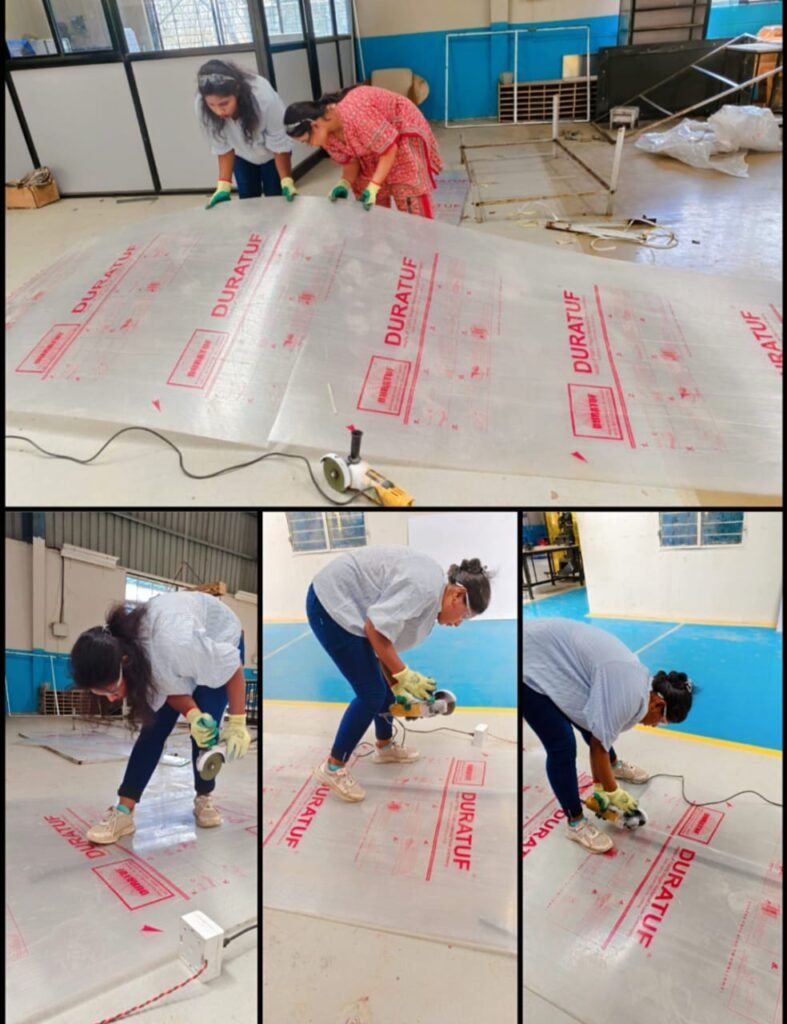
Once the frame was ready, we moved on to the polycarbonate sheets. These clear sheets would cover parts of the dryer and help trap heat. We measured and cut them based on the new frame’s size. Each sheet was cut carefully to make sure there were no cracks or rough edges, and that they would fit perfectly into their spaces in the frame without any gaps.
With both the new frame and all the polycarbonate sheets ready and cut to the right sizes, we were fully prepared to move on to the next steps of building the solar dryer.

15 /03/2025
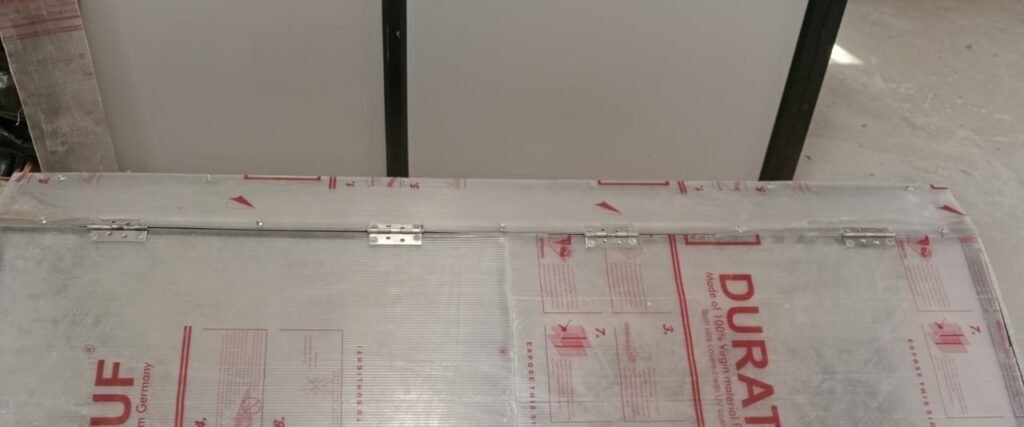
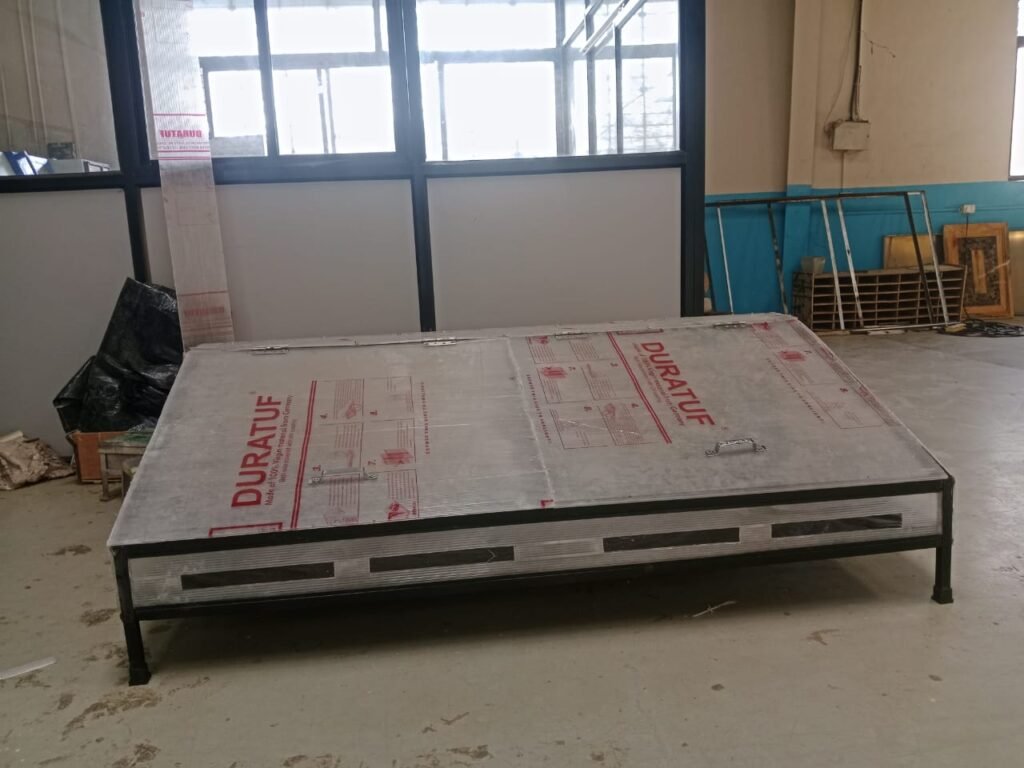
To install the polycarbonate sheets, we first drilled thin slits into the frame where the sheets needed to go. We made sure the slits were straight and in the right place so the sheets would fit properly and stay secure.
After making the slits, we carefully slid the polycarbonate sheets into them. We made sure each sheet went in smoothly and fit evenly without any bending or gaps. The sheets were handled gently to avoid any scratches or damage. Once in place, the model started to look much better and more complete.
We then added some extra supports to keep the sheets steady and made small adjustments to the frame to improve the fit. By the end, the polycarbonate sheets were perfectly fitted, making the model stronger and giving it a cleaner, more finished look.
16/03/2025
To get the frame structure ready for powder coating, we began by thoroughly sanding the surface with sandpaper to achieve a smooth and even finish. This step was important to help the coating adhere properly. Following this, we applied a diluted acid solution with a 100:1 water-to-acid ratio to all parts of the frame. The acid was left on the surface for 15 minutes to remove any remaining impurities or oxidation.
After the waiting period, we wiped down each component with a damp cloth to remove the acid residue and then allowed them to dry completely. Once the components were fully dry, we moved forward with the powder coating process, carefully applying an even coat to each part.
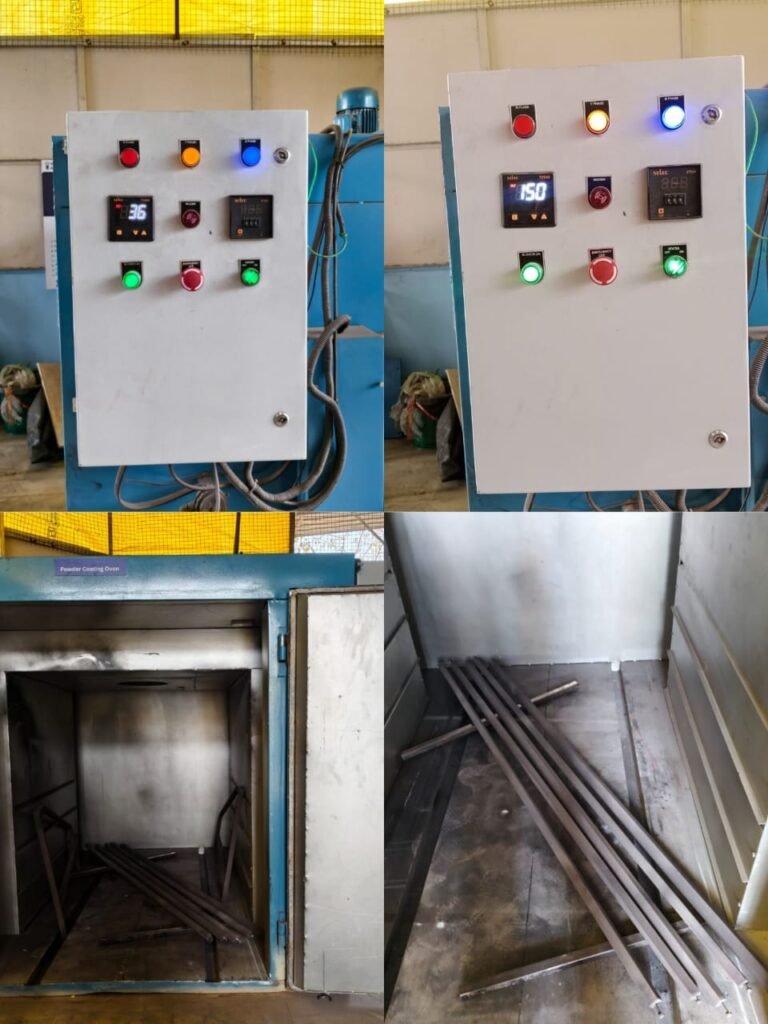
Once the coating was applied, the components were placed in an oven set to a starting temperature of 36°C. The temperature was gradually increased until it reached 150°C. At that point, we turned off the heater to stop the rise in temperature. Since it was evening, we also shut off the blower and opened the top window of the oven to allow proper ventilation. The coated parts were then left inside the oven overnight, allowing them to cool down slowly and naturally, which helped the coating cure evenly and ensured a durable finish.
17/03/2025
After completing the powder coating process, we allowed the components to cool before carefully removing them from the curing oven, ensuring that the freshly applied coating remained smooth and undamaged. With all coated parts set aside, we moved on to preparing the base structure of the solar dryer.
Using a wood cutter machine, we accurately cut a plywood sheet to the dimensions of 6 feet by 3 feet. This sheet would serve as the main base platform for the solar dryer, supporting all other components and playing a key role in maintaining structural integrity.
To ensure proper airflow and ventilation within the dryer, we also created air vents in both the front and rear sections of the plywood base. In the front panel, we made four evenly spaced vents, each measuring 32 cm in length and 3.5 cm in height. These would allow fresh air to enter the system. On the back side, we cut three larger vents, each measuring 41 cm by 8 cm, which would help facilitate the outflow of warm, moist air during the drying process.
These carefully measured and strategically placed vents were essential for maintaining consistent air circulation, preventing moisture buildup, and ensuring the solar dryer would function efficiently once fully assembled.

19/03/2025
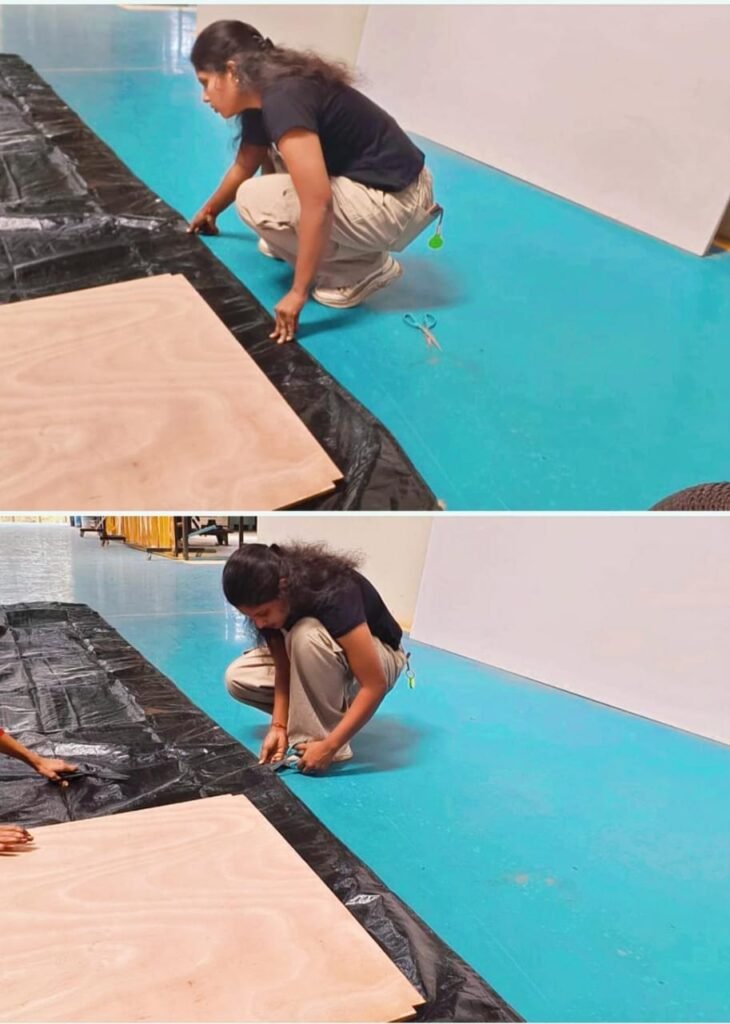
We precisely measured and cut a sheet of black paper to match the exact dimensions of the plywood base, ensuring a clean and accurate fit. This step was crucial, as the black paper would serve as the primary heat-absorbing surface for the solar dryer. The dark color of the paper is effective in absorbing sunlight, which helps to increase the internal temperature of the dryer, thereby improving its drying efficiency.
Once the black paper was cut to size, we carefully aligned and placed it over the surface of the plywood, smoothing it out to eliminate any wrinkles or air bubbles. We made sure the paper adhered properly and laid flat against the plywood to ensure maximum surface contact and uniform heat absorption.
With the black paper securely in place, the base of the solar dryer was successfully completed, forming a solid, heat-efficient foundation for the drying process to take place.
21/03/2025
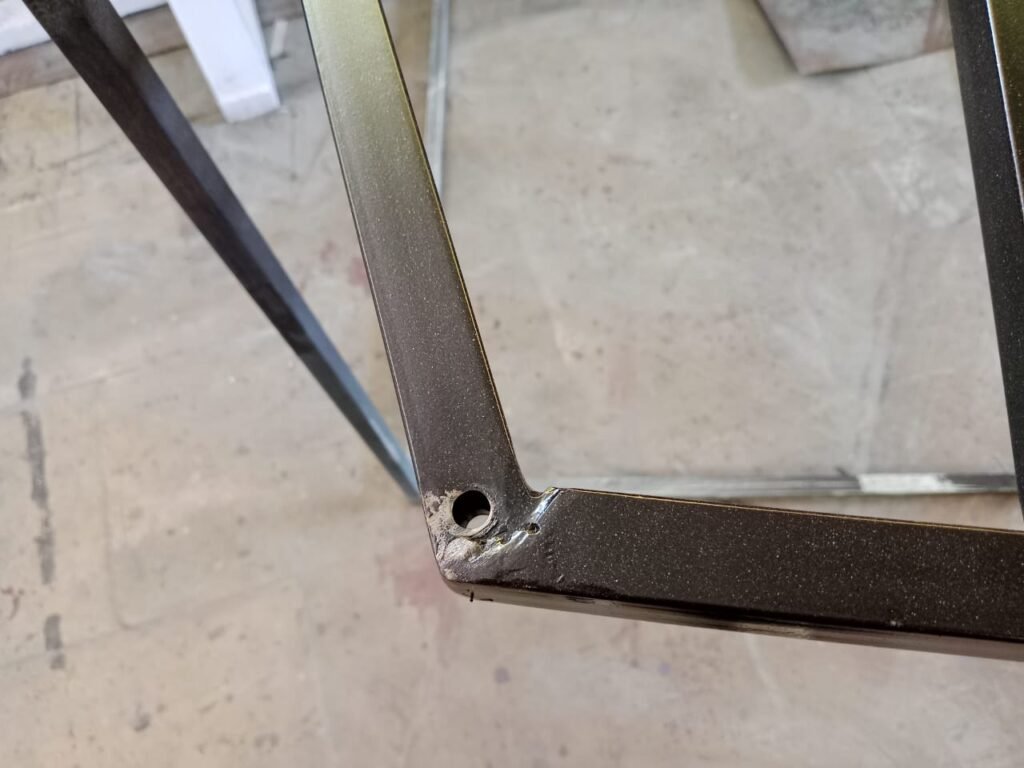
Following the initial round of powder coating, we performed a careful inspection of the flat bed dryer parts and noticed that some areas had been missed. This meant that the components were still exposed to possible rust and wear, which could reduce the dryer’s effectiveness and shorten its lifespan.
To solve the problem, we decided to start the powder coating process over completely. We began by re-cleaning all the components, making sure every surface was spotless and free from any oils, dust, or debris that could interfere with the coating. Once the parts were properly prepared, we reapplied the powder, this time ensuring that every surface—no matter how small or hard to reach—was fully coated.
After applying the powder, we placed the parts back into the curing oven to allow the coating to melt, harden, and bond firmly to the metal. This second round of coating resulted in a smooth, even finish that offered reliable protection and helped ensure the dryer components would last longer and perform better.

22/03/2025
That day After completing the powder coating process, we proceeded to the next phase of assembling the flat bed dryer. A key step in this stage was installing the door hinges, which would allow the door to open and close smoothly and securely. To carry out this task, we used a power drill for its accuracy and efficiency in creating holes for the hinge screws. We began by carefully aligning the hinges on the door and marking the precise spots where the screws would go. Using the drill, we made pilot holes to ensure correct spacing and alignment. Once the holes were ready, we fastened the hinges securely to the door with screws, ensuring they were tightly and properly installed.
23/03/2025
Once the hinges were firmly attached to the flat bed dryer door, we moved on to installing the handles. This step was important because the handles help users open and close the door safely and easily. To make sure the handles were placed correctly, we took careful measurements to find the best spot. We also thought about comfort—like the height and angle—so the handles would be easy to use. After deciding on the right position, we used a template to mark where the handles should go. Then, we drilled small holes for the screws and attached the handles. After tightening the screws, we checked to make sure the handles were straight, evenly spaced, and tightly secured.
24/03/2025
The last step in putting together the flat bed dryer was adding rubber legs, also called floor protectors or leg caps, to the bottom of the dryer’s legs. These rubber pieces were important because they protected the floor from scratches, marks, or damage, and they helped keep the dryer stable and steady.
Before putting them on, we had checked each leg to make sure it was clean. Then, we chose rubber caps that fit the size and shape of the legs. One by one, we pushed the rubber legs onto the ends, making sure they fit tightly and wouldn’t fall off. No tools were needed because the rubber stretched just enough to slide on easily but stayed firmly in place.
Once all the rubber legs were added, the flat bed dryer was fully set up, safe to use, and ready to stand on any kind of floor without causing damage.

25/03/2025
With the successful completion of the assembly process, the flat bed dryer was finally ready for operation. Every component had been carefully installed, including the frame, drying chamber, door with hinges and handles, and the protective rubber legs. Throughout the process, we had followed precise measurements and ensured that all parts were properly aligned and securely fastened.
Once the final inspection was done, we checked all moving parts, such as the door and handles, to confirm they operated smoothly. We also made sure the structure was stable and all fittings were tight .
After all checks were completed, the flat bed dryer stood fully assembled and ready for use—safe, stable, and built to perform efficiently in drying operations.


