
DATE: 03/02/2022
INTRODUCTION:
Humidity measuring devices are available in the market but it is very expensive. Calculate the humidity from dry bulb temperature and wet bulb temperature measuring by thermometer. Trails were taken on how to maintain humidity in a dome dryer.
OBJECTIVES :
Is it possible to make a cheap and easy humidity measuring device? I studied it.
PROCEDURE :
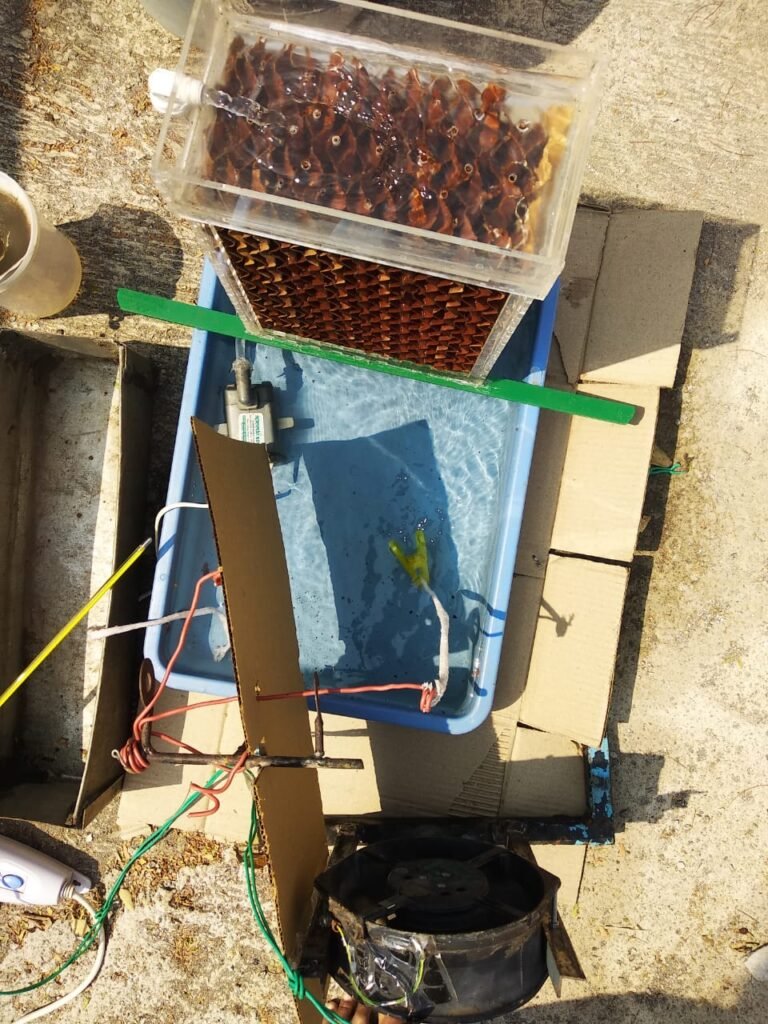
Measuring the dry bulb and wet bulb temperature of fan pad system
First time we set up a fan pad system and put water in its tray and the water was continuously flowing from top tray through the honeycomb structure at that time we calculated water temperature and dry bulb temperature in every 15 min and took humidity from google.
Date: 04/02/2022
PREPARATION :
Following items are required to carry out trails ;
- Cotton sleeve
- Thermometer
- Plastic tray
- Water
- Fan
- Honeycomb structure
- Submersible pump
- Power extension board
- Cardboard sheet

OUTCOME:
Due to the high length of the cotton sleeve in this system , there was water temperature is less than wet bulb temperature. At the same time, as there was a lot of air in the fan, the water temperature decreased. So we installed a new CPU exhaust fan and reduced the length of the cotton sleeve. Next reading will be taken from the data logger without using a thermometer.
DATE : 28/03/2022
Objective :
Collecting information about DS18B20 sensor.
Introduction :
First I downloaded the datasheet of DS18B20 temperature sensor. The features of the sensor were given in that datasheet as follows;
- Measures temperature from -55°C to +125°C. Fahrenheit equivalent is -67°F to +257°F.
- Requires no external components.
- Can be powered from data line .power supply range is 3.0V to 5.5 V.
- Zero standby power required.
DATE : 03/03/2022
The sensor was connected with help of Devesh. To check if it was working properly, we placed a sonsor in cold water and checked if it was showing correct readings. And also created program with help of Suvarna Mam.

DATE : 14/03/2022
Soldering was not done properly, so the sensor did not display the data properly, so the sensor had to be soldered again.

DATE :21/03/2022
Introduction:
- Another sensor was added to measure the water temperature.
- To connect this sensor, I took a new PCB board and pin header soldered to that PCB board.
- Pin chosen to connect sensor.
- Then a resistor is connected to each pin. It has a resistance of 4.7 k ohm.
- Then connected the sensor and took a trails on it.
DATE: 07/04/2022
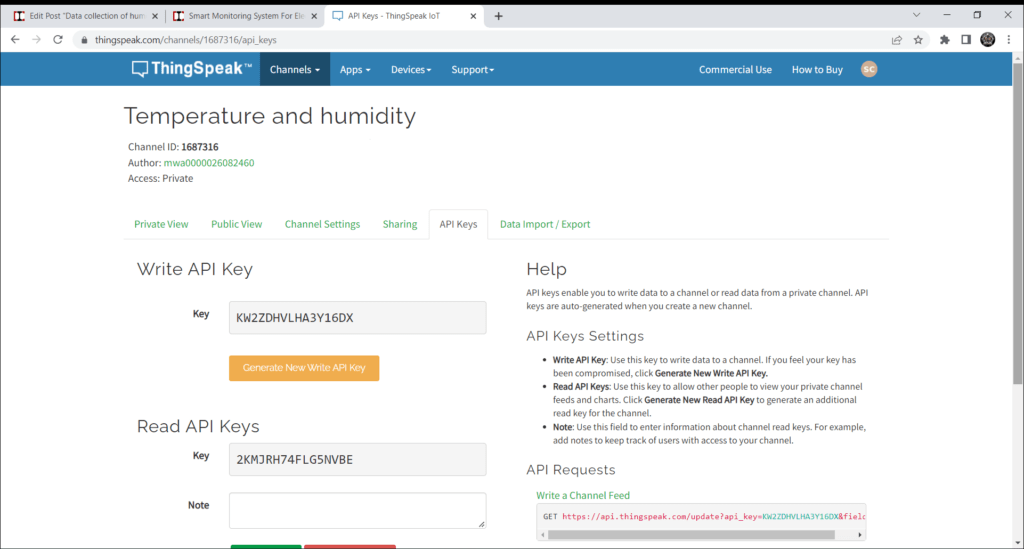
CREATE THINGSPEAK CHANNEL
Thingspeak provide a very good tool for IoT- based projects. By using the Thingspeak site, we can monitor our data and control our system over the Internet, using the channel and webpages provided by Thingspeak.
- In order to Monitor the Data on Thingspeak Server, you first need to set up the Thingspeak.
- To set up the Thingspeak Server, visit https://thingspeak.com/.
- Create an account or Simply sign in if you created the account earlier.
- Then create a new channel with following details.


- Then go to the API Keys section of the dashboard and copy the API key is needed in the code part.
- Open the Serial Monitor after uploading the code.
- The ESP32 will try connecting to the WiFi network.
- Once it connects to the WiFi network, it will display the value of DBT, WBT, and humidity
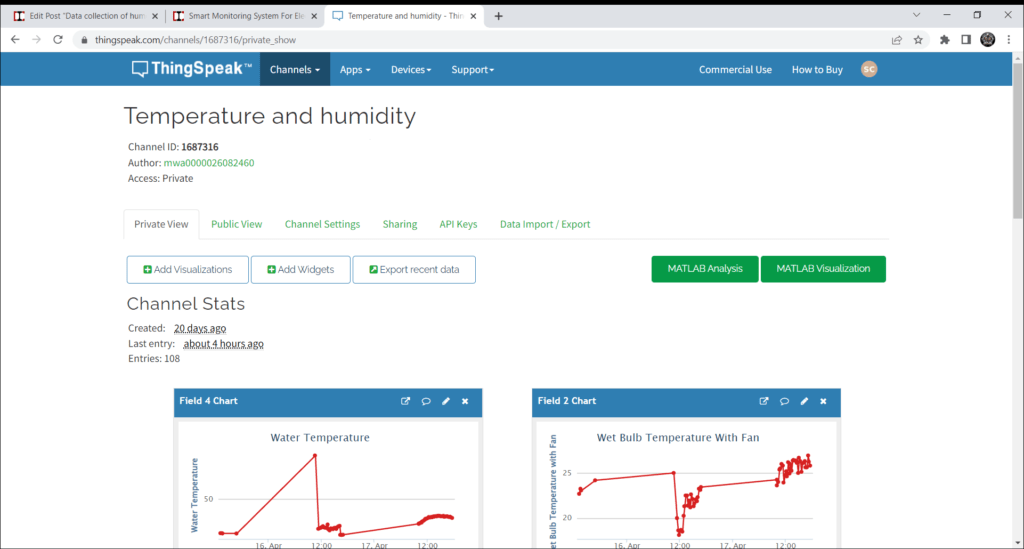
- Then go to the private view of Thingspeak Dashboard.
- You will then see a graph in the private view.
DATE : 13/04/2022
The fan pad system is designed to stand on top of the tray so that the fan pad system stays on top of the tray and you can measure the temperature of the water falling from the fan pad system.
When the system was set up at he top of the meditation hall, there was not enough WiFi network. So I put it on the back of the workshop and there was also same problem with the WiFi network.

DATE :14/04/2022
Introduction :
- After discussing the Dr. Dixit, it was decided that the system should be kept in the shade without sunlight.
- Then humidity and temperature data were taken for three consecutive days.
- You had only to do was fill the tray with 6 liters of water then switch on so that with the help of submersible pump the water would flow down from the upper tray through the honeycomb structure.
- Then you will find DBT and WBT along with water temperature.

Outcomes :
In this case we wanted the water temperature to be lower than WBT but I did not get that reading every time.
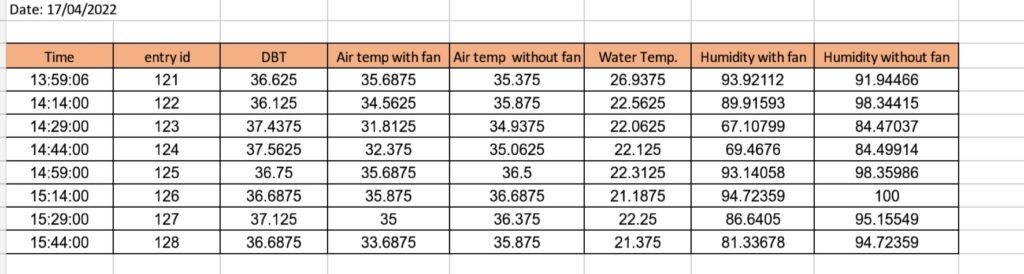
DATE : 17/04/2022
Introduction :
Today, instead of wet bulb temperature, we took reading about air temperature with fan and air temperature without fan.
DATE : 21/04/2022
Introduction :
When I decided to take readings for two days in arow , I got wet bulb less than water temperature in reading. So I installed T2 instead of sensor T3 and took another reading.
Outcome :
After calibrated sensor, it was noticed that the temperature in sensor T4 is higher by 3°C.
DATE :29/04/20222
Introduction :
The calibration of the sensor once again decided to take readings at different temperatures. I thought each sensor showed a different temperature so I tried to calibrate the sensors. I freeze 400 ml of distilled water. Then I checked the temperature of that distilled water. It was 0°C. Then I adjusted it to 10°C, 20°C, 30°C, 40°C and 50°C temperature by adding normal distilled water.
Outcome :
- From this it was noticed that sensor T1 and T2 shows same readings and T3 and T4.
- T3 and T4 shows a temperature 0.3-0.7°C lower than that of T1 and T2.
CONCLUSION :
- We could not get the wet bulb temperature properly as the sensor was not showing the correct reading.
- While taking these readings I recieved the temperature of the air that comes out of the honeycomb structure and the temperature of the water.
- Hence we did not find any precise wet bulb reading to make a cheap and easy humidity measuring thermometer.

