INTRODUCTION
Solar dome dryer project assigned to me , Shivanjali and Rutika .we both are working on it together as decided by Ranjeet sir and prasad sir in the presence of Abhijeet sir . we all working together in a scale down model of solar dome dryer which is less than eight times of original solar dome dryer model .
PURPOSE
- Efficient drying
- preserves Nutrition value
- Energy Efficient and cost effective
- Enhance shelf life of product .
DESCRIPTION
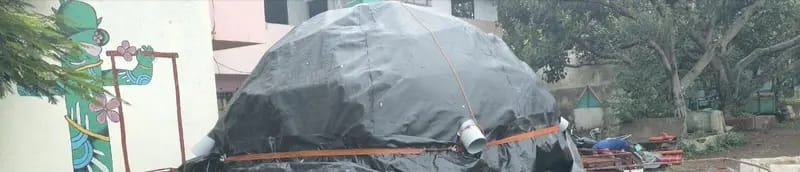
A solar dome dryer is a specialized solar drying system designed in a dome shaped structure to efficiently utilize solar energy for drying various agricultural products . it provides a controlled and hygienic environment for moisture removal , enhancing the quality and shelf life of dried products .
26/02/2025
As discussed during the meeting regarding the solar dome dryer, we decided to design a scaled-down model of the original structure. We chose to work on a 1:8 scale model based on the full-size solar dome dryer. All the necessary dimensions for the original model were provided by Abhijeet Sir. We first determined the appropriate scaling factor and then converted each dimension accordingly to match the 1:8 scale.
27/02/2025
On this day, we calculated the scaled-down dimensions of the solar dome dryer. The original structure had a diameter of approximately 4 meters, which we scaled down to 45 centimeters. While the initial plan was to use an exact 1:8 scale, we adjusted the final scale slightly to accommodate practical constraints. We computed all corresponding dimensions proportionally to maintain the design’s accuracy and structural coherence.
28/02/2025
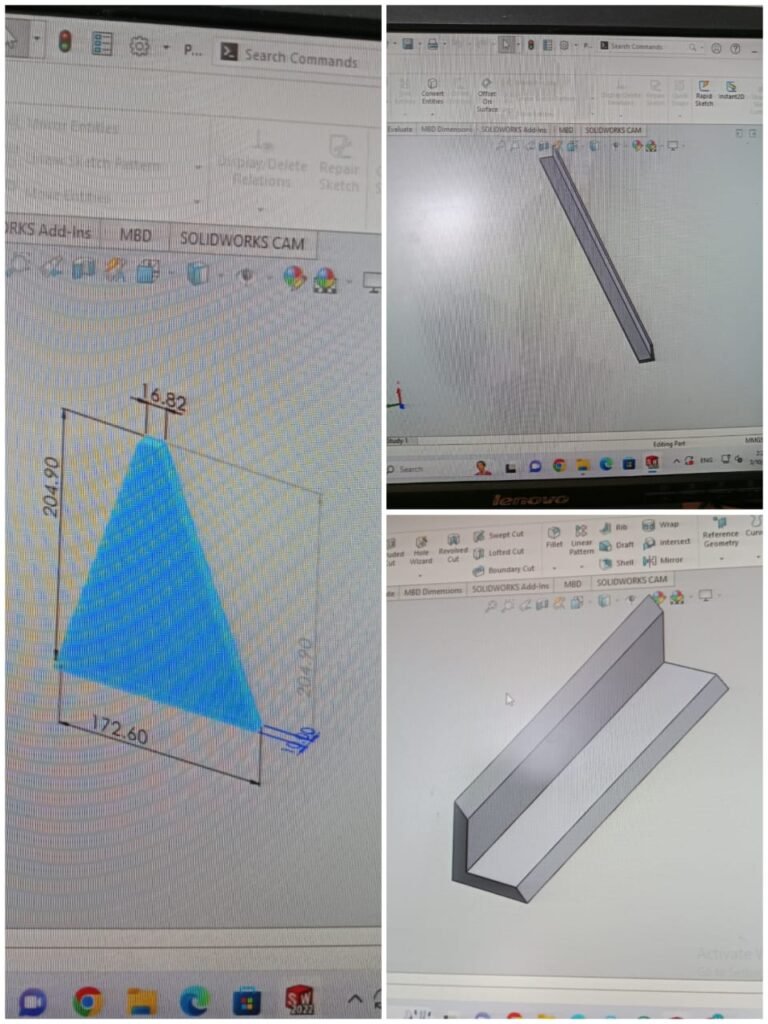
Following a meeting with Prasad Sir, we decided to divide the solar dome dryer model into three major parts for easier handling and detailed work. I was assigned the task of working on the tray section. This involved calculating the scaled-down dimensions of the tray and its supporting structure. The measurements and design layout for the tray were finalized and recorded for fabrication.

01/03/2025
On this day, after a meeting with Prasad Sir, we began working on creating a 3D model for printing. Abhijeet Sir provided us with several tutorial design files and resources on SolidWorks. These tutorials helped us understand the basic tools and features of the software, such as sketching, extrusion, and dimensioning, which are essential for developing accurate 3D models.
02/03/2025
We focused on learning the fundamentals of 3D design using SolidWorks. We explored various tutorial exercises, including creating simple mechanical parts and assemblies. These practice sessions helped us build confidence in navigating the software and improved our understanding of how to translate real-world objects into 3D digital models.
03/03/2025
We continued our learning on SolidWorks by working on more advanced tutorials. These included using features like fillet, chamfer, revolve, and mirror. We also learned about managing design history using the feature tree, which is crucial for editing and refining parts efficiently.
04/03/2025
Our training on SolidWorks progressed with further hands-on practice. We focused on designing components relevant to our solar dome dryer project. We also began experimenting with combining multiple parts into a single assembly, which gave us insight into the process of building functional mechanical systems.
05/03/2025
On this day, we continued exploring SolidWorks tutorials with a focus on optimizing our designs for 3D printing. We learned about exporting files in STL format, checking model integrity using the validation tools, and preparing parts for slicing software. These skills were crucial as we approached the model fabrication stage.On this day, we continued exploring SolidWorks tutorials with a focus on optimizing our designs for 3D printing. We learned about exporting files in STL format, checking model integrity using the validation tools, and preparing parts for slicing software. These skills were crucial as we approached the model fabrication stage.On this day, we continued exploring SolidWorks tutorials with a focus on optimizing our designs for 3D printing. We learned about exporting files in STL format, checking model integrity using the validation tools, and preparing parts for slicing software. These skills were crucial as we approached the model fabrication stage.On this day, we continued exploring SolidWorks tutorials with a focus on optimizing our designs for 3D printing. We learned about exporting files in STL format, checking model integrity using the validation tools, and preparing parts for slicing software. These skills were crucial as we approached the model fabrication stage.
06/03/2025
On this day, we continued working on the tray design using SolidWorks. During the session, we learned how to extrude sketches into 3D shapes, how to accurately define and modify angles, and how to apply features such as cuts and holes to match the functional requirements of our model. These techniques were essential for designing components that would later be fabricated using 3D printing and laser cutting.
07/03/2025
After a discussion with Prasad Sir, we had a session with Deepali Ma’am to gain hands-on experience in 3D printing and laser cutting. She introduced us to the basic principles of both technologies, including machine operation, file preparation, material selection, and safety protocols. We observed the actual setup of a 3D printer and laser cutter, which helped us understand how our digital designs would be physically realized.

08/03/2025
On this day, we resumed work on our SolidWorks design. We focused on refining the tray structure by adjusting dimensions, adding precise cuts, and incorporating design elements that would ensure stability and easy assembly. This step was crucial to ensure the model would be suitable for 3D printing and meet functional requirements.
12/03/2025
After a detailed discussion with Prasad Sir, we met with Deepali Ma’am to begin the process of printing our finalized design. We reviewed our SolidWorks files together to ensure they were properly formatted for 3D printing, including checking for errors and confirming compatibility with the printer. The model was then prepared for slicing, and we proceeded to initiate the printing process under guidance.
14/03/2025
Based on the shape and structure of the solar dome dryer, I designed the trays accordingly in SolidWorks. I used the “extrude boss/base” feature with a thickness of 0.3 mm to create the tray base. The edges were cut at a 45-degree angle to fit neatly within the dome structure. Additionally, I used the same extrusion feature to raise the sides of the tray, providing sufficient depth to hold materials for drying and to improve structural stability.
15/03/2025
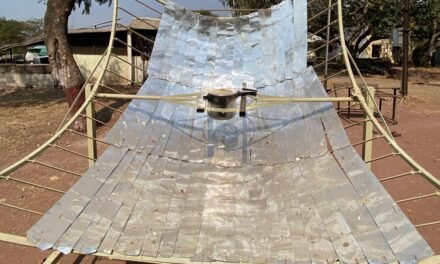
On this day, we placed a net over the tray structure to support the drying process. The net was carefully attached to ensure it stayed firmly in place and allowed proper airflow from all sides. We then placed slices of tomato on the tray to begin the drying process, effectively testing the functionality of the solar dome dryer system in real-world conditions.

19/03/2025
After discussing the design with Prasad Sir, we began creating the model of the solar dome dryer using a 3D printer. We prepared the STL files based on our SolidWorks designs and loaded them into the FlashForge printer. The printing process was initiated with the extruder set at 210°C and the platform at 50°C. The estimated time for the print was 4 hours and 27 minutes.
Later, we also continued work using the laser cutting machine. We precisely cut rods, trays, and other structural components required for the solar dryer. This included framing elements and tray supports to ensure all parts would fit correctly during assembly. The combined use of 3D printing and laser cutting helped us achieve better accuracy and efficiency in our prototyping phase.

conclusion
Following Prasad Sir’s guidance, we have decided to conclude the project due to some issues. One of the primary issues was the shortage of filament material; the quantity available was significantly less than what was required to complete the 3D model. Additionally, the estimated time for printing the model was approximately four days, which would have considerably impacted our overall timeline. Considering these limitations, the decision was made to terminate the project to ensure efficient use of materials, time, and efforts.


