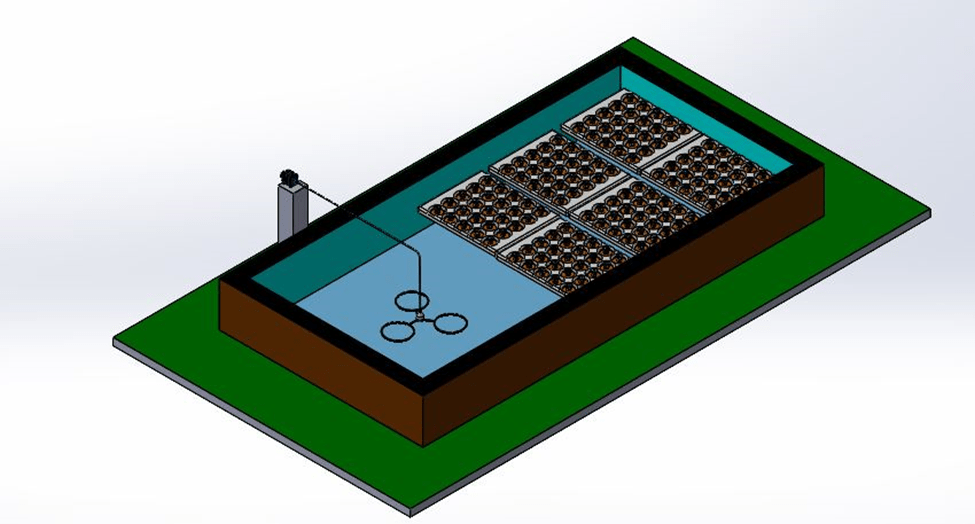
Drawing/Sketch:-

Drawing /Measurements:-


Bill of Materials:-
| SR. NO | Materials | Unit | Qty | Cost |
| 1 | Bricks | NOS | 1263 | 1,200 |
| 2 | Cement | NOS | 5 | 500 |
| 3 | Sand | BRASS | 1 | 750 |
| 4 | Thermocol sheet | NOS | 8 | 150 |
| 5 | Net pot | NOS | 200 | 75 |
| 6 | Aero-tube | NOS | 3M | 120 |
| 7 | End cap | NOS | 1 | 1,000 |
| 8 | Drip pipe | M | 1 | 850 |
| 9 | Plastic T | NOS | 3 | 50 |
| 10 | Blower | NOS | 1 | 350 |
| 11 | Tarpaulin | M | 1 | |
| 12 | Reducer | NOS | 1 | 60 |
| 13 | Teflon tape | NOS | 1 | 20 |
Description of Materials:-
Bricks:-
| Length | 0.8 ft ( with mortar) |
| Width | 0.3 ft |
| Thickness | 0.3ft (with mortar ) |
| 1 Bricks Valumn (with mortar ) | L x W x T =0.072 qu ft/1728=0.0812 QU. FT. |
| Wall Valumn | L x W x T =18 x 2 x 0.75=27 qu. ft. x 2 = 54 qu. ft.L x W x T =9 x 2 x 0.75 =13.5 x 2=27 qu. ft. TOTAL= 81 QU FT. |
| Number of Bricks | WV/1BV= 81 /0.072=1125 BRICKS |
| Total bricks = 1125 ( with mortar) | |
- Ground Base:-
- Assembly: Clear the surface below and make it flat. The water level at the ends of the boundary should be 0.
- Dimensions: W= 20 ft x10 ft
- Bed:-
- Make a bed using the combination of bricks and cement.
- Dimensions: 17.72 ft x 8.99 ft x 1.97 ft

- Tarpaulin:-
- Spread the tarpaulin in the bed and fill the water up to more than half of its capacity.

- Thermocol:-
- Purchase the four thermocol sheets of dimension 870 mm x 1070 mm x 60 mm
- Make 50 mm holes at a distance of 170 mm from each other in all the sheets

- Net pot:-
- To hold the plant in place and allow its root to get nutrients through water, a net pot of 50mm is used.
- These pots are inserted into the holes in the theromcol sheet.


- Blower fitting:-
- A blower is installed at the side of the bed.
- Specification: 230V, 45 Watt

- Aero-tube:-
- To supply the bubbles properly to the water in the bed the air needs to be supplied through three aero-tube.

- Make a circle of the tubes using a 16 mm “T”
- Drip pipe:-
- Connect 16mm x 5 ft dripper pipes to the blower and the T connecting aero tubes.

- End cap:-
- Make 3 holes to the end cap and attach the three aero-tubes using a dripper pipe.

- Reducer:-
- Use a reducer of 50 mm to 16 mm to connect the end cap and the blower.

- Plastic T:-
- To make a closed loop of the aero-tube a “T” connector is used.

- Black Drip Rubber:-
- To prevent leakage of air from the endcap, attach black drip rubber to the hole and insert the pipe into it.

- Dripper pipe connector:-
- Connect this to the end of the end cap holes and the pipes leading to the aero-tube.
Fabrication:-
- Material processing
- Construction
- Plumbing
- Electrical supply
Installation:-


