Requirement of oxygen concentrator.
Due to covid 19 not only India but the world is facing problems while treating peoples. The major issues faced are not having facility to treat this much amount of patient, not having enough medicine, not having enough oxygen production.
Several big hospitals across India are relying on daily oxygen supplies but they are not getting enough to keep some as backup in case of emergency.
So as tackling one problem at a time we are trying to reduce the pressure on the oxygen generation plant.
About Oxykit
OxiKit open source oxygen concentrator design built and validated by TATA Consulting Engineers to produce 20 LPM at 94% concentrated oxygen.

Documentation
Components
VALVES & REGULATORS
- 3-Way Solenoid Valve 3/8″ NPT OXI-VAR-SOL 2
- 2-Way Direct Acting Solenoid Valve 1/4″ NPT OXI-VAR-DAS 1
- Miniature Air Pressure Regulator 1/4″ NPT (3-60 PSI) OXI-VAR-HPR 1
- Low Pressure Regulator 3 to 30PSI OXI-VAR-LPR 1
- Pressure Gauge 1/4″ NPT Back, 0-60psi (Back Mount)50mm Axial iron shell integrated pressure gauge chroming shell, brass back connection, dia. 50 mm.NPT1/4, accuracy 2.5%. OXI-VAR-PGB 2
- 3-30LPM LZQ-7 Oxygen Air Gas Flowmeter OXI-VAR-OGF 1
FITTINGS
- 3/8″ Male NPT to 3/8″Push to Connect – Strait OXI-FIT-STR 3 Y 0
- 3/8″ Male NPT to 3/8″Push to Connect – 90 Elbow OXI-FIT-ELB 12 Y 0
- 3/8″Push to Connect to 3/8″Push to Connect to 3/8″Push to Connect – Tee OXI-FIT-TEE 6 Y 0
- 3/8″Push to Connect to 3/8″Push to Connect to 3/8″Push to Connect – Y OXI-FIT-WYE 1 Y 0
- 1/4″ Male NPT to 3/8″ Push to Connect – 90 Elbow OXI-FIT-MEL 2 Y 0
- 1/4″ Male NPT to 3/8″ Push to Connect – Strait OXI-FIT-MST 4 Y 0
- Brass/Stainless 3/8-Inch tube PTC x 1/4-Inch Male NPT – Coupler OXI-FIT-BCO 2 Y 0
- Brass 1/4 NPT Female to 1/4″ NPT Female – Coupling OXI-FIT-COU 3 N
- Brass 1/2-in NPT Male to 1/4″ NPT Female – Adapter Bushing OXI-FIT-ADB 2 N
- Brass 1/4″ NPT male plug hex or square head OXI-FIT-HEX 1 N
- Air pressure safety relief valve 1/4″ NPT male set to open at 50 psi OXI-FIT-APS 1 N
TUBING
- High Density Polyethylene (HDPE) Tubing, 1/4″ ID, 3/8″ per roll OD (10 Feet Per Machine Required- White) OXI-TUB-HDP 1 N $71.91
- Clear Vinyl tube, 1/4″ ID, 3/8″ per roll OD (2 Feet Per Machine Required – Clear) OXI-TUB-CVT 1 N $16.99
- 1.5 orifices 3 Y 0
BRAIN COMPONENTS
- Arduino Uno Board With Mounting Plate OXI-BRC-AUB 1 N
- Arduino Uno Board Relay Shield 4 relays OXI-BRC-ABR 1 N
- 12V 40 watt power supply OXI-BRC-PSP
- 20 awg Electronics Wire OXI-BRC-STW
HEAT/HUMIDITY MANAGEMENT COMPONENTS
- 3/8″ OD Copper Tubing (Need around 20′) OXI-HMC-CUT 1 N $24.09
- 12V DC 120mm High Speed Cooling Fan OXI-HMC-HSP 5 Y 0
- Humidifier Water Bottle OXI-HMC-HWB 1 Y 0
COMPRESSOR
- Oxikit 2.4HP Free Air Compressor Motor – Oil Free – Ultra Quiet – 300 High Flow LPM OXI-COM-180 1 N $364.64
MISCALLANEOUS
- Cable Ties 40 pack OXI-MIS-CAB 40 Y 0
- 2″ Wheels OXI-MIS-WHL 1 N $22.99
- 2x4x10 Wood OXI-MIS-WOD 1 N $17.99
- 3/4″ MDF 15.5″ x 15.5″ (Can also use Plywood) OXI-MIS-PLY 1 N $44.60
- 1/4″ MDF 6″ x 4.5″ (Can also use Plywood) OXI-MIS-PLW 1 N $8.53
- in-line HIPAA Sanitary Air Filter OXI-MIS-AFL 1 Y 0
- Heat Shrink or Electrical Tape OXI-MIS-ELT 1 N $13.25
- Solder or Twist Connectors OXI-MIS-SOL 1 N $38.99
- SIEVE PVC PARTS 3″ Schedule 40 PVC Female Adapter – Socket to FIPT OXI-SPP-SFI 2 N $6.20
- 3″ Schedule 40 PVC Male Adapter – MIPT to Socket OXI-SPP-MIS 2 N $7.68
- 3″ x 3/4″ Sch 40 PVC Reducer Bushing Flush Style – Spigot to FIPT OXI-SPP-SPF 6 N $15.90
- 3/4″ x 3/8″ Sch 40 PVC Reducer (T.T.) Bushing – MIPT to FIPT OXI-SPP-MIF 6 N
- $4.32 3″ Sch 40 PVC Coupling – Socket to Socket OXI-SPP-STS 6 N $17.28
- 2″ x 3/4″ Schedule 40 PVC Reducer Bushing – Spigot to FIPT OXI-SPP-RBU 2 N
- $3.06 PVC 3 in. Round Snap-In Floor Drain 4 N
- $10.88 3″ Diameter PVC Pipe ( 9″) 2 Y 0 3″ Diameter PVC Pipe ( 18″) 2 Y 0
SIEVE INTERNAL PARTS
- 2″ Diameter x 3″ Tall – Compression Springs – 50 lb per inch tension OXI-SIP-SPR 2 Y 0
- 304 Stainless Steel Woven 100 Mesh 0.18mm Hole Disk 75mm OXI-SIP-MSF 2 y 0
- 304 Stainless Steel Woven 100 Mesh 0.18mm Hole Disk 71mm OXI-SIP-MSO 2 N $23.94
- Non-woven Filter Material – Vent Register Filter 4″ X 12″ OXI-SIP-VRF 1 N $12.00
- Gorilla PVC Cement 8 oz. R1584C Medium Body Prima Glue, One-Step OXI-SIP-CEM 1 N $12.22
- Rector seal 25551 8-Ounce No. 5 Pipe Thread Sealant OXI-SIP-REC 1 N $22.43
- 10 Pound Zeolite OXI-OTH-ZET 1 Y 0
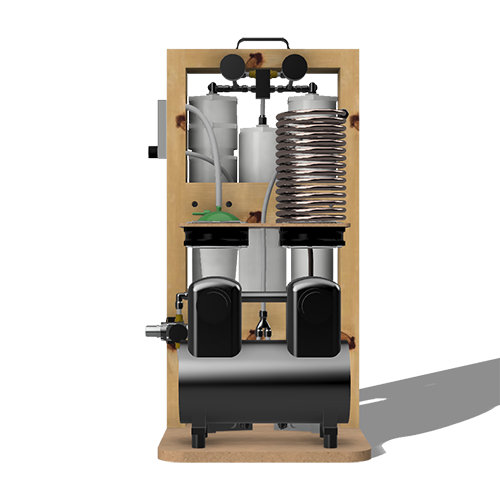
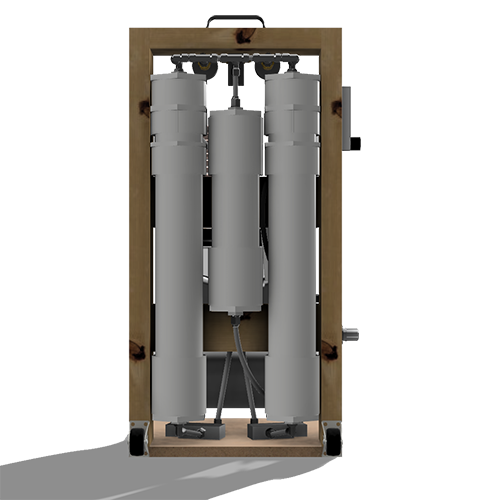
Assembly and system look
Zeolite canister
The most challenging part of canister assembly is to make it airtight a minor leak will drop the pressure tremendously.

Flow chart of the process Canister assembly.


Collected material, assembled canisters for zeolite and surge tank.


Pneumatic Connections

Solenoid valve A and B control the flow of air so we can decide where we are directing the air and the amount of pressure we have to achieve.
- Cycle1: First valve A is normally open condition, B is connected to exhaust and C is Closed. During this cycle the Pressure in canister A should be increased up to 2.5 bar and maintained for 0.5 S, This pressure is created due to the oriface connected in parallel with Valve C. Due to this increased pressure most of the Nitrogen get absorbed by the zeolite and oxygen is supplied into the serge tank.
- Cycle2: Then valve C is opened And due to easiest path Concentrated oxygen will flow through 2nd canister this cycle will flush the nitrogen adsorbed by the zeolite in previous cycle, this cycle should remain for 0.5 to 1.5 sec as per the size and quantity of the zeolite.
- Cycle3: In third cycle Solenoid A and C are closed and B is open which let the air pass through zeolite and similar to first cycle it adsorb nitrogen at about 2.5 bar pressure.
- in this way the cycle repeats itself and from output we get about 90-94% oxygen concentration and while flushing we are mostly flushing the adsorbed nitrogen.
Assembly of the canister, compressor, tank.


Electronics
Using Arduino UNO for controlling the relays who controls the solenoid valves.
Another circuit which uses OOM202 sensor to measure the oxygen concentration.
Oxygen Analyzer.
Its very necessary to measure the oxygen level, As per current market situation oxygen analyzer were not readily available. so we decided to make one. for that we got OOM202 Oxygen concentration sensor which gives 13mV signal when placed in air of 0% concentration and gives 16 mV when placed in 100% pure oxygen at normal pressure.
Components.
- Arduino UNO.
- oom202 oxygen sensor.
- 16*2 LCD display shield for Arduino.
- PU8 Connector for oom202 sensor.
Calibration of the sensor.
As the Arduino being 8 bit microprocessor it cant read the 13-16 mV as it dose not have that much resolution, so we will required a gain amplifier which will amplify the signal and make it readable to Arduino.
Process:
1: Placed the sensor in normal air where we consider it to be giving reading for 21% concentration as normal air posses 21% of oxygen. the reading was 1460 mV
2: same procedure is repeated by using medical oxygen 96% concentrated it gives about 6760mv
Video below demonstrates the readings at 21% and 96%.
so 1460/21=69.52mV per percent of oxygen concentration.
and 6760/96=70.41mV per percent of oxygen concentration.
so by approximation we can consider oxygen sensor to give 70mV per percentage of oxygen concentration in air.
Solenoid control with Arduino(Theory)
For controlling AC solenoid valves with Arduino we are using a relay which is controlled by 5VDC signal and can switch 230 VAC supply which then given to Solenoid Valves.
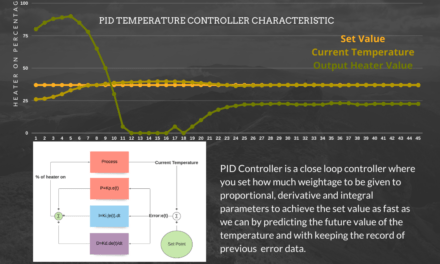
First Oxygen concentration reading.
status on 30/06/2021
Moisture removal
- Reduction of moisture from atmospheric air:
For this we made a filter filled with 250 gms of silica which can absorb 40% of the moisture of its weight.
Calculation RH at pabal from https://www.lenntech.com/calculators/humidity/relative-humidity.htm - At pabal measured RH was 37% at 40degree centigrade.
So from the mentioned site we found at 37% RH and 40 degrees we have 20.84 gms of water in 1 kg of air. - We required to maintain the moisture level below 15% of RH at 40.
So moisture needs to be taken out from air=
moisture in air at 37% RH – moisture in air at 15% RH - and at 45degrees and 10% RH we have 7.63 gms/kg water in air.
So According to formula
Moisture required to remove=20.84-7.63
=13.21 gms from each 1000 ltr of air - Say we required to run concentrator for 8 hours (For experiment purpose) we have flow rate of 108 lpm, we have to flow 108*60*8=51,840 ltr of air.
Now density of air is 1.225 kg/m3 i.e 1.225kg/1000 ltr.
moisture needs to be removed= 51.840*1.225*13.21=624 gms of water. - Now our system can remove moisture of 0.4*250= 100gms of water.
So system can run for (100/624) *8 hours=1.28 HRs - Or silica needs to be replaced after testing for 1 hour.
After using the silica gel with the filter candles used for water filtration it is seen that these filters leaks the air as the seal was able to stop water leakage but not the air at 2.5 bar. So this work is been given to gosavi sir with manufacturing of canister for zeolite.
Testing with reduction of oriface and 1hp compressor.
Testing is not done as failure of moisture removal process.
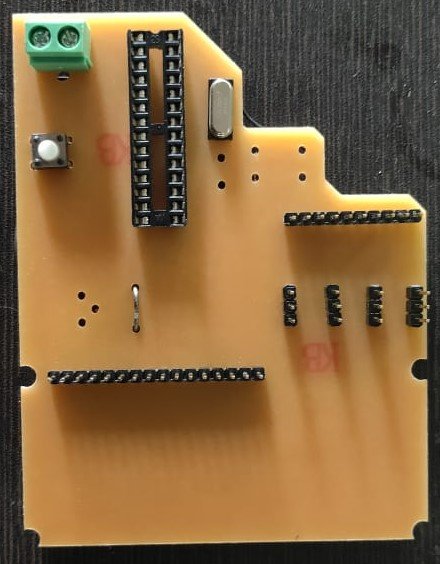
Analyzer PCB model design and fabrication.
The one of the thing working perfect in the circuit is oxygen analyzer and electronic circuit for solenoid control, so with concern of Gosavi sir started to work on PCB designing for Oxygen analyzer and Solenoid control board.
Mechanical Design is ready but implemented just after the testing of electronic circuit.
Analyzer model design and fabrication. (22/06/2021-23/06/2021)
Circuit Connection.


Solenoid Valve control circuit.(22/06/2021-23/06/2021)


PCB Milling Session and fabrication.(24/06/2021-01/07/2021)
Learned to get Designed PCB milled so prototype will be tested and implemented.

The First mistake was to mirror the image if you want to use through hole component. A New PCB with corrected orientation.


Assembled PCB.(03/07/2021)

Modification Done in the concentrator. (29/07/2021)
- Added activated alumina approx. 1 Kg to make the moisture absorber unit with this unit oxygen concentrator can be now tested for min 20 hours continuously.
- Changed the diameter of sieve pipe to 2.5″ so that the 1 hp compressor can build the required pressure in 3-4 sec and can give concentrated oxygen for 4 sec.
- Replaced the sodium based zeolite with lithium based which gave us magnificent increase in oxygen concentration from 60% to 90%.
- Experimented with different size of oriface from 0.8,0.6,0.4 mm but 0.2 mm dia oriface gave us expected concentration.
Results after the modification
- Concentration of the oxygen goes up for the same cycle and oriface.
- Current max 90% of the concentrated oxygen is achieved which last for 3 continuous hours, our tests are continued.
- While atmospheric temp was around 35 degrees we found that our compressor stopped working for sometime primary assumption is the compressor got heated and temperature switch got disengaged.
- Need to test the endurance limit of the concentrator/Compressor.
Primary Tests. (04/08/2021)
- We tested the oxygen concentrator for 2.5 hours continuously.
- Flow rate of the oxygen was 7 LPM (liter per minute).
- First a fall starting the concentrator after a break of a week we did not got 90% concentration.
- We got 80% to 65 % concentration over time. Surrounding temperature recorded was 26 degrees.
| Sr No | Time | Machine time (Minutes) | O2 Concentration in % |
| 1 | 2.10 | 0 | 19 |
| 2 | 2.15 | 5 | 77.45 |
| 3 | 2.20 | 10 | 77.58 |
| 4 | 2.30 | 20 | 74.28 |
| 5 | 2.40 | 30 | 80.30 |
| 5 | 2.50 | 40 | 73.06 |
| 6 | 3.00 | 50 | 75.09 |
| 7 | 3.15 | 65 | 73.20 |
| 8 | 3.30 | 80 | 71.57 |
| 9 | 3.40 | 90 | 60.04 |
| 10 | 3.50 | 100 | 68.92 |
| 11 | 4.00 | 110 | 66.91 |
| 12 | 4.10 | 120 | 67.83 |
| 13 | 4.20 | 130 | 66.78 |
| 14 | 4.30 | 140 | 65.28 |
- Now need to test the endurance limit of the compressor, we will test the system for 8 hours of continuous running and check how the compressor works.
After long days we started to use oxygen concentrator for our egg incubator.
We decided to start oxygen supply through oxygen concentrator for 5 mins daily into the incubator.

Oxygen concentrator repair workshop at DIY lab vigyan ashram.
M19 collective by maker asylum arranged a camp for oxygen concentrator repair, from Vigyan ashram our team including Prathamesh Darwade, Pooja Jadhav, Vrushabh Zunzunkar and ashish shende joined this workshop. we opened around 8 concentrator and now we knows how this concentrator appear from inside.
After opening the concentrator we found a part common in all concentrator is got damaged which is made up of plastic, which introduces the leakage in the system.