Introduction-
As the world’s population continues to grow, so does the amount of garbage that people produce. On-the-go lifestyles require easily disposable products, such as soda cans or bottles of water, but the accumulation of these products has led to increasing amounts of plastic pollution around the world. As plastic is composed of major toxic pollutants, it has the potential to cause great harm to the environment in the form of air, water and pollution. There it not only disfigures the beauty of nature and leads to economic losses but also has alarming effects on nature,aimals, and ultimately also on our health.
So we decided to do recycling of plastic .so we taken this as a project. We seen for the references on the internet and decided to do plastic injection machine. I (suvarna) and my collegue (Thanh) worked on that project. Thanh looked after mechanical part of that project and I took initiative for electronics part.
Objective –
The purpose of recycling is to conserve energy, help the environment, reduce pollution, slow global warming and reduce waste products in landfills. By recycling, people can greatly contribute to the earth’s overall health and keep the air, water and land clean. Recycling is a simple and easy way to help save the environment.Recycling plastic (Convert waste plastic into useful product)
Working Principle –
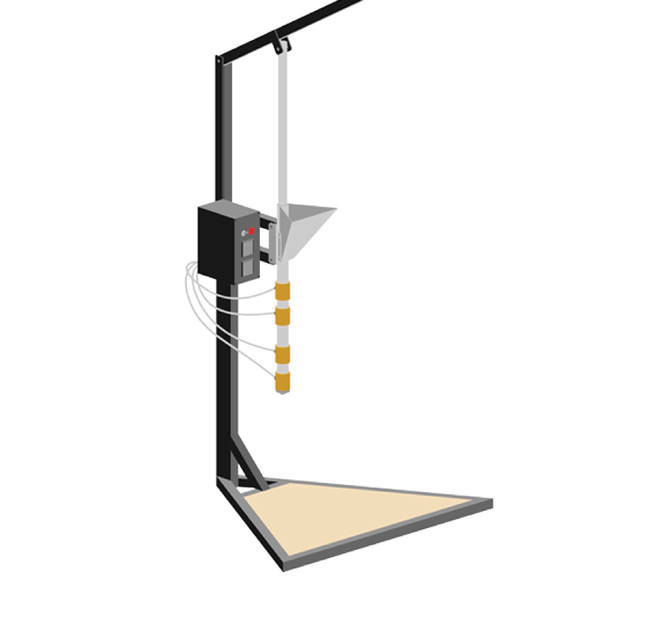
Material granules for the part is fed via a hopper into a heated barrel, melted using heater bands and the frictional action of a reciprocating screw barrel. The plastic is then injection through a nozzle into a mould cavity where it cools and hardens to the configuration of the cavity. We was Implement injection molding machine from preciousplastic.com. It is open source design.
Link- https://preciousplastic.com/en/videos/build/injection/
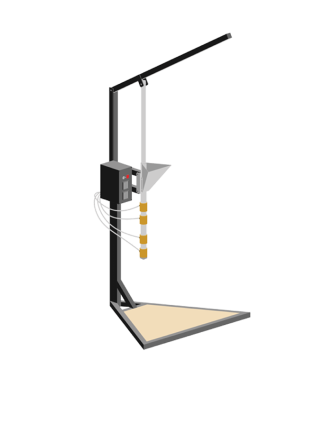
Injection molding machine by Dave
Bill of material
Material-
We have made some changes in bill of material list provided by Dave design. For some material is not available in same size given in the Dave design. Electronics parts are changed for reducing machine cost.
First with the electronics, we got a thermostat instead of a PID controller with a separate thermocouple sensor. Then with the machine parts, as the shop didn’t have the tube and bar size we wanted, and as the workshop didn’t have enough of the square tubes the size we wanted. Eventually this did create problems, first with fitting the tube onto the frame, because the frame was 2 cm bigger than the design, and then with fitting the band heaters on the tube as the band was 2 mm bigger than the tube. In the end we solved the tube problem by using a different connector system and we solved the band heater problem by using scrap metal in the shop to fill in.
We did change the lever from a square tube to a pipe as well, but this did not really affect the design. The length of our bar and tube also wasn’t exactly what Dave gave. It was 600 and 550 mm instead of 585 and 530 mm for the bar and tube respectively. Honestly 2 cm does not matter.
Building machine –
We have no idea about workshop work. So lot of things does wrong. Many people’s was helped us in every work. Thanh was took many efforts for made mechanical design. She had faced many problems and made mistake and took solution for that below.
- Mechanical Part-
Mistake, Problems &solution –
- There was not that many, but initially in excitement of doing project we directly started to do mechanical part without planning. It may cause falls in mechanical parts.
- First make planning of work and then do these things.
- I cut the hopper in one piece to avoid welding, and instead bended it.
- The gaps were filled with Mseal and we used oil to avoid adhesion to the tube.
- The problem was in the nozzle. A plastic pellets was put into a hopper and it goes down to the nozzle. But pellets was not melting properly around nozzle because of that a melting plastic was note goes into the readymade mold.
- So we have made changes in nozzle. First nozzle shape is round circle at the bottom of nozzle. We have made nozzle end in cone shape.
- Electronics Part-
In electronics part we have used thermostat, band heaters, wires, indicator switch. Thermocouple and Relay are along with thermostat. So these things are not bought separately. I have required box for all electronic part was put in. So I was made acrylic box. For that first of all I am creating box from a box maker website and then this box was took into inscape software. The box was edited in inscape software. Then this edited file took into RD works software and print was give to the laser cutting machine.
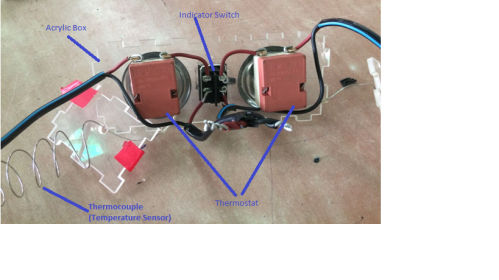
- Thermostat-
A thermostat is a component which senses the temperature of a system so that the system’s temperature is maintained near a desired set point. A thermostat exerts control by switching heating or cooling devices on or off, or by regulating the flow of a heat transfer fluid as needed, to maintain the correct temperature. Thermostats are used in any device or system that heats or cools to a set-point temperature. We have used 50o C to 300oC range thermostat. Because a melting point of plastic pellets range from 120 o C to 280 o C.
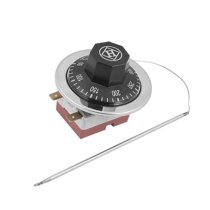
Thermostat
2.Band heaters-
Band heaters are designed to heat up cylindrical parts by conduction. The are used in many manufacturing processes such as the injection, extrusion and molding processes It is choosing between various technologies will depend on operating conditions such as temperature, power and environment. There are different types of band heaters. But we have used ceramic band heaters.
3.Plastic Pellets-
There are many types of plastic pellets.
- Polyethylene terephthalate (PET or PETE)
- High-density polyethylene (HDPE)
- Polyvinyl chloride (PVC)
- Low-density polyethylene (LDPE)
- Polypropylene (PP)
- Polystyrene (PS)
But we have used LDPE plastic pellets.
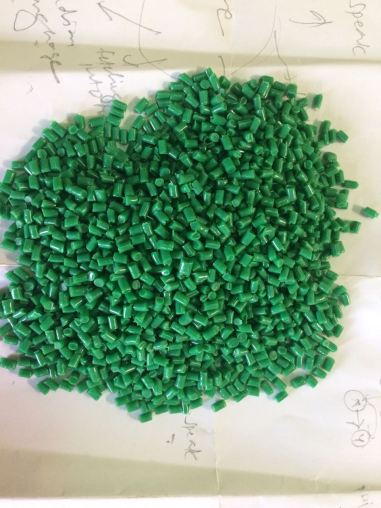
Plastic Pellets
Problems, mistake & solution-
- First I was used thick cable for the connection of thermostat and indicator switch. Because of that a box could not fit properly.
- After that I used 2.5mm thick wire for internal connections.
- After getting mechanical part material we were order a band heater by following the Dave design. But, at the time of getting material as the shop didn’t have the tubesize we wanted. Eventually this did create problems, with fitting the band heaters on the tube as the band was 2 mm bigger than the outer diameter of the tube.
- We solved the band heater problem by using scrap metal in the shop to fill in gap.Remember that first of all decided tube size and then order band heaters.
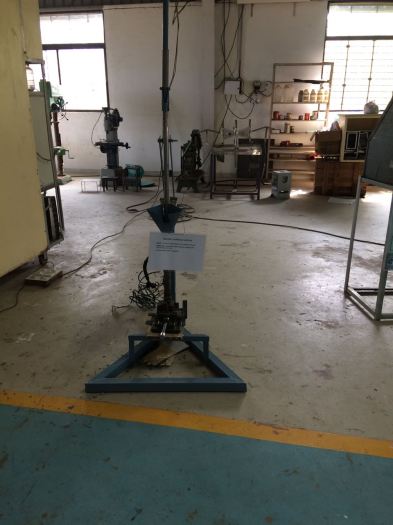
Our Injection molding machine
Finally we have made Injection Molding Machine. But problem is that how to adjust height of mold to reach at the nozzle whole. So I was added plane plate above a frame. After the machine has to color. Then we have start worked on mold.
Making Mold –
I was made POP (Plaster of Paris) material mold for temporary purpose. For getting idea from how to make 2D mold.
Steps of POP mold
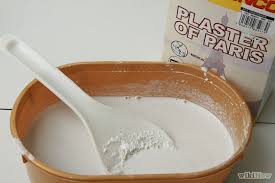
Mixed POP and water

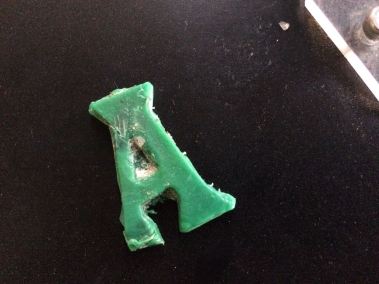
A letter put on a POP mold
A letter cut on a laser cutting machine. After that keep a mold in sunlight for dried. Then A letter pull out from a mold. And try on injection molding machine.

POP mold was successful. Then I decided mold made of MS (Mild Steel) material. But question is that which product was made from injection molding machine. I think over it and decided made letters. This letters used in many applications. Like make a name plate, for teaching kids, and in kid’s toys.
I was started made a mold of letter. For that I first learned solid works& Fastcam software. S letter was made on a solid works and create .dxf file. That file gave to the plasma cutting machine. Then S letter was cut on a plasma machine. For mold I used mold part of a letter not solid part. This S letter square dimension is 70mmX70mm. Two same dimension plane plates were cut. One is for above surface and another one used at the bottom. A letter (S) plate in middle.

Letter Plate
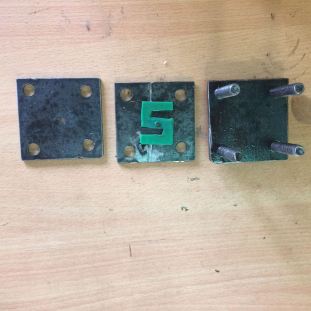
Mold Plates

Mold

Product


